
1. Pengenalan dan Selesai Produkview
This manual provides essential information for the installation, operation, maintenance, and troubleshooting of the Lilianos Used BYHX DX5 Carriage Board. This board is a critical component for various large-format inkjet printers, specifically designed to work with DX5 print heads and compatible with Xuli, Allwin, and Skycolor printer models. It is available in both VB and 3.0 versions.
The BYHX DX5 carriage board facilitates communication and control between the printer's mainboard and the DX5 print heads, ensuring precise ink delivery and stable printing operations. Proper handling and installation are crucial for its optimal performance and longevity.
2. Penerangan Produk
The Lilianos BYHX DX5 carriage board is a specialized electronic circuit board engineered for integration into professional inkjet printing systems. It serves as the interface for DX5 print heads, managing data transmission and power supply to ensure high-quality print output.
Ciri-ciri utama termasuk:
- Compatibility with BYHX systems.
- Support for DX5 print heads.
- Available in VB and 3.0 versions to suit different printer configurations.
- Designed for use with Xuli, Allwin, and Skycolor printers.

Gambar 2.1: Lebihview of the BYHX DX5 Carriage Board. This image displays the main components and layout of the board, including integrated circuits, capacitors, and multiple connector ports for print heads and data cables.
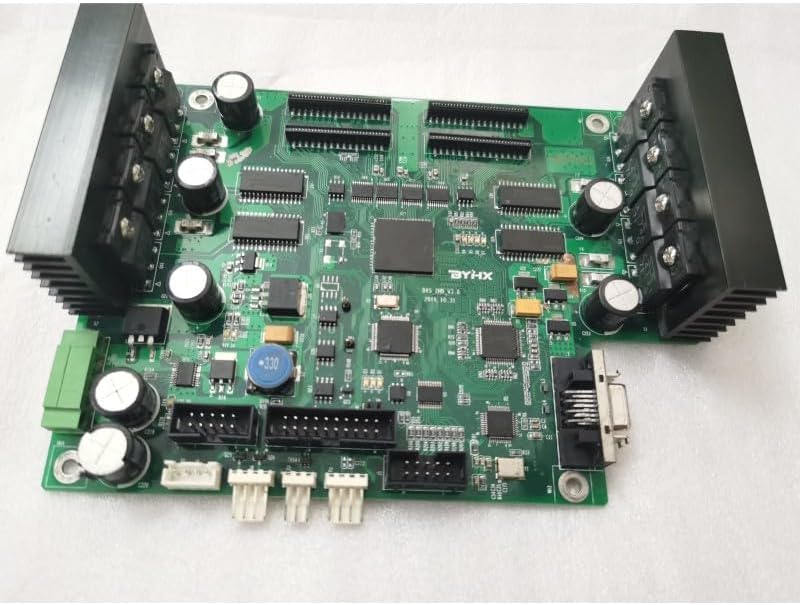
Rajah 2.2: Bersudut view of the BYHX DX5 Carriage Board. This perspective highlights the heat sinks on either side of the board, designed to dissipate heat from critical components, along with various connection points.
3. Pemasangan dan Persediaan
Installation of the BYHX DX5 carriage board requires careful attention and should ideally be performed by a qualified technician. Incorrect installation can lead to damage to the board, print heads, or the printer itself.
3.1 Pemeriksaan Pra-Pemasangan
- Sahkan Keserasian: Before installation, it is crucial to confirm the correct mainboard version (VB or 3.0) and ensure compatibility with your specific printer's mainboard and DX5 print head. Contact service for verification if unsure.
- Matikan: Always ensure the printer is completely powered off and unplugged from the main power supply before beginning any installation or maintenance.
- Pelepasan Statik: Pakai tali pergelangan tangan anti-statik atau kerap sentuh objek logam yang dibumikan untuk melepaskan elektrik statik, yang boleh merosakkan komponen elektronik sensitif.
- Periksa Lembaga: Carefully inspect the new carriage board for any visible damage during shipping.
3.2 Langkah Pemasangan (Umum)
While specific steps may vary by printer model, the general procedure involves:
- Access the Carriage Assembly: Open the printer's access panels to locate the print head carriage assembly.
- Tanggalkan Papan Lama (jika berkenaan): Carefully disconnect all cables and mounting screws from the existing carriage board. Note the orientation and connection points.
- Pasang Papan Baharu: Align the new BYHX DX5 carriage board with the mounting points in the carriage assembly. Secure it with screws, ensuring it is firmly seated.
- Sambungkan Kabel: Reconnect all ribbon cables, power cables, and data cables to their respective ports on the new board. Ensure all connections are secure and correctly oriented. Refer to your printer's specific service manual for detailed wiring diagrams.
- Close Panels: Once all connections are verified, close the printer's access panels.

Rajah 3.1: Atas-bawah view of the BYHX DX5 Carriage Board. This image provides a clear view of all connection ports, which is essential for correct cable routing during installation.

Figure 3.2: Close-up of Board Components. This detailed view shows the integrated circuits and other electronic components, emphasizing the precision required when handling the board.
4. Operasi
The BYHX DX5 carriage board operates as an integral part of your printer's control system. Once correctly installed, its operation is seamless and managed by the printer's main control unit and software.
4.1 Kuasa Permulaan
- Sambungkan Kuasa: Plug the printer back into the main power supply.
- Hidupkan kuasa: Turn on the printer using its main power switch.
- Permulaan Sistem: Allow the printer to complete its self-test and initialization sequence. The carriage board will be detected and configured by the printer's firmware.
4.2 Operasi Biasa
During printing, the carriage board receives data from the mainboard and translates it into signals that control the firing of the print head nozzles. It also manages the power supply to the print heads and monitors their status. No direct user interaction with the board is required during normal operation.
5. Penyelenggaraan
Proper maintenance of the BYHX DX5 carriage board, primarily through maintaining a clean and stable operating environment, will extend its lifespan and ensure reliable performance.
5.1 Pertimbangan Alam Sekitar
- Kawalan Habuk: Keep the printer area clean and free of dust. Dust accumulation on electronic components can lead to overheating and short circuits.
- Kelembapan dan Suhu: Operate the printer within the recommended humidity and temperature ranges specified by the printer manufacturer. Extreme conditions can negatively impact electronic components.
- Getaran: Ensure the printer is placed on a stable surface to minimize vibrations, which can loosen connections over time.
5.2 Pembersihan
- Matikan: Always power off and unplug the printer before attempting any cleaning.
- Pembersihan Luaran: Use a soft, lint-free cloth to gently wipe the exterior of the carriage board if accessible.
- Udara termampat: For internal dust, use compressed air (designed for electronics) to gently blow away dust from the board, holding the can upright to prevent propellant discharge. Do not use excessive force.
- Elakkan Cecair: Never use liquid cleaners directly on the board. If necessary, dampen a cloth with isopropyl alcohol and gently wipe, ensuring no liquid drips onto components.

Rajah 5.1: Bahagian bawah view of the BYHX DX5 Carriage Board. This view shows the intricate circuitry and solder points, emphasizing the delicate nature of the component and the need for careful handling during maintenance.
6. Penyelesaian masalah
If you experience issues with your printer after installing the BYHX DX5 carriage board, consider the following troubleshooting steps. Many problems can be resolved by checking connections and ensuring proper installation.
| Masalah | Kemungkinan Punca | Penyelesaian |
|---|---|---|
| Printer not recognizing print heads / No print output | Loose or incorrect cable connections; Incompatible board version; Damaged print head or board. |
|
| Error messages related to carriage or print head | Firmware incompatibility; Board malfunction; Sensor issues. |
|
| Intermittent printing issues / Poor print quality | Loose connections; Dust or debris on connectors; Power fluctuations. |
|
Nota Penting: If troubleshooting steps do not resolve the issue, or if you suspect a malfunction of the board, it is recommended to contact professional technical support. Do not attempt complex repairs yourself unless you are a qualified technician.
7. Spesifikasi
| Atribut | Perincian |
|---|---|
| Nama Produk | BYHX DX5 Carriage Board |
| Nombor Model | LLA-52DB1EA9AA3B0D698F2E5D0050067153 |
| Jenama | Generik |
| Keserasian | DX5 Print Heads, Xuli, Allwin, Skycolor Printers |
| Versi Tersedia | VB and 3.0 Type |
| warna | Cn / Double Dx5 3.0 Type (as per variant) |
| Pengeluar | Generik |
| ASIN | B0F2FFLRLP |
| Tarikh Tersedia Pertama | 25 Mac 2025 |
8. Waranti dan Sokongan
The Lilianos BYHX DX5 Carriage Board comes with a Waranti 1 tahun from the date of purchase. This warranty covers manufacturing defects and malfunctions under normal operating conditions.
8.1 Prosedur Tuntutan Waranti
If you encounter any problems with the board within the warranty period, please follow these steps:
- Perkhidmatan Hubungan: Before returning the product, please contact our customer service. It is essential to confirm the mainboard version and the specific print head it is used for. Our service team will guide you through initial troubleshooting and verification.
- Return for Repair: If a defect is confirmed, you will be instructed to send the board back to China for repair. Repairs under warranty are free of charge.
- Pembungkusan: Ensure the board is securely packaged in anti-static material and a sturdy box to prevent damage during transit.
Nota: The warranty does not cover damage caused by improper installation, misuse, accidents, unauthorized modifications, or natural disasters. Always ensure to contact service before attempting any returns or repairs.