
1. Pengenalan
Thank you for choosing the CUSHYBITE PCLST01K 18V 10-inch Cordless String Trimmer/Edger. This lightweight and powerful tool is designed for efficient small yard maintenance. It features an auto-feed head for continuous line advancement and an easy twist-to-edge shaft for seamless transitions between trimming and edging tasks. This manual provides essential information for safe operation, assembly, maintenance, and troubleshooting to ensure optimal performance and longevity of your tool.
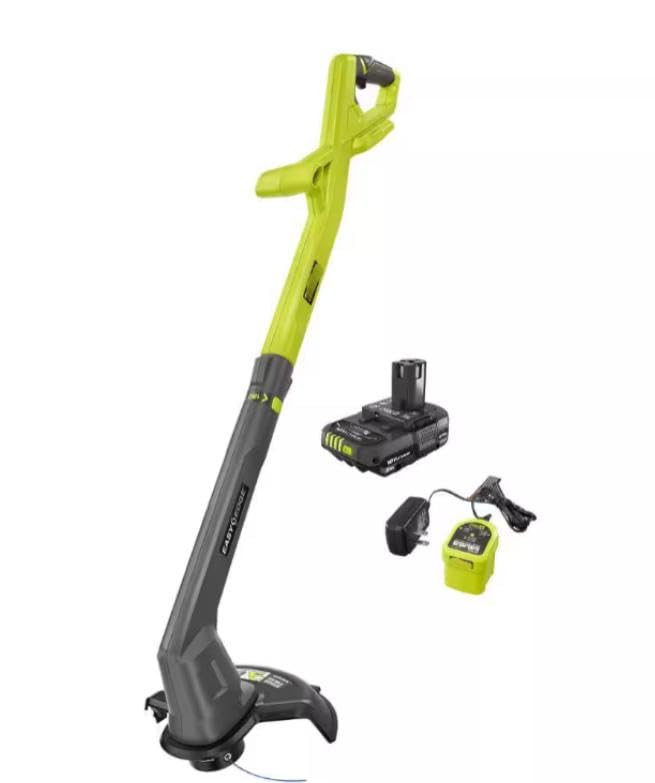
Figure 1: CUSHYBITE PCLST01K Cordless String Trimmer/Edger overview.
2. Maklumat Keselamatan Penting
Sentiasa baca dan fahami semua amaran keselamatan, arahan, ilustrasi dan spesifikasi yang disediakan dengan alat kuasa ini. Kegagalan mematuhi semua arahan yang disenaraikan di bawah boleh mengakibatkan renjatan elektrik, kebakaran dan/atau kecederaan serius.
- Pakai Pelindung Mata: Sentiasa pakai cermin mata keselamatan atau gogal semasa mengendalikan trimmer.
- Pakai Pakaian yang Sesuai: Jangan pakai pakaian atau barang kemas yang longgar. Pakai seluar panjang yang tebal, baju lengan panjang, but dan sarung tangan.
- Pastikan Kawasan Kosong: Ensure bystanders, children, and pets are at a safe distance (at least 50 feet/15 meters) from the operating area.
- Inspect Work Area: Before starting, clear the area of any objects that could be thrown by the cutting line, such as rocks, broken glass, nails, wire, or string.
- Elakkan Keadaan Basah: Do not operate the trimmer in wet grass or rain.
- Keselamatan Bateri: Use only the specified battery and charger. Do not charge batteries in damp atau lokasi basah.
- Kekalkan Kawalan: Sentiasa kekalkan pijakan dan keseimbangan yang betul. Jangan melebihi jangkauan.
- Putuskan Sambungan Bateri: Sentiasa keluarkan pek bateri apabila tidak digunakan, sebelum membersihkan, atau semasa menukar aksesori.
3. Kandungan Pakej
Carefully unpack all items and inspect for any damage. If any parts are missing or damaged, do not operate the tool. Contact customer support.
- 10-inch Cordless String Trimmer/Edger
- Bateri 2.0Ah 18V
- Pengecas Bateri
- Manual Operator (dokumen ini)

Figure 2: Included components: 10" String Trimmer/Edger, 2.0Ah Battery, and Charger.
4. Persediaan dan Pemasangan
4.1 Mengecas Bateri
- Connect the charger to a standard 120V AC outlet.
- Slide the 2.0Ah battery pack onto the charger. Ensure it clicks into place.
- The charger indicator light will show the charging status. Refer to the charger's specific instructions for light patterns.
- Setelah dicas sepenuhnya, keluarkan bateri daripada pengecas.
4.2 Memasang Pengawal
The guard must be installed before operating the trimmer to protect against thrown debris.
- Align the guard with the mounting slots on the trimmer head.
- Push the guard firmly until it snaps securely into place.
- Ensure the guard is properly seated and cannot be easily removed.
4.3 Memasang Bateri
- Pastikan perapi dimatikan.
- Slide the charged battery pack into the battery port on the trimmer handle until it clicks securely.
- Untuk mengeluarkan, tekan butang pelepas pada pek bateri dan luncurkannya keluar.
5. Arahan Operasi
5.1 Bermula dan Berhenti
- Untuk mula: Ensure the battery is installed. Press the safety lock-out button, then squeeze the trigger switch.
- Untuk berhenti: Lepaskan suis pencetus.
5.2 Operasi Pemangkasan
Hold the trimmer firmly with both hands. Maintain a comfortable stance. Swing the trimmer from side to side, keeping the cutting head slightly above the ground. The auto-feed head will advance the line as needed with each trigger pull.
5.3 Operasi Tepi
To convert to edging mode, twist the shaft of the trimmer. The head will rotate 90 degrees, allowing for vertical cutting along sidewalks and driveways. Walk slowly and steadily, guiding the trimmer along the edge.

Figure 3: Key features including the twisting shaft for edging and auto-feed head.
6. Penyelenggaraan
Regular maintenance ensures the longevity and optimal performance of your string trimmer.
6.1 Pembersihan
- Sentiasa keluarkan pek bateri sebelum membersihkan.
- Lap bahagian luar alat dengan kain bersih,amp kain. Jangan gunakan detergen atau pelarut yang kuat.
- Clear any grass clippings or debris from the guard and cutting head.
6.2 Replacing the Cutting Line
When the cutting line becomes too short or breaks, it needs to be replaced. This model uses an auto-feed head, which typically requires a specific type and diameter of line (e.g., 0.065 inches).
- Keluarkan pek bateri.
- Locate the spool cap on the trimmer head.
- Press the tabs on the spool cap and remove it, then remove the old spool.
- Insert a new pre-wound spool or manually wind new line onto the existing spool, following the directional arrows.
- Thread the line through the eyelets on the trimmer head.
- Replace the spool cap, ensuring it clicks securely into place.

Figure 4: Trimmer head showing the spool area for line replacement.
7. Penyelesaian masalah
| Masalah | Kemungkinan Punca | Penyelesaian |
|---|---|---|
| Trimmer tidak bermula. | Bateri tidak dicas atau dipasang dengan tidak betul. Kunci keselamatan tidak diaktifkan. | Ensure battery is fully charged and securely installed. Press safety lock-out button before squeezing trigger. |
| Talian pemotongan tidak bergerak ke hadapan. | Tali kusut atau terlalu pendek. Kili kosong. | Remove battery, inspect spool for tangles, or replace the cutting line spool. |
| Motor berjalan tetapi talian tidak berputar. | Spool is not properly seated. Debris is jamming the head. | Remove battery, check that the spool cap is securely fastened. Clear any debris from the cutting head. |
| Mengurangkan prestasi pemotongan. | Line is worn or incorrect type. Battery charge is low. | Replace cutting line with recommended diameter. Recharge battery. |
8. Spesifikasi
- model: PCLST01K
- Voltage: 18V DC
- Memotong Swath: 8-10 inches (adjustable)
- Diameter Garisan: 0.065 inches (recommended)
- Jenis Bateri: Lithium-Ion (2.0Ah included)
- Berat: Under 4 lbs (tool only)
- Runtime (with 2.0Ah battery): Lebih 30 minit
- ciri-ciri: Auto-feed head, Twist-to-edge shaft, Ergonomic overmold handle
9. Waranti dan Sokongan
CUSHYBITE products are manufactured to high-quality standards. For information regarding warranty coverage, technical support, or replacement parts, please refer to the warranty card included with your purchase or visit the official CUSHYBITE website. Please have your model number (PCLST01K) and purchase date available when contacting support.