
Produk Selesaiview
The NutriChef 7.87-inch Stainless Steel Egg Poacher Pan Set is designed for preparing perfectly poached eggs with ease. This set includes a durable stainless steel pan, a tempered glass lid, four non-stick poaching cups, a silicone spatula, an oven mitt, and an electronic timer. Its construction ensures even heat distribution, making it suitable for various cooktops, including induction.

Image: The NutriChef Egg Poacher Pan Set displayed with perfectly poached eggs on toast.
Komponen Termasuk
Your NutriChef Egg Poacher Pan Set includes the following items:
- 7.87-inch Stainless Steel Pan
- Tempered Glass Lid with steam vent
- Four (4) Non-Stick Poaching Cups
- Removable Tray for poaching cups
- Spatula Silikon
- Two (2) Silicone Oven Mitts
- Pemasa Elektronik

Image: All components of the NutriChef Egg Poacher Pan Set laid out, showing the pan, lid, four poaching cups, silicone spatula, two silicone oven mitts, and an electronic timer.
Arahan Persediaan
- Buka Pembungkusan Semua Komponen: Keluarkan semua item dari bungkusan dengan berhati-hati.
- Pembersihan Awal: Before first use, wash the stainless steel pan, tempered glass lid, and non-stick poaching cups with warm, soapy water. Rinse thoroughly and dry completely. The silicone spatula and oven mitts can also be washed.
- Assemble Poaching Tray: Place the removable tray into the stainless steel pan. Insert the four non-stick poaching cups into the designated holes on the tray.
Arahan Operasi
Follow these steps to prepare perfectly poached eggs:
- Add Water to Pan: Pour approximately 1 cup of water into the stainless steel pan. Ensure the water level is below the bottom of the poaching cups.
- Prepare Poaching Cups: Lightly grease the inside of each non-stick poaching cup with butter or cooking oil to prevent sticking. For best results, spray with vegetable oil when the cups are already warm.
- Place Cups and Heat: Place the poaching cups into the tray within the pan. Bring the water to a boil over medium-high heat.
- Add Eggs: Once the water is boiling, carefully crack one egg into each poaching cup.
- Tutup dan Masak: Place the tempered glass lid on the pan. The lid features a steam vent to prevent boiling over. Cook for approximately 4-6 minutes for a runny yolk, or longer for a firmer yolk. Use the included electronic timer for precision.
- Remove Eggs: Using the silicone oven mitts for safety, carefully remove the lid. Use the silicone spatula to gently lift each poached egg from its cup.
- Hidangkan: Serve immediately on toast, English muffins, or as part of your favorite dish.
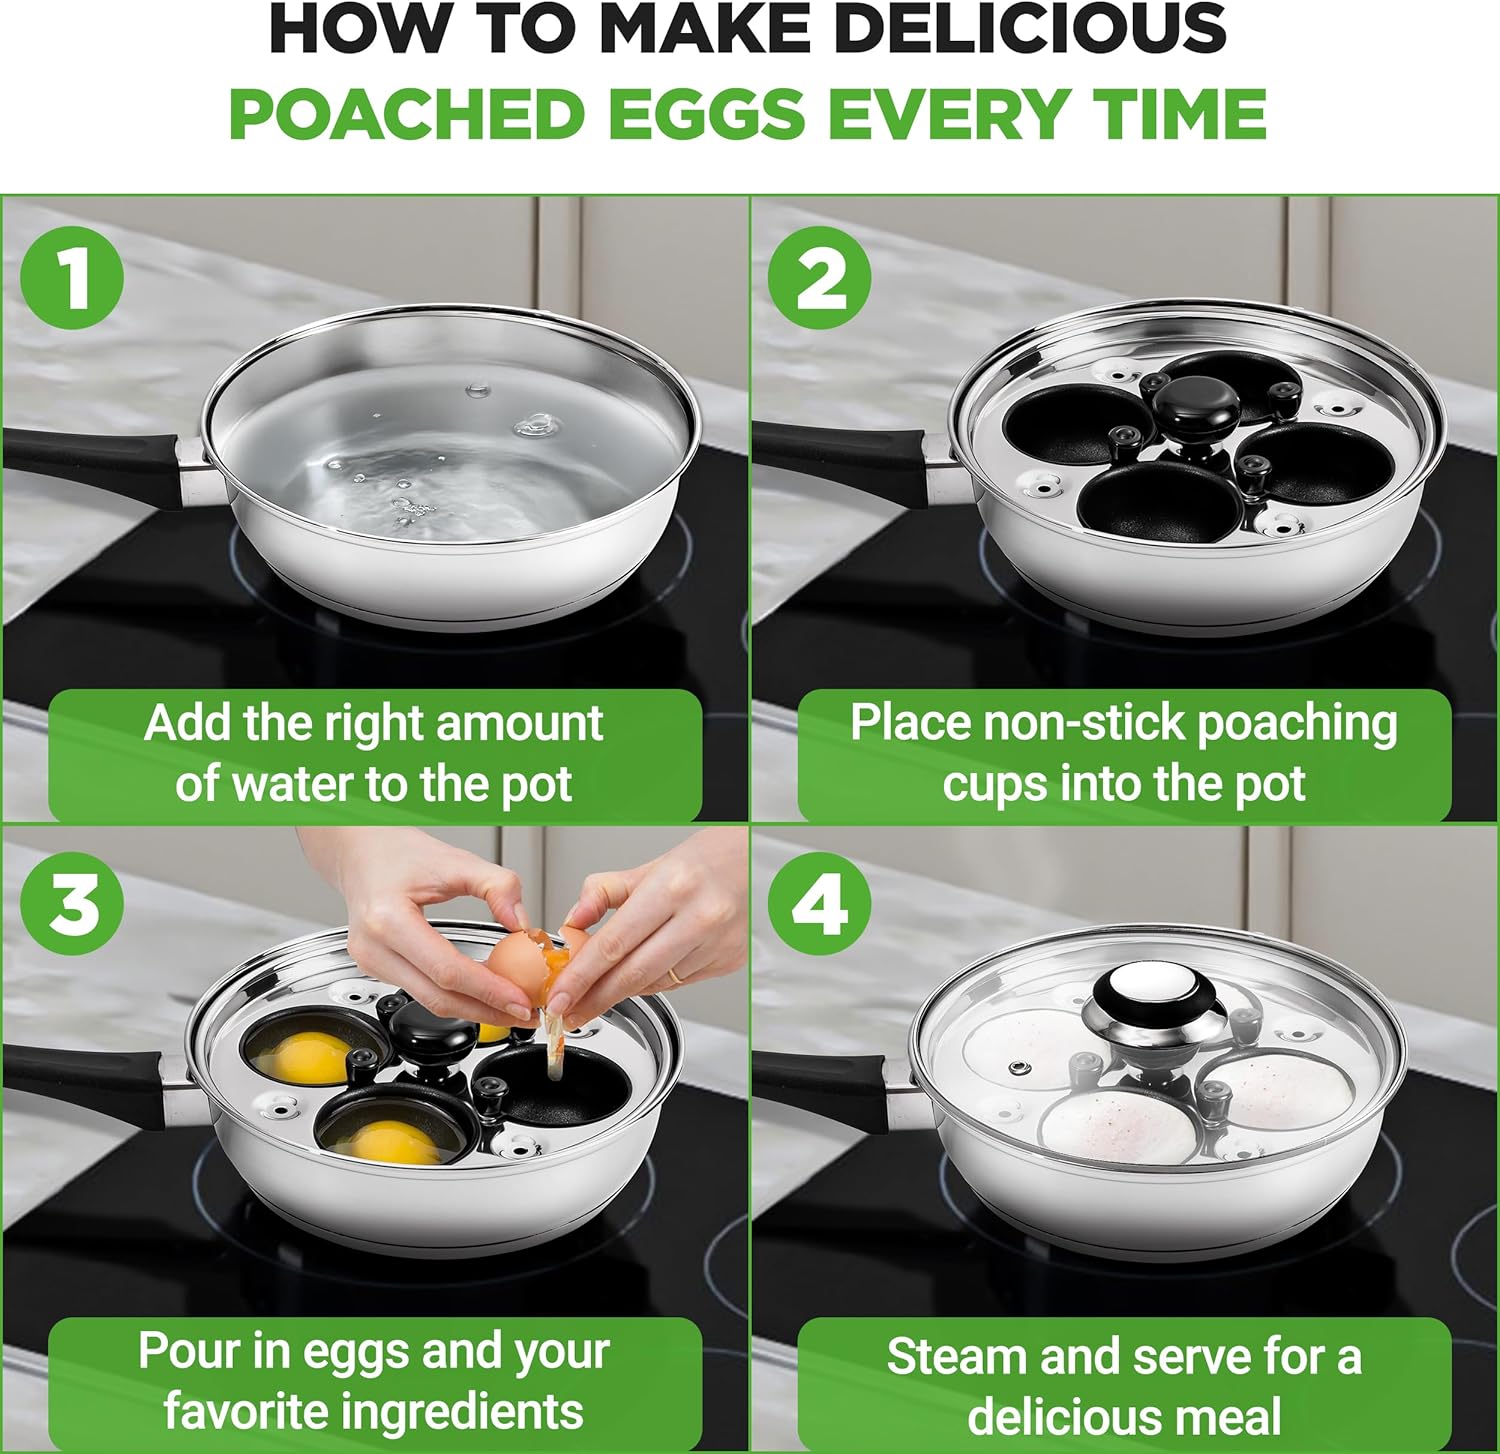
Image: A four-step visual guide demonstrating how to use the NutriChef Egg Poacher: adding water, placing cups, adding eggs, and steaming with the lid.
Video: An official product video from NutriChef demonstrating the use of the egg poacher set, including adding water, cracking eggs into the non-stick cups, covering with the glass lid, and using the timer for precise cooking.
Penyelenggaraan dan Penjagaan
- Pembersihan: Wash the egg poacher pan, lid, and cups by hand using a mild cleaner and warm water. Rinse thoroughly.
- Pengeringan: Ensure all components are completely dry before storing to prevent water spots or corrosion.
- Storan: Simpan produk dalam persekitaran yang kering apabila tidak digunakan.
- Keselamatan Mesin basuh pinggan mangkuk: Item ini adalah bukan dishwasher safe. Hand washing is recommended to maintain the quality and longevity of the non-stick coating and stainless steel finish.
- Elakkan bahan pelelas: Do not use abrasive cleaners or scouring pads, as these can damage the non-stick surface and polished stainless steel.
Menyelesaikan masalah
- Eggs Sticking to Cups: Ensure cups are adequately greased before adding eggs. For best results, apply a light coating of cooking oil or butter to warm cups.
- Yolk Too Firm/Runny: Adjust cooking time. For a runny yolk, try 4-5 minutes. For a firmer yolk, extend cooking to 6-7 minutes. Experiment with your stove's heat settings and water temperature.
- Air Mendidih: Ensure the water level is below the poaching cups. The lid and tray have vents to help manage steam, but excessive water can still cause overflow.
- Memasak tidak rata: The pan is designed for even heat distribution. Ensure the pan is centered on the heat source and that the heat setting is consistent.
Spesifikasi
| Ciri | Perincian |
|---|---|
| Jenama | NutriChef |
| Nombor Model (ASIN) | B0DXCM9Z4W |
| Diameter Kuali | 7.87 Inci |
| Dimensi Keseluruhan (L x W x H) | 15.35" x 8.54" x 4.21" (with handles) |
| Bahan (Badan) | 304 (18/8) Stainless Steel |
| Material (Bottom) | Aluminum + 18/0 Stainless Steel |
| Material (Egg Cup & Rack) | 201 (14/1) Stainless Steel |
| Bahan Tudung | Kaca Terbaja |
| Kapasiti | 4 Cawan |
| warna | Perak |
| Serasi Induksi | ya |
| Mesin basuh pinggan mangkuk selamat | Tidak |
| Peti Deposit Keselamatan | Tidak |
Maklumat Keselamatan
- Always use the provided silicone oven mitts when handling hot components of the pan set, especially the lid and poaching cups.
- Keep children and pets away from the cooking area when the pan is in use.
- Do not leave the pan unattended on a hot stove.
- Ensure the pan handle is securely attached before use.
- Avoid sudden temperature changes, which can damage the tempered glass lid.
Waranti dan Sokongan
For warranty information, product registration, or customer support, please refer to the official NutriChef weblaman web atau hubungi jabatan khidmat pelanggan mereka secara langsung. Butiran perhubungan biasanya terdapat pada pembungkusan produk atau pengilang webtapak.