1. Pengenalan
This manual provides detailed instructions for the installation, operation, and maintenance of your Haloview Byte Tango BT6 Touch RV Backup Camera System. Please read this manual thoroughly before using the product to ensure proper function and safety.
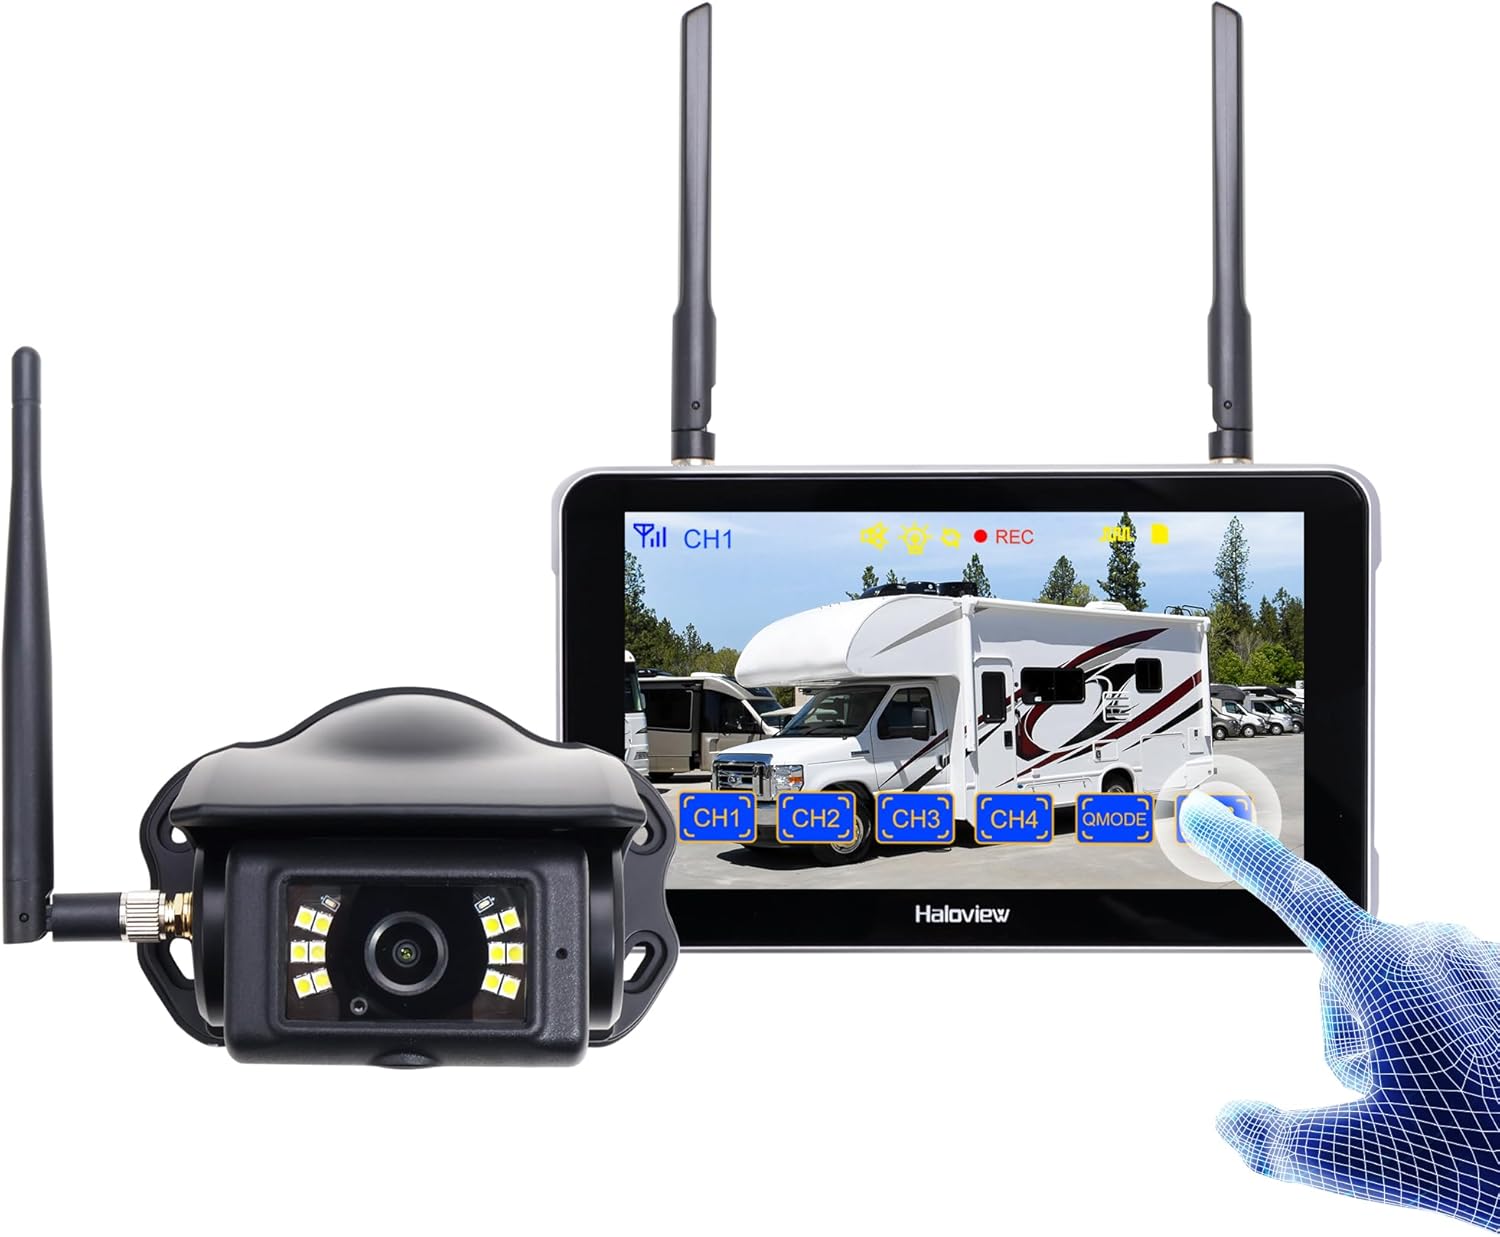
Image 1.1: Haloview Byte Tango BT6 Touch RV Backup Camera System components, including the 5.5-inch touch screen monitor and the wireless camera.
Ciri-ciri Utama:
- 2.5D Curved Glass 5.5'' Touch Screen: Offers a smooth and responsive user interface.
- Low Latency Wireless Technology: Ensures minimal lag and interference-free signal transmission, supporting vehicles up to 65ft in length (e.g., RVs, travel trailers, trucks, campers, vans, pickups, tractors, fifth wheels, motorhomes).
- Full-Color Dim-Light Night Vision: Advanced image sensors provide full-color video even in low-light conditions. Night Vision Fill Lights can be activated or deactivated remotely via the monitor.
- Tangkapan Audio: Built-in speaker alerts users to pedestrians, animals, or unusual sounds in the surroundings.
- DVR terbina dalam: Supports real-time recording and video playback with 1080P@30fps FHD resolution.
2. Apa yang ada di dalam Kotak
Sahkan bahawa semua item yang disenaraikan di bawah disertakan dalam pakej anda:

Image 2.1: All components included in the Haloview Byte Tango BT6 Touch system package.
- BT6 Touch Screen Monitor
- Kamera BTC128
- Pendakap Lekap Cawan Sedut
- Pendakap Lekap 3M
- Kabel Jenis-C
- Kabel Penukaran Kamera
- Penyesuai Kuasa untuk RV Pra-wayar Furrion
- Kabel Berpasangan
- Penyesuai Daya Rokok Ringan
3. Persediaan dan Pemasangan
3.1 Pemasangan Kamera
- Pilih Lokasi Pemasangan: Select a suitable surface mount location at the rear of your vehicle, ensuring a clear view and protection from direct impact.
- Selamatkan Kamera: Mount the BTC128 camera securely using appropriate fasteners. Ensure the antenna is positioned for optimal signal reception.
- Sambungan Kuasa: Connect the camera to a 12V DC power source. If your RV is pre-wired for Furrion, use the provided power adapter. Otherwise, connect to your vehicle's reverse light circuit or another suitable 12V power source.
3.2 Pemasangan Monitor
- Pasang Monitor: Attach the 5.5-inch monitor to your dashboard or windshield using either the suction cup mount bracket or the 3M adhesive mount bracket. Ensure the monitor is positioned for easy viewtanpa menghalang pemanduan anda view.
- Power the Monitor: Connect the monitor to power using the provided cigarette lighter power adapter or the Type-C cable for USB power.
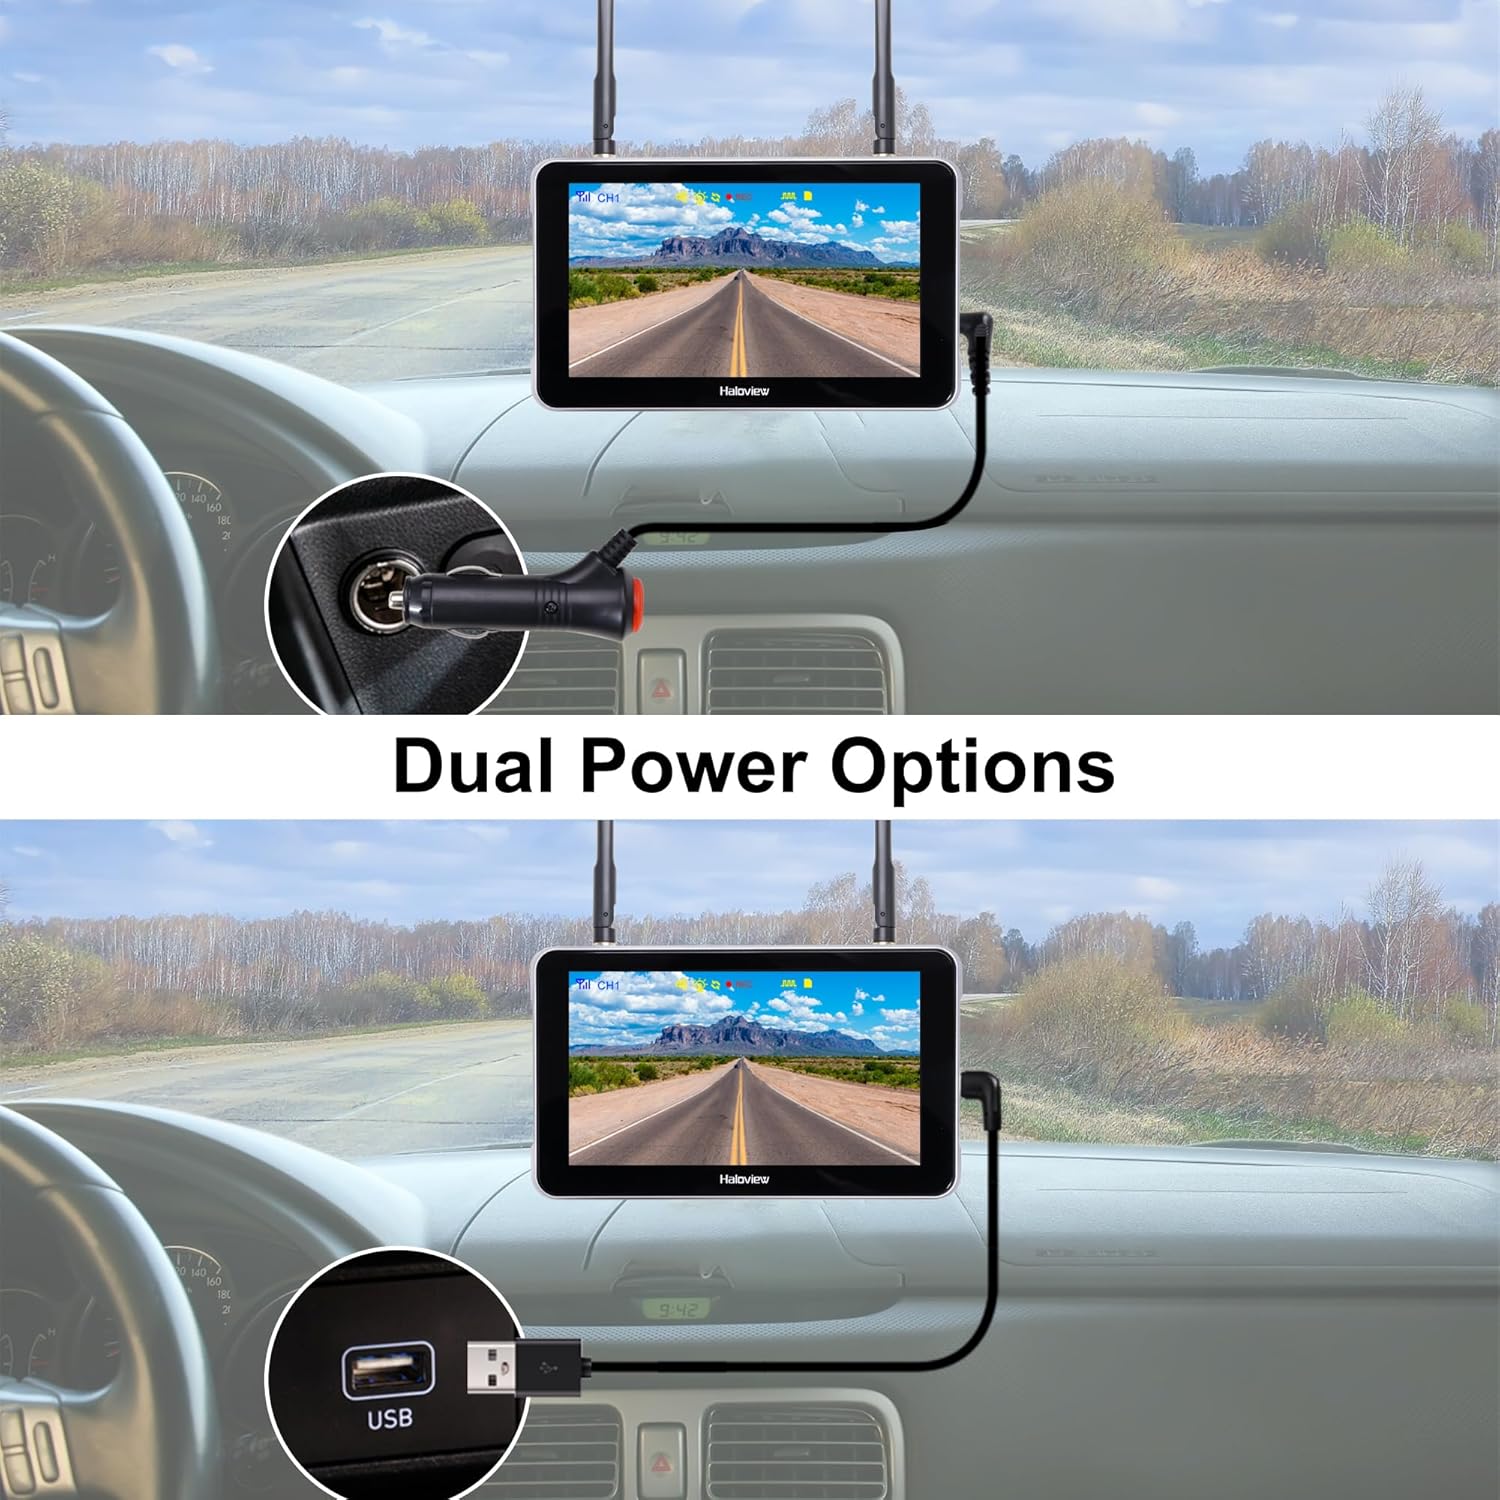
Image 3.1: The monitor can be powered via a cigarette lighter adapter or a USB Type-C cable.
3.3 Memadankan Kamera dan Monitor
The camera and monitor are typically pre-paired from the factory. If no image appears or you are adding additional cameras, follow these steps:
- Hidupkan kedua-dua kamera dan monitor.
- On the monitor, navigate to the pairing menu (refer to the operating section for menu access).
- Select an available channel for pairing.
- Press the pairing button on the camera (if applicable, consult camera-specific instructions) or follow the on-screen prompts on the monitor to initiate pairing.
- Once paired, the camera's video feed will appear on the monitor.

Image 3.2: Wireless signal transmission between the camera and monitor.
4. Arahan Operasi
4.1 Operasi Asas
- Hidupkan/Mati Kuasa: Press and hold the power button on the monitor to turn it on or off.
- Antara Muka Skrin Sentuh: Navigate through menus and settings by tapping and swiping on the 5.5-inch touch screen.
- Pertukaran Saluran: If multiple cameras are connected, tap the channel buttons (CH1, CH2, etc.) on the screen to switch between camera views.

Image 4.1: The touch screen allows for intuitive control of the system.
4.2 Ciri Lanjutan
- Flip Imej: Access the settings menu to adjust the image orientation (horizontal/vertical flip) to match your camera's mounting position.

Image 4.2: The image flip function allows for various display orientations.
- Penglihatan Malam: The system automatically adjusts for low-light conditions. Night Vision Fill Lights can be manually controlled via the monitor settings if ambient light is extremely low.

Image 4.3: The camera provides full-color images even in dim light conditions.
- Rakaman DVR: Insert a Micro-SD card (not included) into the monitor's slot to enable continuous recording. Access recorded footage through the playback menu. The system records in 1080P at 30 frames per second.

Image 4.4: The monitor supports Micro-SD card recording for continuous video capture.
- Rear Assist Marker Lines: Customizable parking guidelines can be activated and adjusted via the monitor settings to aid in reversing and parking maneuvers.
Image 4.5: Customizable rear assist marker lines for precise maneuvering.
5. Penyelenggaraan
- Pembersihan: Use a soft, dry cloth to clean the monitor screen and camera lens. For stubborn dirt, slightly dampen kain dengan air. Elakkan pembersih atau pelarut yang melelas.
- Sambungan Kabel: Periodically check all cable connections for tightness and signs of wear. Ensure power cables are securely plugged in.
- Kanta Kamera: Keep the camera lens clear of dirt, snow, or ice to maintain optimal image quality.
- Antena: Ensure antennas on both the camera and monitor are securely attached and positioned for best signal.
6. Penyelesaian masalah
- Tiada Imej pada Monitor:
- Ensure both the camera and monitor are powered on.
- Periksa semua sambungan kuasa.
- Verify that the camera and monitor are properly paired (refer to Section 3.3).
- Check for obstructions between the camera and monitor that might block the wireless signal.
- Kualiti Imej Lemah:
- Bersihkan lensa kamera.
- Pastikan kamera dipasang dengan selamat dan tidak bergetar.
- Check for strong interference sources nearby.
- Isu Rakaman:
- Ensure a compatible Micro-SD card is inserted correctly.
- Check if the Micro-SD card is full; format it if necessary (this will erase all data).
- Verify recording settings in the monitor menu.
- Monitor Not Responding to Touch:
- Restart the monitor by powering it off and on again.
- Pastikan skrin bersih dan bebas daripada serpihan.
7. Spesifikasi
| Ciri | Spesifikasi |
|---|---|
| Product Dimensions (Monitor) | 6.1 x 1 x 8.8 inches (155mm L x 25mm W x 88mm H) |
| Berat Barang | 2.7 paun |
| Saiz Skrin | 5.5 Inci |
| Teknologi Paparan | LCD |
| Kesambungan Wayarles | Wayarles Digital 2.4G |
| Peranti Serasi | BTC128, BTC129, BTC126, BTC125, BTC131 |
| Jenis Pemasangan | Lekapan Permukaan |
| Vol Operasitage | 12 Volt (DC) |
| Teknologi Penderia Optik | CMOS |
| Jenis Kanta | Sudut Lebar Tetap |
| Sudut Sebenar daripada View | 120 Darjah |
| Resolusi Rakaman Video | 1080P@30fps FHD |

Image 7.1: Physical dimensions of the Haloview monitor and a summary of key features.
8. Waranti dan Sokongan
8.1 Maklumat Waranti
Haloview products are covered by a limited warranty. Please refer to the warranty card included with your product or visit the official Haloview weblaman web untuk terma dan syarat jaminan terperinci. Simpan resit pembelian anda sebagai bukti pembelian untuk tuntutan jaminan.
8.2 Sokongan Pelanggan
For technical assistance, troubleshooting, or product inquiries, please contact Haloview sokongan pelanggan melalui saluran berikut:
- Webtapak: Visit the official Haloview webtapak untuk Soalan Lazim, sumber sokongan dan borang hubungan.
- e-mel: Refer to your product packaging or the Haloview webtapak untuk alamat e-mel sokongan pelanggan.
- telefon: Contact numbers may be available on the official weblaman web untuk sokongan langsung.
When contacting support, please have your product model (BT6 Touch) and purchase information ready.