
1. Pengenalan
This manual provides detailed instructions for the safe and efficient operation of your PREXISO PLC10GLIT Rechargeable Green Cross Line Laser Level. Please read all instructions carefully before use to ensure optimal performance and safety.
Maklumat Keselamatan
- AMARAN: Do not look directly into the laser beam. Direct exposure can cause eye injury.
- This device emits Class 2 laser radiation.
- Jauhkan peranti daripada capaian kanak-kanak.
- Do not attempt to modify or disassemble the laser level.
- Gunakan hanya bateri tertentu dan aksesori pengecasan.
2. Kandungan Pakej
Sahkan bahawa semua item yang disenaraikan di bawah disertakan dalam pakej anda:
- PREXISO Green Cross Line Laser Level (Model: PLC10GLIT)
- Rechargeable Li-ion Battery (pre-installed or included separately)
- Kabel Pengecas USB-C
- Magnetic L-Bracket
- 1.2m Aluminum Tripod with 1/4″-20 mount
- Carry Case / Storage Bag
- Manual Pengguna

3. Persediaan
3.1 Pemasangan & Pengecasan Bateri
The device uses a built-in rechargeable Li-ion battery. Ensure the battery is charged before first use.
- Locate the battery compartment on the bottom of the laser level.
- Masukkan bateri Li-ion, pastikan kekutuban yang betul.
- Tutup petak bateri dengan selamat.
- Connect the USB-C charging cable to the Type-C port on the device and to a suitable USB power source.
- The LED indicator will show red during charging and turn green when fully charged.

3.2 Tripod Setup
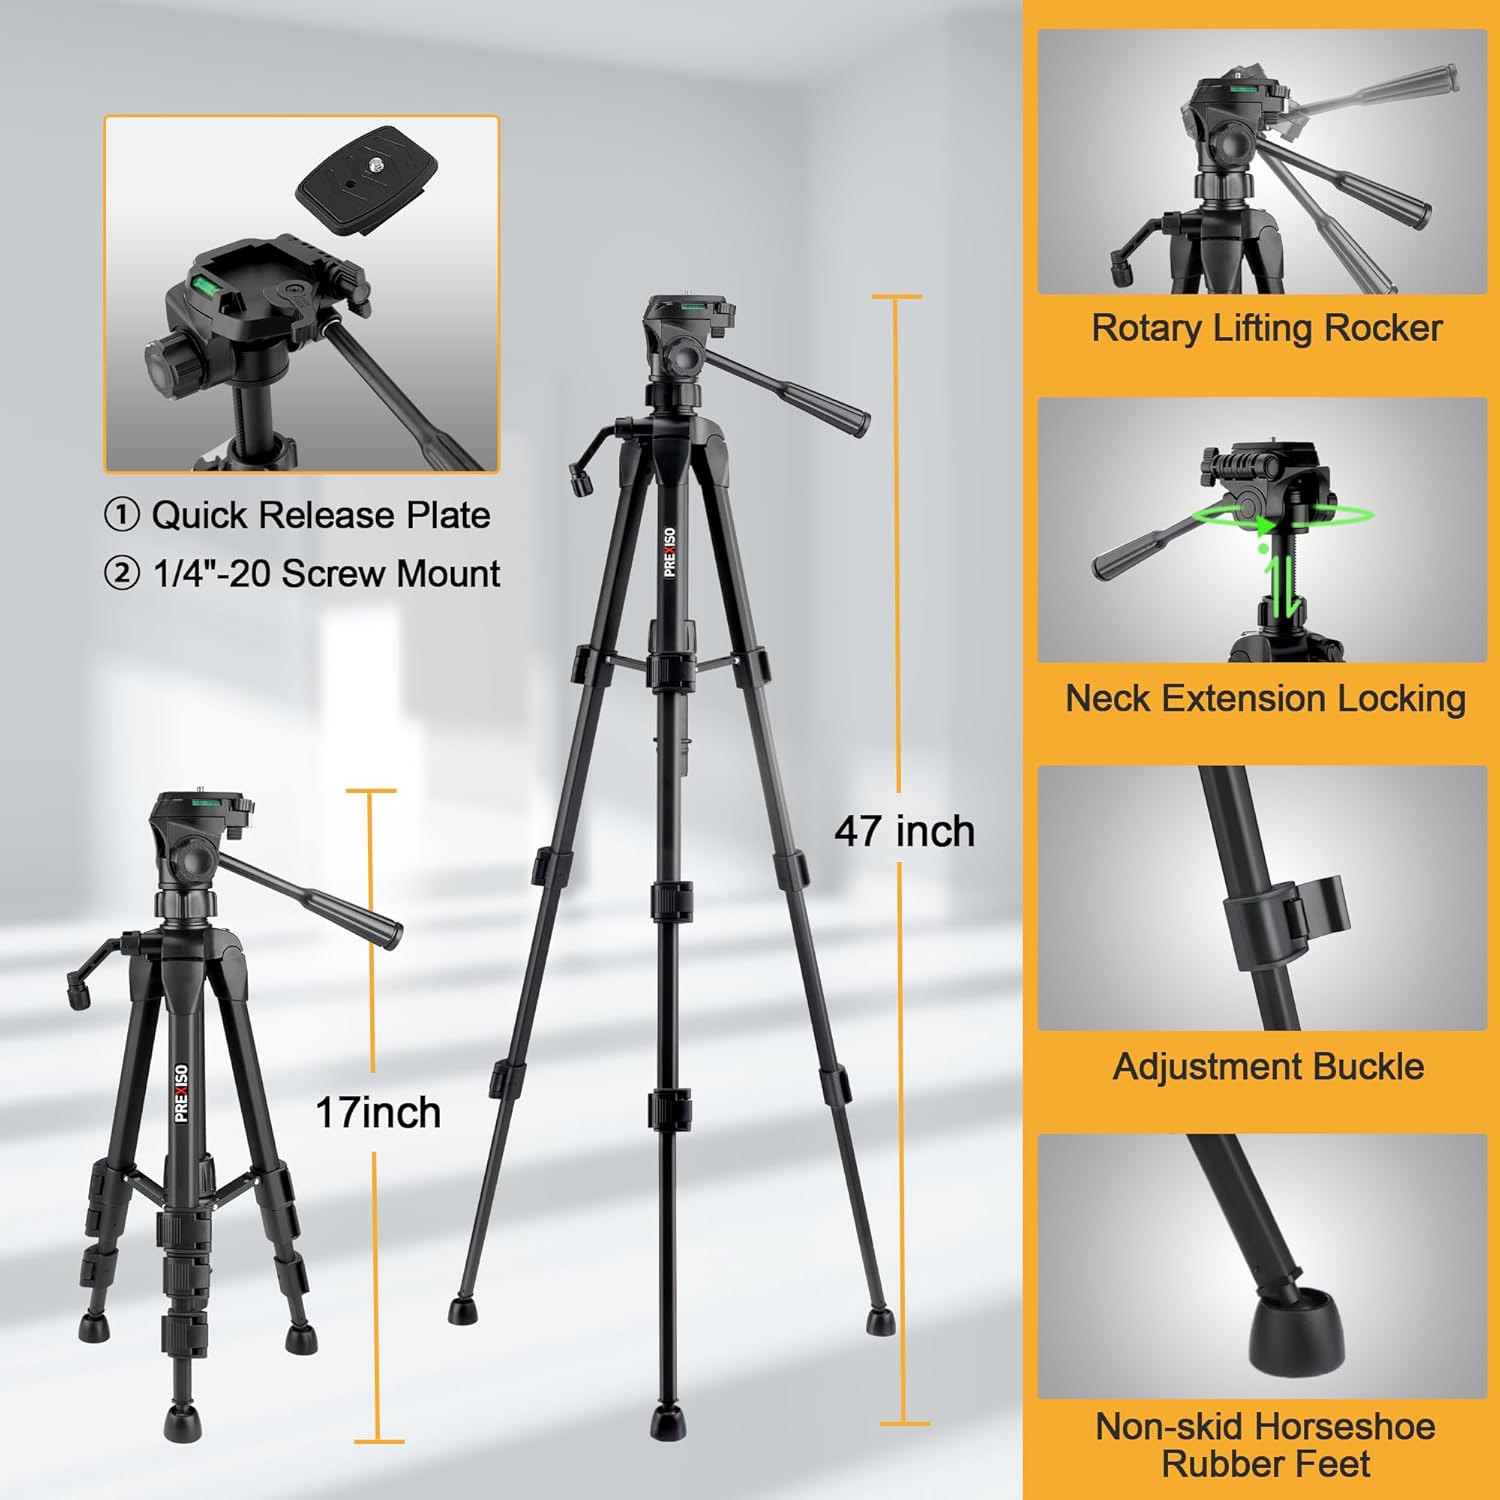
The included 1.2m aluminum tripod provides a stable platform for precise leveling.
- Extend the tripod legs to the desired height and secure them using the adjustment buckles.
- Attach the laser level to the tripod's 1/4″-20 screw mount.
- Adjust the tripod head using the rotary lifting rocker and neck extension locking mechanism for fine positioning.
3.3 Magnetic L-Bracket Attachment
The integrated magnetic L-bracket allows for versatile mounting on metal surfaces.
- Attach the laser level to the L-bracket via the 1/4″-20 screw.
- The strong magnets on the L-bracket can securely hold the device to metal studs, beams, or other ferrous materials.
- The bracket also features anti-slip rubber pads for added stability.
4. Mod Operasi
4.1 Self-Leveling Mode
This mode automatically levels the laser lines for accurate horizontal and vertical projections.
- Slide the pendulum lock switch to the "Auto" (unlocked) position. The LED will turn green.
- Place the laser level on a stable surface. The device will self-level within a 5° range.
- If the device is outside the 5° self-leveling range, the laser lines will flash, and a red LED alert will activate. Adjust the device's position until the lines are steady and the LED is green.

4.2 Manual Mode (Lock Mode)
Use this mode to project laser lines at any desired angle, useful for diagonal applications.
- Slide the pendulum lock switch to the "Manual" (locked) position.
- Press and hold the power button for 2 seconds to activate the laser lines.
- The laser lines will now be locked and can be projected at any angle without flashing.
4.3 Pelarasan Kecerahan
The laser level features three adjustable brightness settings for optimal visibility in various lighting conditions.
- Short press the brightness button (usually indicated by a sun icon) on the top of the device to cycle through the three brightness modes (100%, 70%, 40%).

5. Aplikasi Serbaguna
The PREXISO PLC10GLIT is designed for a wide range of professional and DIY tasks, including:
- Tile layout and installation
- Pemasangan backsplash
- Cabinet fitting
- Hanging pictures and artwork
- Door and window calibration
- Framing and general home renovation projects

6. Spesifikasi
| Nombor Model | PLC10GLIT |
| Jenis Laser | Green Cross Line Laser (520 nm) |
| Julat Meningkat Diri | ± 5° |
| Ketepatan | ± 1/4″ pada 30 kaki |
| Indoor Working Range | Sehingga 20 m (65 kaki) |
| Mod Kecerahan | 3 (100%, 70%, 40%) |
| Sumber Kuasa | Rechargeable Li-ion Battery (included) |
| Port Pengecasan | USB Jenis-C |
| Masa Penggunaan Berterusan | Sehingga 6 jam |
| Penarafan IP | IP54 (Kalis Habuk dan Percikan) |
| Tripod Mount Thread | 1/4″-20 |
| Ketinggian tripod | 1.2 m (47 inci) |
| Berat Barang | 1.83 kg |
| Pengeluar | HANGZHOU GREAT STAR INDUSTRIAL CO.,LTD |

7. Penyelenggaraan
- Keep the laser level clean and free from dust and debris. Use a soft, dry cloth for cleaning.
- Store the device in its carry case when not in use to protect it from damage.
- Elakkan daripada mendedahkan peranti kepada suhu yang melampau atau cahaya matahari langsung untuk tempoh yang lama.
- Periksa bateri dengan kerap untuk sebarang tanda kerosakan atau kebocoran.
8. Penyelesaian masalah
8.1 Laser Lines are Flashing
If the laser lines are flashing in self-leveling mode, it indicates the device is outside its 5° self-leveling range. Adjust the position of the laser level until the lines become steady and the LED indicator turns green.
8.2 Laser Not Turning On
- Pastikan bateri terisi penuh.
- Check if the pendulum lock switch is in the correct position (Auto for self-leveling, Manual for locked lines).
- If in Manual mode, ensure the power button is pressed and held for 2 seconds to activate.
9. Waranti dan Sokongan
Your PREXISO PLC10GLIT Rechargeable Green Cross Line Laser Level comes with a Waranti pengilang selama 2 tahun. For warranty claims, technical support, or any inquiries, please contact the manufacturer or your retailer with your purchase details.
10. Video Produk Rasmi
PREXISO Laser Level with Tripod - Rechargeable Dual Modules
Video ini memberikan penamatview of the PREXISO Laser Level, highlighting its features, including the rechargeable dual modules and tripod compatibility. It demonstrates the product in various usage scenarios.
PREXISO Rechargeable Laser Level Self Leveling
This video showcases the self-leveling capabilities of the PREXISO Rechargeable Laser Level, demonstrating how it automatically adjusts to provide accurate lines for your projects.