KITCHENARM 851011
KITCHENARM 19-in-1 HANDY Bread Machine User Manual
Model: 851011
pengenalan
This manual provides comprehensive instructions for the safe and efficient operation, maintenance, and troubleshooting of your KITCHENARM 19-in-1 HANDY Bread Machine, Model 851011. Please read this manual thoroughly before first use and retain it for future reference.

Figure 1: KITCHENARM 19-in-1 HANDY Bread Machine (Model 851011).
Kandungan Pakej
Verify that all items are present and in good condition upon opening the package. If any items are missing or damaged, contact customer service.
- 1 x KITCHENARM Bread Machine (Model KA8510)
- 1 x User Manual & Recipe Book
- 2 x Kneading Paddles (one for use, one spare)
- 1 x Metal Hook for paddle removal
- 1 x US Three-Prong Plug (integrated)
- 1 x Non-Stick Bread Pan (2LB Vertical Pan)
- 2 x Cup-Spoon Sets (measuring cups and spoons)
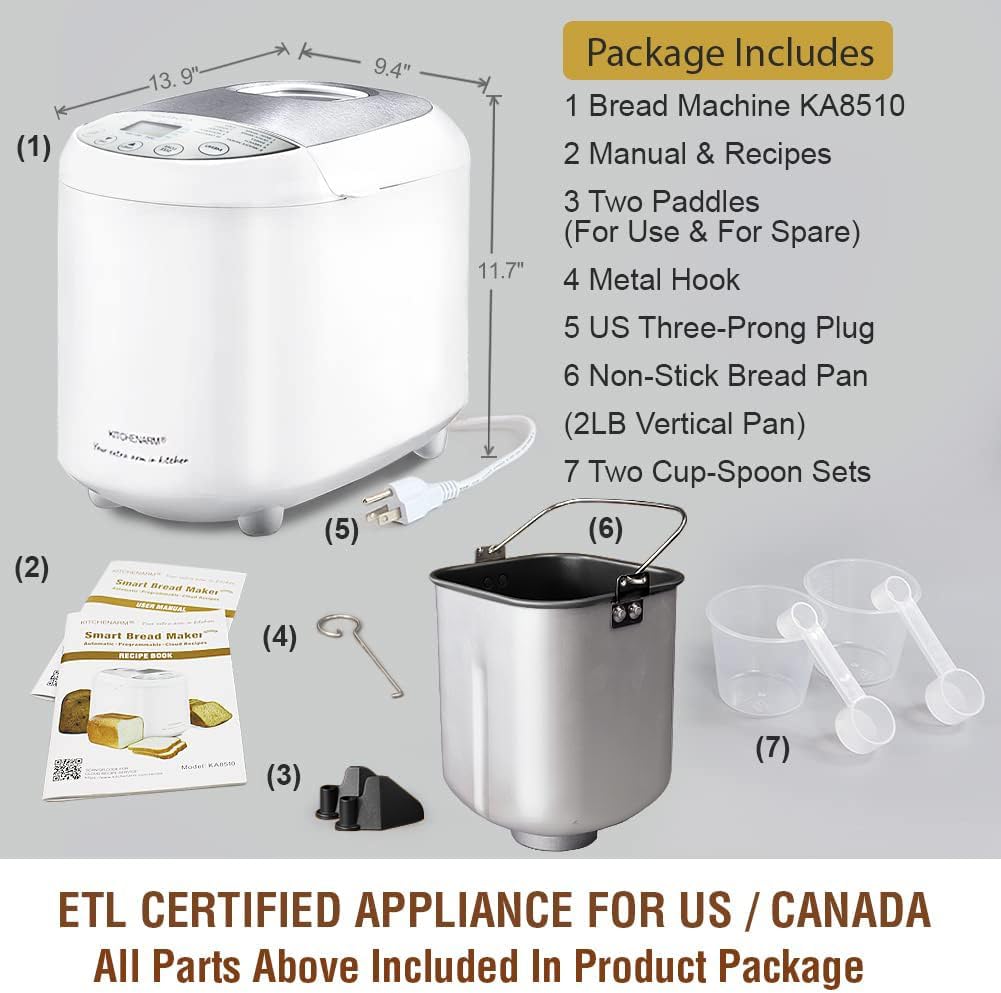
Rajah 2: Termasuk aksesori dan komponen.
Arahan Keselamatan Penting
Apabila menggunakan peralatan elektrik, langkah berjaga-jaga keselamatan asas hendaklah sentiasa dipatuhi, termasuk yang berikut:
- Baca semua arahan.
- Jangan sentuh permukaan panas. Gunakan pemegang atau tombol.
- Untuk melindungi daripada renjatan elektrik, jangan rendam kord, palam atau perkakas dalam air atau cecair lain.
- Pengawasan rapi diperlukan apabila sebarang perkakas digunakan oleh atau berhampiran kanak-kanak.
- Cabut plag dari soket apabila tidak digunakan dan sebelum membersihkan. Biarkan sejuk sebelum memakai atau menanggalkan bahagian.
- Jangan kendalikan sebarang perkakas dengan kord atau palam yang rosak atau selepas perkakas tidak berfungsi atau rosak dalam apa jua cara. Kembalikan perkakas ke kemudahan servis sah terdekat untuk pemeriksaan, pembaikan atau pelarasan.
- Penggunaan lampiran aksesori yang tidak disyorkan oleh pengilang perkakas boleh menyebabkan kecederaan.
- Jangan gunakan di luar rumah.
- Jangan biarkan kord tergantung di tepi meja atau kaunter, atau menyentuh permukaan panas.
- Jangan letakkan pada atau berhampiran gas panas atau penunu elektrik, atau dalam ketuhar yang dipanaskan.
- Berhati-hati yang melampau mesti digunakan apabila menggerakkan perkakas yang mengandungi minyak panas atau cecair panas lain.
- Untuk memutuskan sambungan, matikan mana-mana kawalan kepada "mati", kemudian tanggalkan palam dari alur keluar dinding.
- Jangan gunakan perkakas untuk kegunaan selain daripada yang dimaksudkan.
- Perkakas ini mempunyai palam terkutub (satu bilah lebih lebar daripada yang lain). Untuk mengurangkan risiko kejutan elektrik, palam ini bertujuan untuk dimuatkan ke dalam alur keluar terkutub hanya satu arah. Jika palam tidak muat sepenuhnya ke dalam alur keluar, balikkan palam. Jika masih tidak muat, hubungi juruelektrik bertauliah. Jangan cuba mengubah suai palam dalam apa jua cara.
SIMPAN ARAHAN INI.
Persediaan dan Penggunaan Pertama
Before First Use: Initial Burn-Off
Before using your bread machine for the first time, it is recommended to perform an initial burn-off cycle to eliminate any manufacturing odors or residues. This process takes approximately 10 minutes.
- Remove all packaging materials and accessories from the bread machine.
- Wipe the interior and exterior of the machine with a damp cloth. Ensure the bread pan and kneading paddle are clean and dry.
- Place the empty bread pan with the kneading paddle inserted into the machine. Close the lid.
- Plug the bread machine into a grounded electrical outlet.
- Select a short baking program (e.g., "Bake" or "Home Made" with a short duration if customizable, or simply run an empty cycle for 10 minutes).
- Allow the machine to run for approximately 10 minutes. A slight odor or smoke may be present; this is normal.
- Unplug the machine and allow it to cool completely for at least 2 hours before proceeding with actual bread making.
Pengenalan Komponen

Figure 3: Key components of the bread machine.
- Lubang wap: Release steam during baking. Do not block.
- besar Viewdalam Tetingkap: Allows observation of the bread-making process.
- Tudung Keluli Tahan Karat: Tahan lama dan senang dibersihkan.
- Control Panel with LCD Display: For program selection, settings, and status display.
- Kuali Roti: Non-stick pan where ingredients are mixed, kneaded, risen, and baked.
- Dayung menguli: Mixes and kneads the dough.
Arahan Operasi
Langkah Asas Membuat Roti
Follow these general steps for most bread recipes. Refer to the included recipe book for specific ingredient quantities and program recommendations.
- Masukkan Pengayuh Uli: Place the kneading paddle onto the shaft inside the bread pan.
- Tambah Bahan: Add ingredients to the bread pan in the order specified by your recipe (typically liquids first, then dry ingredients, with yeast added last, often in a small well on top of the flour).
- Letakkan Loyang Roti: Insert the bread pan into the bread machine, ensuring it clicks securely into place. Close the lid.
- Pilih Program: Plug in the machine. Use the "MENU" button to select the desired program (e.g., Basic White, French, Gluten Free).
- Pilih Saiz Roti dan Warna Kerak: Use the "LOAF SIZE" button to choose 1LB, 1.5LB, or 2LB. Use the "CRUST COLOR" button to select Light, Medium, or Dark.
- Mulakan Kitaran: Press the "START/STOP" button to begin the bread-making cycle. The machine will automatically mix, knead, rise, and bake.
- Keluarkan Roti: Once the cycle is complete (indicated by a beep), unplug the machine. Carefully remove the hot bread pan using oven mitts. Invert the pan to release the bread onto a wire rack to cool. Use the metal hook to remove the kneading paddle from the loaf if it remains embedded.

Figure 4: Unique 1-Press Bread Making process.
Program Tersedia
Your KITCHENARM bread machine features 19 pre-programmed menus, including 12 bread menus and 7 non-bread menus. Each program is optimized for specific recipes.
| Tidak. | Nama Program | Penerangan / Penggunaan Biasa |
|---|---|---|
| 1 | Putih asas | Untuk roti putih dan roti campuran. |
| 2 | Express White | Faster cycle for white bread. |
| 3 | manis | Untuk roti yang mempunyai kandungan gula yang tinggi. |
| 4 | Perancis | Untuk roti ringan dengan kerak rangup. |
| 5 | Tanpa Gluten | Khusus untuk resipi bebas gluten. |
| 6 | Gandum Penuh | For whole wheat flour breads. |
| 7 | Dark Rye | For rye bread recipes. |
| 8 | Multigrain | Untuk roti dengan pelbagai bijirin. |
| 9 | SD Starter | For preparing sourdough starter. |
| 10 | Asam masam | For baking sourdough bread. |
| 11 | doh | Prepares dough for manual shaping and baking. |
| 12 | Keto | For low-carb, ketogenic bread recipes. |
| 13 | Roti Pantas | For quick breads using baking powder/soda. |
| 14 | kek | Untuk membakar kek. |
| 15 | jem | Untuk membuat jem buatan sendiri. |
| 16 | Yogurt | For preparing yogurt. |
| 17 | Uli | Only performs kneading cycle. |
| 18 | bakar | Only performs baking cycle. |
| 19 | Home Made | Customizable program for advanced users. |
The machine supports 3 loaf sizes (1LB, 1.5LB, 2LB) and 3 crust colors (Dark, Medium, Light). It also features a 15-Hour Delay Timer and an ADD-NUTS Alarm for adding ingredients at the appropriate time.

Gambar 5: Cthamples of items that can be prepared with the 19 programs.
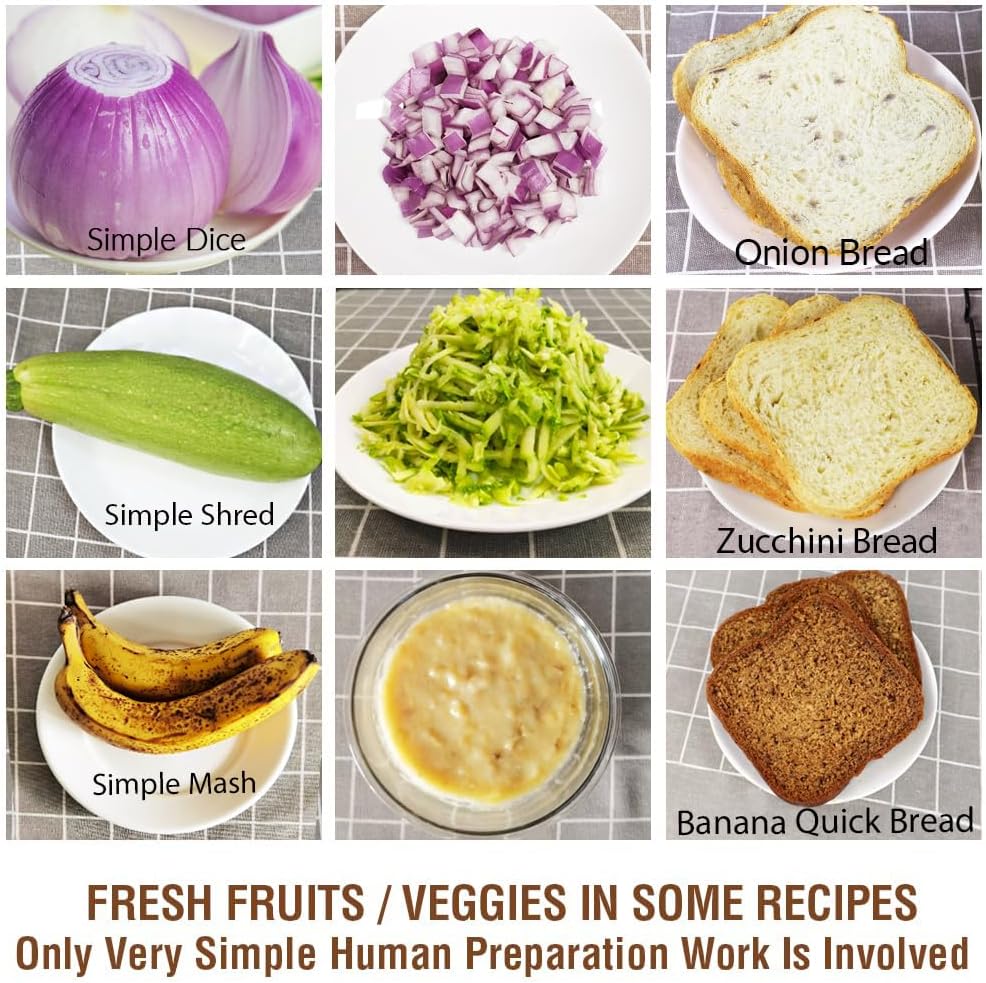
Figure 6: Preparation of fresh fruits and vegetables for recipes.
Penjagaan dan Penyelenggaraan
Pembersihan
Proper cleaning ensures the longevity and performance of your bread machine. Always unplug the machine and allow it to cool completely before cleaning.
- Kuali Roti dan Dayung Uli: The non-stick bread pan and kneading paddle should be hand washed only with warm, soapy water. Do not use abrasive cleaners or metal scouring pads, as this can damage the non-stick coating. Rinse thoroughly and dry completely.
- Luaran: Wipe the exterior body and control panel with a soft, damp kain. Jangan rendam unit utama dalam air atau sebarang cecair lain.
- Dalaman: Gunakan yang lembut, damp kain untuk mengelap bahagian dalam ruang pembakar. Keluarkan sebarang serbuk atau sisa.
- Tudung: The stainless steel lid can be wiped clean with a damp kain. Memastikan viewing window is clear.
Penyimpanan
Store the bread machine in a cool, dry place when not in use. Ensure all components are clean and dry before storage.
Menyelesaikan masalah
Bahagian ini membincangkan isu-isu biasa yang mungkin anda hadapi. Untuk masalah yang tidak disenaraikan di sini, sila hubungi khidmat pelanggan.
| Masalah | Kemungkinan Punca | Penyelesaian |
|---|---|---|
| Roti tidak naik atau terlalu banyak naik. | Incorrect yeast amount, expired yeast, incorrect water temperature, incorrect flour type, too much or too little liquid. | Ensure yeast is fresh and active. Use correct water temperature (lukewarm for active dry yeast). Measure ingredients precisely, preferably by weight. Refer to recipe book for correct flour type. |
| Roti terlalu padat atau berat. | Too much flour, too little liquid, old yeast, incorrect program. | Reduce flour slightly or increase liquid. Check yeast freshness. Ensure correct program is selected for the recipe. |
| Bread has a large hole at the bottom. | Kneading paddle left in bread during baking. | Some programs allow for removal of the kneading paddle before the final rise. Consult your recipe book or manual for specific program timings. Use the metal hook to remove the paddle after baking. |
| Machine does not start or respond. | Tidak dipasang, kuasa outage, pan not properly seated, lid not closed. | Ensure the machine is securely plugged into a working outlet. Check circuit breaker. Ensure bread pan is fully inserted and lid is closed. |
| Bunyi yang kuat semasa operasi. | Bread pan not seated correctly, foreign object in pan, machine on uneven surface. | Ensure bread pan is securely locked in place. Check for any foreign objects. Place machine on a stable, flat surface. |
Spesifikasi Produk
- Jenama: DAPUR
- Nombor Model: 851011
- warna: White Body - Stainless Steel Lid & Chamber
- Dimensi Produk (D x W x H): 9.4" x 13.9" x 11.7"
- Berat Barang: 11.97 paun
- Wattage: 550 watt
- Bilangan Program: 19
- Saiz Roti: 1LB, 1.5LB, 2LB
- Warna Kerak: Terang, Sederhana, Gelap
- Pemasa Kelewatan: Sehingga 15 jam
- Pensijilan: ETL Certified for US / Canada
- Pengeluar: Kitchenarm LLC
- Penjagaan Produk: Hand Wash Only (for bread pan and paddle)
Waranti dan Sokongan Pelanggan
KITCHENARM is committed to providing high-quality products and excellent customer service.
- Waranti Produk: This product comes with a 2-YEAR Product Warranty.
- Perkhidmatan Pelanggan: LIFETIME Customer Service is provided, including access to Cloud Recipes and Recipe Customization assistance.
- Alat Ganti: Original replacement parts are available.
For warranty claims, technical support, or to inquire about replacement parts, please contact Kitchenarm LLC customer service through their official channels. Refer to the contact information provided in your product registration or on the official KITCHENARM webtapak.

Figure 7: KITCHENARM commitment to warranty and customer service.
Ask a question about this manual
Ask about setup, troubleshooting, compatibility, parts, safety, or missing instructions. Manuals+ will review the question and use this page’s manual context to help answer it.