1. Pengenalan
The fishkeeper FK112-18W Aquarium Internal Filter is designed to maintain a healthy and clean aquatic environment for fish tanks ranging from 80 to 300 gallons. This submersible filter integrates four essential functions: filtration, aeration, wave-making, and water circulation. Its ultra-quiet operation and adjustable water flow make it suitable for various aquatic species in both freshwater and saltwater aquariums.

Image 1.1: The fishkeeper FK112-18W Aquarium Internal Filter installed in an aquarium.
2. Kandungan Pakej
Sila sahkan bahawa semua komponen berikut disertakan dalam pakej anda:
- 1x Internal Filter with Power Cord
- 1x Suction Cup Holder
- 4x Rubber Suction Cups
- 1x Aeration Connector
- 1x Air Tube with Regulator
- 1x Suction Nozzle
- 1x L-shaped Tube
- 1x Rain Shower Tube with Regulator
- 1x Activated Carbon Sponge
- 1x Blue Sponge
- 1x Manual Pengguna

Image 2.1: All components included in the filter package.
3. Spesifikasi
| Ciri | Spesifikasi |
|---|---|
| Model | FK112-18W |
| kuasa | 18W |
| Kadar Aliran | 450 GPH (1700 L/J) |
| Saiz Akuarium yang Disyorkan | 80-300 Gallons (300-1130 L) |
| Voltage / Kekerapan | AC110-120V/60Hz (US Standard) |
| Berat Barang | 1.26 paun |
| Dimensi Pakej Item | 9.45 x 4.06 x 3.31 inci |
| warna | Biru |
| Kegunaan Khusus | Penapisan Akuarium |
4. Maklumat Keselamatan
- Always disconnect the power supply before performing any maintenance, installation, or removal of the filter.
- Ensure the filter is fully submerged in water during operation to prevent damage to the motor and ensure quiet performance.
- Jangan kendalikan penapis jika kord kuasa atau palamnya rosak.
- This product is intended for indoor aquarium use only.
- Jauhkan daripada kanak-kanak.
5. Persediaan dan Pemasangan
Follow these steps for proper installation of your internal aquarium filter:
- Sediakan Penapis: Buka semua komponen dan pastikan ia bersih.
- Pasang Cawan Penyedut: Secure the four rubber suction cups to the suction cup holder on the back of the filter unit.
- Pilih Kaedah Pemasangan: Decide on your preferred water outlet method (rain shower pipe or flat water outlet) and aeration option. Refer to Image 5.1 for different installation configurations.
- Install Water Outlet:
- For Rain Shower Pipe: Connect the L-shaped tube to the filter's outlet, then attach the rain shower tube with regulator.
- For Flat Water Outlet: Attach the suction nozzle directly to the filter's outlet.
- Install Aeration Tube (Optional): If aeration is desired, connect the aeration connector to the filter's air intake, then attach the air tube with regulator. Position the air tube above the water surface. Refer to Image 5.3 for detailed steps.
- Letakkan Penapis: Submerge the filter completely in your aquarium. Use the suction cups to firmly attach the filter to the inside wall of the tank. Ensure the filter is 100% submerged in water before plugging it in.

Image 5.1: Different installation methods for the filter.

Image 5.2: The filter pump must be 100% submerged in water.

Image 5.3: Rainwater pipe and aerator tube installation steps.
6. Operasi
Once installed and fully submerged, plug the filter into a suitable power outlet. The filter will begin operating immediately, performing its 4-in-1 functions:
- Penapisan: Water is drawn through the biochemical sponge filter media.
- Pengudaraan: If the air tube is installed, air is drawn in and mixed with the water, increasing oxygen levels.
- Wave-making/Water Circulation: The outflow creates gentle water movement, distributing heat and nutrients.
Melaraskan Aliran Air: The filter features an adjustable flow rate. Rotate the knob on the water outlet to control the intensity of the water movement, tailoring it to the needs of your aquatic inhabitants.
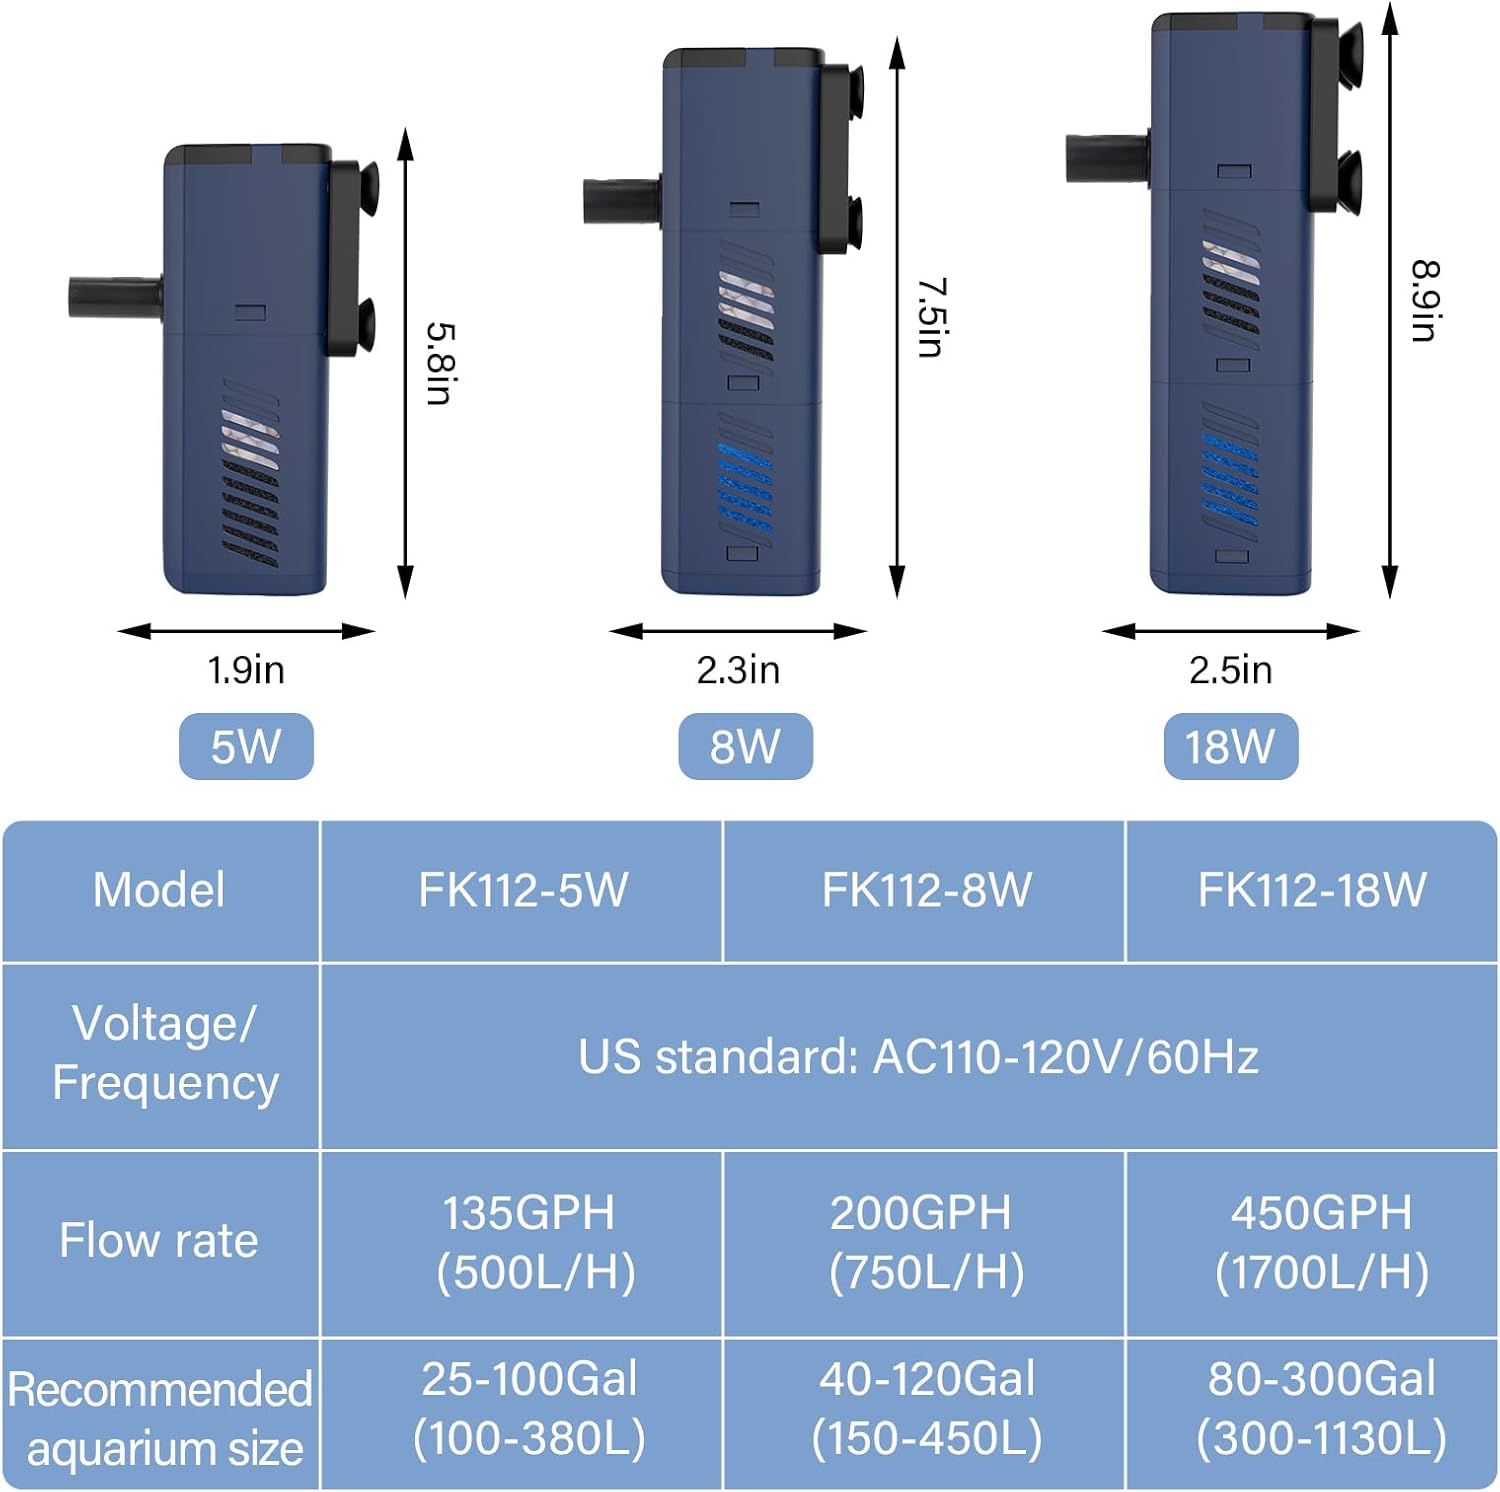
Image 6.1: Adjustable water flow mechanism.
Operasi senyap: The filter is designed with an advanced magnetic rotor noise-reduction system, ensuring operation with minimal sound. This contributes to a peaceful environment for both you and your aquarium inhabitants.

Image 6.2: Ultra-quiet operation.
7. Penyelenggaraan
Penyelenggaraan tetap adalah penting untuk prestasi optimum dan jangka hayat penapis anda. Sentiasa cabut plag penapis sebelum melakukan sebarang penyelenggaraan.
7.1. Membersihkan Span Penapis
The biochemical sponge filter effectively captures waste and cultivates beneficial bacteria. The sponges are washable and reusable.
- Keluarkan Penapis: Unplug the filter and carefully remove it from the aquarium.
- Buka: Hold the filter with both hands and turn the filter bucket to separate the filter housing.
- Keluarkan Span: Take out the activated carbon sponge and blue sponge.
- Clean Sponges: Rinse the sponges thoroughly in old aquarium water (from a water change) to preserve beneficial bacteria, or in dechlorinated tap water if a deep clean is needed. Avoid using untreated tap water as chlorine can kill beneficial bacteria.
- Pasang semula: Place the clean sponges back into the filter housing and reassemble the unit.

Image 7.1: Easy cleaning steps for filter sponges.

Image 7.2: Dual filtration system components.
7.2. Cleaning the Impeller
To maintain quiet operation and efficient water flow, it is suggested to clean the impeller monthly.
- Separate Pump and Filter: Unplug the filter and separate the pump section from the filter housing.
- Remove Impeller Cover: Carefully remove the impeller cover.
- Keluarkan Pendesak: Gently pull out the impeller.
- Komponen Bersih: Clean the impeller and the impeller chamber with a soft brush (not included) to remove any debris or buildup.
- Pasang semula: Reinsert the impeller, replace the impeller cover, and reattach the pump to the filter housing.

Image 7.3: Filter noise solution and impeller cleaning steps.
8. Penyelesaian masalah
If you encounter issues with your fishkeeper FK112-18W filter, refer to the following common problems and solutions:
| Masalah | Kemungkinan Punca | Penyelesaian |
|---|---|---|
| Aliran Air Berkurang | Clogged filter sponges or impeller. | Clean filter sponges and impeller as described in Section 7. |
| Filter is Noisy | Impeller is dirty, damaged, or not seated correctly. Air trapped in the pump. | Clean the impeller and impeller chamber. Ensure the impeller is properly seated. Gently shake the filter while submerged to release trapped air. Ensure filter is fully submerged. |
| Penapis Tidak Bermula | No power. Impeller jammed. | Check power connection. Ensure filter is plugged in. Disconnect power, remove and clean the impeller, then reassemble. |
| Poor Aeration | Air tube clogged or not positioned correctly. | Check and clean the air tube and regulator. Ensure the air tube's intake is above the water surface. |
9. Waranti dan Sokongan
The fishkeeper FK112-18W Aquarium Internal Filter comes with a Waranti 24 bulan (2 tahun). dari tarikh pembelian. Waranti ini meliputi kecacatan pembuatan dan memastikan produk bebas daripada kecacatan bahan dan mutu kerja di bawah penggunaan biasa.
If you experience any issues with your product or require assistance, please contact our customer support team. Our friendly support staff are available to help you with troubleshooting, parts replacement, or any other inquiries you may have.
For support, please refer to the contact information provided on the product packaging or the official fishkeeper webtapak.