1. Pengenalan
Thank you for choosing the Generic Solar Outdoor Wall Mounted Light. This manual provides essential information for the proper installation, operation, and maintenance of your solar light. Please read these instructions carefully before use and retain them for future reference.
This solar light is designed for outdoor use, providing illumination for fences, porches, patios, and other areas. It features automatic charging during the day and turns on automatically at night, incorporating a light-sensitive device and motion sensor for efficient operation.
2. Produk Lebihview
The solar light integrates a solar panel, LED light source, and motion sensor into a compact, wall-mountable unit. It is constructed from durable plastic, designed to withstand outdoor conditions.

Rajah 2.1: The solar light automatically charges during daylight hours and illuminates at night.
3. Kandungan Pakej
- 1 x Solar Outdoor Wall Mounted Light
- Perkakasan pemasangan (skru, palam dinding) - (Note: Specific hardware may vary, ensure suitability for your mounting surface)
- Manual Arahan (dokumen ini)
4. Spesifikasi
| Ciri | Spesifikasi |
|---|---|
| Nombor Model | B0DP9SQF81 |
| Dimensi | Approximately 5.98 × 5.12 inches (15.2 × 13 cm) |
| bahan | plastik |
| warna | Hitam |
| Sumber Cahaya | LED |
| Sumber Kuasa | Berkuasa Suria |
| Jenis Sensor | Light Sensitive Device, Motion Sensor |
| Berat Barang | 8.6 auns (lebih kurang 244 gram) |

Rajah 4.1: Dimensi produk untuk perancangan pemasangan.
5. Persediaan dan Pemasangan
5.1 Memilih Lokasi
- Select a location that receives at least 6-8 hours of direct sunlight daily to ensure optimal charging.
- Avoid placing the light under eaves, trees, or other obstructions that may block sunlight.
- Ensure the chosen location is away from other strong light sources (e.g., streetlights, other outdoor lights) at night, as these may interfere with the light sensor and prevent the solar light from turning on.
5.2 Arahan Pemasangan
- Sediakan Permukaan Pemasangan: Ensure the wall or fence surface is clean and stable.
- Tandakan Mata Gerudi: Hold the solar light in the desired position and mark the locations for the mounting screws.
- Lubang gerudi: Use an appropriate drill bit to drill holes at the marked points. Insert wall plugs if necessary for your mounting surface.
- Selamatkan Cahaya: Sejajarkan lampu dengan lubang yang digerudi dan pasangkannya dengan kuat menggunakan skru yang disediakan.
6. Arahan Operasi
6.1 Penggunaan Awal
Before first use, allow the solar light to charge in direct sunlight for at least 8-10 hours. This ensures the internal battery is fully charged for optimal performance.
6.2 Operasi Automatik
- The solar light is equipped with a light-sensitive device. It will automatically turn off and charge during the day when sufficient light is detected.
- At dusk or when ambient light levels drop, the light will automatically turn on.
6.3 Fungsi Sensor Gerakan
The integrated motion sensor detects movement within its range, typically up to 10 meters. When motion is detected, the light will illuminate at full brightness. After a period of no motion, the light will return to a dimmer state or turn off, depending on its specific mode (if multiple modes are available, refer to product packaging for details).
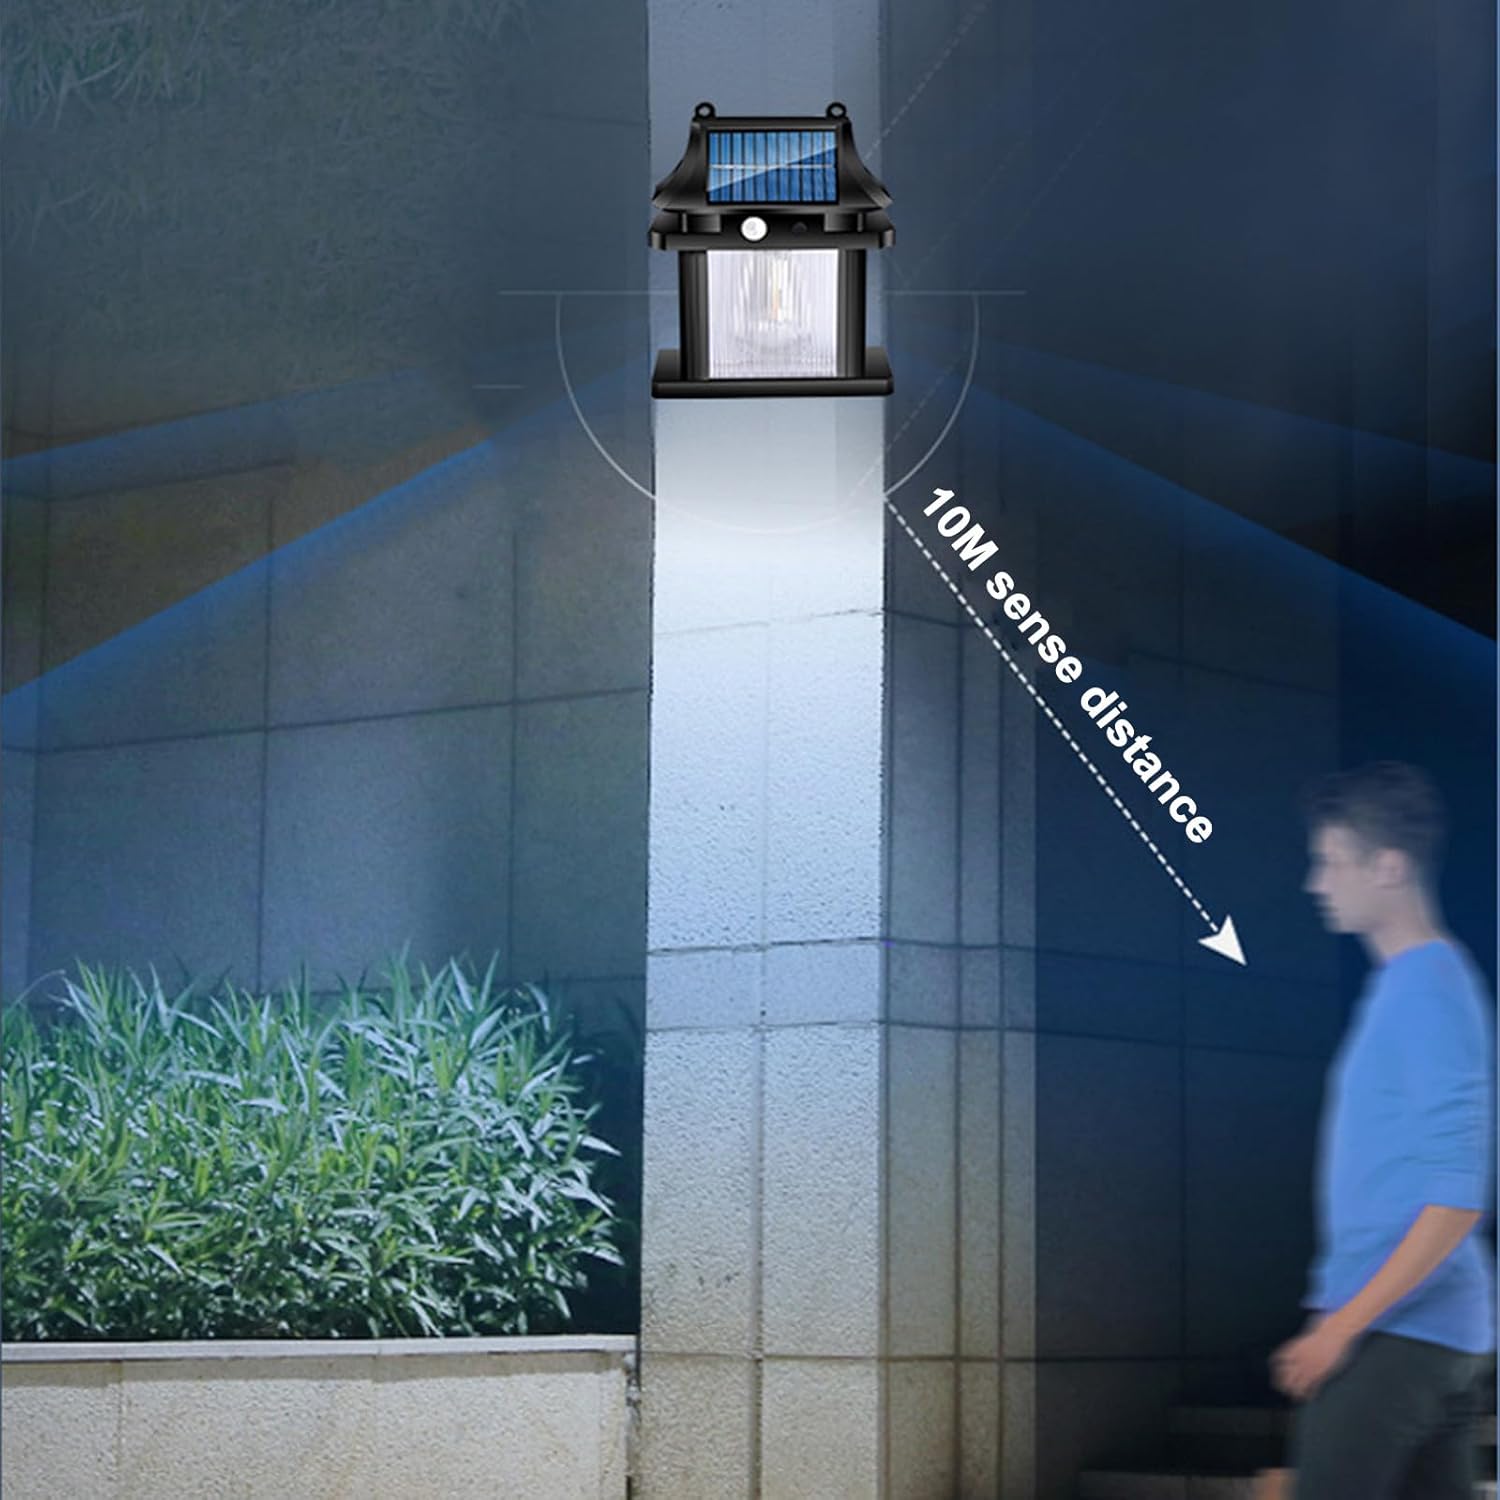
Rajah 6.1: The motion sensor detects movement up to 10 meters.
7. Penyelenggaraan
7.1 Pembersihan
- Bersihkan permukaan panel solar dengan kerap dengan lembut, damp kain untuk menghilangkan habuk, kotoran dan serpihan. Panel yang bersih memastikan pengecasan yang cekap.
- Do not use abrasive cleaners or harsh chemicals, as these can damage the solar panel or light housing.
7.2 Rintangan Cuaca
This solar light is designed to be waterproof and withstand various outdoor weather conditions, including rain. However, prolonged exposure to extreme weather may affect its lifespan.

Rajah 7.1: The solar light is designed to be waterproof.
8. Penyelesaian masalah
| Masalah | Kemungkinan Punca | Penyelesaian |
|---|---|---|
| Lampu tidak menyala pada waktu malam. | Cahaya matahari yang tidak mencukupi untuk pengecasan. | Relocate the light to an area with more direct sunlight. Ensure the solar panel is clean. |
| Gangguan cahaya ambien. | Ensure the light is not installed near other strong light sources (e.g., streetlights) that might trick the sensor into thinking it's daytime. | |
| Cahaya malap atau hanya menyala untuk masa yang singkat. | Bateri tidak dicas sepenuhnya. | Allow the light to charge for 1-2 full sunny days. Clean the solar panel. |
| Sensor gerakan tidak mengesan pergerakan. | Halangan dalam laluan sensor. | Clear any foliage or objects blocking the sensor's view. |
| Isu julat sensor. | Ensure movement is within the 10-meter detection range. |
9. Waranti dan Sokongan
For warranty information and customer support, please refer to the details provided by your retailer or contact the manufacturer directly. Keep your purchase receipt as proof of purchase.
If you encounter issues not covered in this manual, please reach out to the seller or manufacturer for assistance.