
ERY-100
Machinist MR9A PRO MAX X99 Motherboard User Manual
Model: ERY-100
1. Pengenalan
Welcome to the user manual for the Machinist MR9A PRO MAX X99 Motherboard. This guide provides detailed instructions for installing, operating, maintaining, and troubleshooting your motherboard. Please read this manual thoroughly before beginning installation to ensure proper setup and optimal performance.
The Machinist MR9A PRO MAX X99 is designed to support LGA 2011-3 Intel Xeon E5 V3&V4 CPU Processors and DDR4 RAM Memory, offering robust performance for various computing needs.
2. Produk Lebihview
2.1 Ciri-ciri Utama
- LGA 2011-3 Socket for Intel Xeon E5 V3&V4 Processors
- DDR4 RAM Memory Support (Four Channel)
- NVME M.2 SSD Support
- USB 3.0 Connectivity
2.2 Susun Atur Papan Induk dan Komponen
Biasakan diri anda dengan pelbagai komponen dan penyambung pada papan induk.

Figure 2.2.1: Detailed layout of the Machinist MR9A PRO MAX X99 Motherboard, highlighting key connectors such as CPU fan headers, power connectors (24PIN DC, 8PIN DC), DDR4 RAM slots, SATA ports, M.2 slots (SATA M.2, NVME M.2, WIFI M.2), USB 2.0 and 3.0 headers, PCIe slots, audio headers, and diagnostic card display.
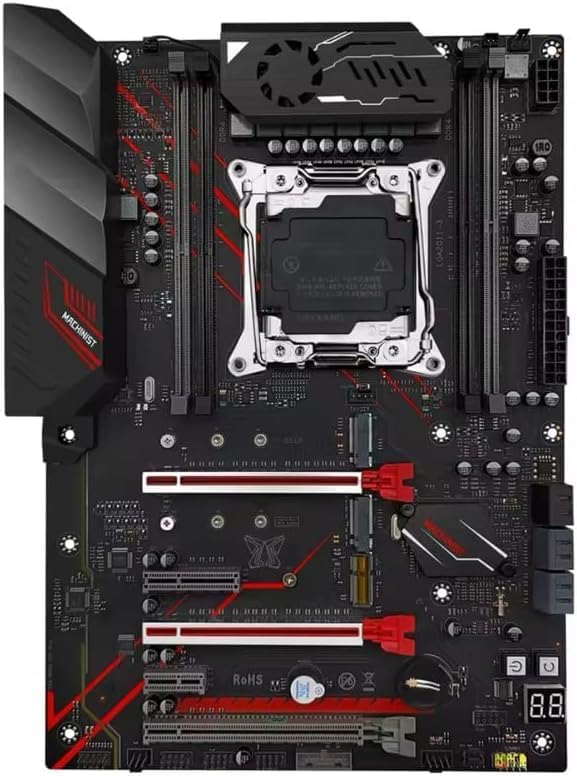
Rajah 2.2.2: Atas-bawah view of the Machinist MR9A PRO MAX X99 Motherboard, showcasing its overall design and component placement.
2.3 Dimensi

Figure 2.3.1: Dimensions of the Machinist MR9A PRO MAX X99 Motherboard, measuring approximately 300mm in length and 215mm in width.
2.4 Aksesori Termasuk

Figure 2.4.1: Standard accessories included with the motherboard, typically a CPU fan bracket with screws and a SATA data cable.
3. Spesifikasi
| Ciri | Spesifikasi |
|---|---|
| Pengeluar | MESIN |
| Nombor Model | ERY-100 |
| Soket CPU | LGA 2011-3 (Note: Product page lists LGA 1700, but title/description confirm LGA 2011-3 for Xeon E5 V3&V4) |
| Pemproses yang Serasi | Intel Xeon E5 V3&V4 Series |
| Teknologi Memori RAM | DDR4 |
| Saiz Maksimum Memori RAM | 64 GB |
| Slot Memori Tersedia | 4 (Four Channel) |
| Jenis Chipset | X99 (Note: Product page lists Intel B760, but title/description confirm X99) |
| Antaramuka Penyimpanan | SATA, NVME M.2 |
| Port USB | USB 3.0, USB 2.0 |
4. Arahan Persediaan
4.1 Sebelum Anda Bermula
- Ensure you have all necessary components: CPU, CPU cooler, RAM, storage devices (SSD/HDD), power supply, and a compatible PC case.
- Work on a clean, flat, and static-free surface. Use an anti-static wrist strap or frequently touch a grounded metal object to discharge static electricity.
- Refer to your PC case manual for specific mounting instructions.
4.2 Pemasangan Motherboard
- Sediakan Kes: Install the I/O shield into the rear opening of your PC case. Install standoffs in the case according to the motherboard's mounting holes.
- Pasang CPU: Open the CPU socket retention lever. Carefully align the CPU with the socket, ensuring the golden triangle on the CPU matches the triangle on the socket. Gently place the CPU into the socket without forcing it. Close the retention lever to secure the CPU.
- Pasang Penyejuk CPU: Apply thermal paste to the CPU if not pre-applied on the cooler. Mount the CPU cooler according to its instructions, ensuring it is securely fastened and makes good contact with the CPU. Connect the CPU fan cable to the 'CPU_FAN' header on the motherboard.
- Pasang RAM: Open the clips on the DDR4 memory slots. Align the RAM module with the slot, ensuring the notch on the module matches the key in the slot. Press down firmly on both ends of the module until the clips snap into place. For optimal performance, install RAM in the recommended dual-channel or quad-channel configuration as per the motherboard's silkscreen or manual.
- Pasang Peranti Storan:
- M.2 SSD: Insert the M.2 SSD into the appropriate M.2 slot (NVME M.2 or SATA M.2) at an angle, then gently push it down and secure it with the provided screw.
- Pemacu SATA: Connect SATA data cables from your SSDs/HDDs to the SATA ports on the motherboard.
- Pasang Papan Induk: Carefully place the motherboard into the PC case, aligning the screw holes with the installed standoffs. Secure the motherboard with screws.
- Sambungkan Bekalan Kuasa: Connect the 24-pin ATX power cable from your power supply to the main 24-pin power connector on the motherboard. Connect the 8-pin (or 4+4-pin) CPU power cable to the 8-pin CPU power connector. Connect SATA power cables to your storage drives.
- Sambungkan Kabel Panel Depan: Connect the power button, reset button, HDD LED, power LED, and USB/audio headers from your PC case to the corresponding pins on the motherboard's front panel header. Refer to the motherboard layout diagram (Figure 2.2.1) for pin locations.
- Pasang Kad Pengembangan: Insert graphics cards or other PCIe expansion cards into the appropriate PCIe slots and secure them with the case's retention mechanism.
5. Mengendalikan Motherboard
5.1 But Pertama dan Persediaan BIOS/UEFI
After completing the hardware installation, connect your monitor, keyboard, and mouse. Power on your system.
- Semasa proses but, tekan berulang kali DEL or F2 key (or as indicated on screen) to enter the BIOS/UEFI setup utility.
- In the BIOS/UEFI, you can configure boot order, system time, fan speeds, and other hardware settings. Ensure your storage drive is recognized and set as the primary boot device for OS installation.
- Save changes and exit the BIOS/UEFI. The system will restart.
5.2 Pemasangan Sistem Pengoperasian dan Pemacu
- Masukkan media pemasangan sistem pengendalian anda (pemacu USB atau DVD) dan ikut gesaan pada skrin untuk memasang OS pilihan anda.
- After OS installation, install the necessary drivers for your motherboard's components (chipset, LAN, audio, USB, etc.). These drivers are typically available on the manufacturer's website or included on a driver CD/USB drive with the motherboard.
- Regularly check the Machinist official website for the latest driver updates and BIOS/UEFI versions to ensure system stability and performance.
6. Penyelenggaraan
Proper maintenance can extend the lifespan of your motherboard and ensure stable operation.
- Penyingkiran habuk: Bersihkan habuk dari papan induk dan komponen secara berkala menggunakan udara termampat. Pastikan sistem dimatikan dan dicabut plag sebelum dibersihkan.
- Kemas Kini BIOS/UEFI: Update your BIOS/UEFI only when necessary, following the manufacturer's instructions carefully. Incorrect updates can damage the motherboard.
- Kemas Kini Pemandu: Pastikan pemacu anda dikemas kini untuk memastikan keserasian dan prestasi optimum dengan perisian dan perkakasan baharu.
- Pengurusan Kabel: Ensure cables inside the case are neatly routed to improve airflow and prevent obstruction.
7. Penyelesaian masalah
Bahagian ini menyediakan penyelesaian kepada isu biasa yang mungkin anda hadapi.
| Masalah | Kemungkinan Punca | Penyelesaian |
|---|---|---|
| Sistem tidak dihidupkan. | Kabel kuasa longgar, bekalan kuasa rosak, sambungan panel hadapan salah. | Check 24-pin and 8-pin power connections. Ensure power supply switch is ON. Verify front panel power button connection. Test with a known good power supply if possible. |
| Tiada paparan pada monitor. | Kad grafik tidak dipasang dengan betul, kabel monitor longgar, RAM rosak. | Reseat graphics card. Check monitor cable connections. Try reseating RAM modules or testing with one module at a time. |
| System powers on but no POST (Power-On Self-Test). | CPU not seated correctly, RAM issues, short circuit. | Reseat CPU and check for bent pins. Reseat RAM. Remove all non-essential components and test. Check for any loose screws or components touching the motherboard. |
| Sistem pengendalian tidak dikesan. | Incorrect boot order, faulty storage drive, loose SATA/M.2 cable. | Check BIOS/UEFI boot order. Ensure storage drive is properly connected. Test storage drive on another system if possible. |
| System crashes or freezes. | Terlalu panas, overclock tidak stabil, RAM rosak, pemacu ketinggalan zaman. | Monitor temperatures. Reset BIOS/UEFI to default settings. Run memory diagnostic tests. Update drivers. |
8. Waranti dan Sokongan
For specific warranty information regarding your Machinist MR9A PRO MAX X99 Motherboard, please refer to the warranty card included with your product or visit the official Machinist webtapak. Terma dan syarat waranti mungkin berbeza mengikut wilayah dan peruncit.
For technical support, driver downloads, and BIOS/UEFI updates, please visit the official Machinist support webtapak. Anda juga boleh menghubungi peruncit anda untuk mendapatkan bantuan.
Ask a question about this manual
Ask about setup, troubleshooting, compatibility, parts, safety, or missing instructions. Manuals+ will review the question and use this page’s manual context to help answer it.