
RAINPOINT HCS014ARF
RainPoint Wireless Weather Sensor Instruction Manual
Model: HCS014ARF | Brand: RAINPOINT
Produk Selesaiview
This high-precision wireless weather sensor operates at a 433.92 MHz RF frequency, offering a transmission range of up to 100 meters in open-air environments for flexible placement. It accurately measures temperatures from -40°C to +60°C (-40°F to +140°F) and humidity levels between 1%RH and 99%, ensuring reliable climate monitoring. The sensor automatically pairs with compatible WiFi Smart Weather Stations (B0BMG2XVDN) but cannot operate independently. Featuring a compact, portable design with a hanging rope, it is suitable for various indoor and outdoor applications. With three RF channels, users can monitor multiple locations simultaneously. Powered by two AA batteries (sold separately), this sensor provides a wire-free, hassle-free installation for continuous and accurate weather tracking.

Figure 1: RainPoint Wireless Weather Sensor
Apa yang ada dalam Kotak
- RainPoint Wireless Weather Sensor (Model: HCS014ARF)
- Manual Arahan (dokumen ini)
Nota: Dua bateri AA diperlukan untuk operasi dan dijual secara berasingan.
Spesifikasi
| Ciri | Perincian |
|---|---|
| Dimensi Produk | 0.94 x 1.81 x 5.1 inci; 1.92 auns |
| Nombor Model Item | HCS014ARF |
| Pengeluar | Baldr |
| Negara Asal | China |
| Jenama | TITIK HUJAN |
| Penggunaan yang Disyorkan | Garden, Laboratory, Home |
| Kegunaan Khusus | Monitor Humidity & Temperature, Work with WiFi weather station B0BMG2XVDN, Easy to hang everywhere |
| Sumber Kuasa | Dikuasakan Bateri (2 x bateri AA, tidak termasuk) |
| Ciri Khas | Penderia cuaca |
| bahan | plastik |
| Teknologi Ketersambungan | Wi-Fi (433.92 MHz RF frequency for sensor transmission) |
| Julat Suhu | -40°C hingga +60°C (-40°F hingga +140°F) |
| Julat Kelembapan | 1% RH hingga 99% RH |
| Julat Penghantaran | Up to 100 meters in open-air environments |
| Saluran RF | Three (for monitoring multiple locations) |

Figure 2: Key Specifications of the Weather Sensor
Panduan Persediaan
1. Pemasangan Bateri
The RainPoint Wireless Weather Sensor requires two AA batteries (not included). To install the batteries:
- Buka penutup petak bateri di bahagian belakang sensor.
- Masukkan dua bateri AA, pastikan kekutuban yang betul (+ dan -).
- Tutup penutup petak bateri dengan selamat.

Figure 3: Sensor with battery compartment visible.
After battery installation, the sensor's red light will flash, indicating it has entered matching mode.
2. App Installation and Account Creation (for compatible WiFi Smart Weather Station)
This sensor works exclusively with a compatible WiFi Smart Weather Station (e.g., B0BMG2XVDN) and its associated mobile application. The following video demonstrates the process of installing the "HomGar" app and creating an account, which is a prerequisite for using your weather station hub and connecting this sensor.
Video 1: BALDR APP Controlled Wi-Fi Weather Station Hub Setup. This video guides you through downloading the HomGar app, creating an account, and logging in, which are essential steps before pairing your weather station hub and sensor.
3. Pairing the Weather Station Hub with the App
The sensor communicates with a main WiFi Smart Weather Station Hub. The hub needs to be connected to your home WiFi network via the app. The video above also demonstrates this process. Ensure your hub is powered on and close to your 2.4 GHz Wi-Fi router.
- Open the HomGar app and tap the "+" icon on the home page to add a device.
- Select the "Display Hub" from the list of devices.
- Enter your 2.4 GHz Wi-Fi network password. (Note: This hub only works with 2.4 GHz Wi-Fi. If you have a dual-band router, ensure 2.4 GHz is enabled and smart connect is disabled).
- On the weather station hub, press and hold the `+ / Wi-Fi` button for 5 seconds until "SCAN" is displayed.
- The app will automatically search for and pair with the hub. Confirm the device when found.
If the Smart WiFi connection fails, you can try the AP connection mode. In the app, tap "Switch Mode" to enter AP Mode. Then, on the hub, hold the `+ / Wi-Fi` button for 5 seconds until "SCAN AP" is displayed. Connect your phone to the device's Wi-Fi hotspot (usually named "HomGar_XXXX") and then return to the app to complete pairing.
4. Pairing the Wireless Weather Sensor with the Hub
Once your WiFi Smart Weather Station Hub is successfully connected to the app, you can add the wireless sensor.
- In the HomGar app, navigate to the hub's device page.
- Select "Sub-devices" and then choose "Thermo-Hygro Sensor" to add.
- Ensure the sensor has fresh batteries installed (as per step 1). The sensor's red light should be flashing, indicating it's in matching mode.
- The gateway (hub) will automatically search for and pair with the sensor.
- Once paired, the sensor's data (temperature and humidity) will appear in the app.

Rajah 4: Viewing sensor data in the HomGar app and on the hub display.
Operasi
The RainPoint Wireless Weather Sensor continuously measures temperature and humidity. Data is transmitted wirelessly to your paired WiFi Smart Weather Station Hub, which then sends it to the HomGar mobile application.
- Pemantauan masa nyata: View current temperature and humidity readings directly on your weather station hub's display and within the HomGar app.
- Sejarah Data: The app provides charts and historical data, allowing you to track climate changes over time.
- Multi-location Monitoring: With three RF channels, you can connect multiple sensors to your hub to monitor different indoor or outdoor locations simultaneously.
- Penghantaran Jarak Jauh: The sensor offers a transmission range of up to 100 meters in open-air environments, providing flexibility in placement.

Figure 5: The sensor transmits data up to 100 meters to the main weather station hub.
Penyelenggaraan
- Penggantian Bateri: Replace the two AA batteries when the low battery indicator appears on the hub or app to ensure continuous operation.
- penempatan: While designed to withstand extreme weather, it is recommended to place the sensor under a cover and away from direct sunlight. This protects the sensor from potential heat sources and precipitation, contributing to more accurate readings and extended device life.
- Pembersihan: Lap sensor dengan lembut, damp cloth as needed. Do not use abrasive cleaners or immerse the device in water.
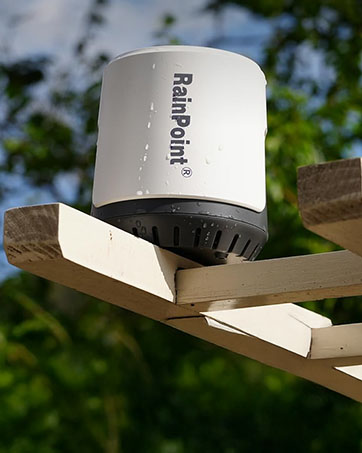
Gambar 6: Cthample of sensor placement under a protective cover.
Menyelesaikan masalah
| Masalah | Kemungkinan Punca / Penyelesaian |
|---|---|
| Sensor not pairing with hub. |
|
| Hab tidak bersambung ke Wi-Fi. |
|
| Bacaan suhu/kelembapan tidak tepat. |
|
| No data displayed in the app. |
|
Waranti dan Sokongan
For warranty information and technical support, please refer to the official RAINPOINT website or contact their customer service directly. Contact details are typically provided on the product packaging or the manufacturer's official support page.
Anda juga boleh melawat Kedai RAINPOINT di Amazon untuk mendapatkan lebih banyak maklumat produk dan sumber sokongan.
Ask a question about this manual
Ask about setup, troubleshooting, compatibility, parts, safety, or missing instructions. Manuals+ will review the question and use this page’s manual context to help answer it.