
1. Produk Lebihview
The JONSBO D32 STD Micro-ATX PC Case is a compact and highly compatible chassis designed for building high-performance desktop systems. It supports a wide range of hardware components, including back-connect motherboards, various cooling solutions, and long graphics cards, making it suitable for both gaming and business applications.
This manual provides detailed instructions for setting up, operating, maintaining, and troubleshooting your JONSBO D32 STD PC Case.

Figure 1: JONSBO D32 STD Micro-ATX PC Case, front view dengan komponen dalaman.
2. Ciri-ciri Utama
- Keserasian Tinggi: Supports MATX Back-Connect/BTF motherboards, 240mm AIO liquid coolers, 365mm GPUs, and ATX/SFX-L/SFX PSUs.
- Reka bentuk padat: Optimized for desktop use with a small footprint, featuring a magnetic dust-proof net at the bottom.
- Flexible Cooling Options: Accommodates up to 6 cooling fans (Top: 2x120mm/140mm, Bottom: 3x120mm/2x140mm, Rear: 1x120mm) and CPU air coolers up to 164mm (Intel) or 163mm (AMD).
- Konfigurasi Storan: Supports up to 3x 2.5" SSDs or 2x 2.5" SSDs + 1x 3.5" HDD.
- I/O Depan: Includes USB3.2 Gen1 Type-A (x1), USB3.2 Gen2 Type-C (x1), and a combined HP MIC 2-in-1 port.
3. Persediaan dan Pemasangan
3.1 Membongkar dan Pemeriksaan
Carefully remove the PC case from its packaging. Inspect the case for any signs of damage during transit. Ensure all accessories listed in the packing list are present. The case includes a plastic container with labeled bags for screws and zip ties for convenience.
3.2 Component Installation Guidelines
The D32 STD case is designed for efficient component installation. Follow these guidelines for optimal setup:
- Pemasangan Papan Induk: The case supports MINI-ITX and MICRO-ATX motherboards, including back-connect MICRO-ATX types. Ensure proper standoff alignment before securing the motherboard. For back-connect motherboards, the D32STD supports widths up to 207mm.
- Pemasangan Unit Bekalan Kuasa (PSU): The case supports ATX, SFX-L, and SFX PSUs. A front power structure improves internal space utilization. For ATX PSUs, the recommended length varies based on GPU installation: 150mm (GPU in 1st PCI-E slot) or 170mm (GPU in 2nd PCI-E slot). A 14cm ATX PSU is generally easier to manage. Note: Internal power adapter cable is incompatible with 16A plug power supply.
- Pemasangan Kad Grafik (GPU): The D32 STD supports graphics cards up to 365mm in length. The total clearance from the GPU backplane to the bottom is 94mm (1st PCI-E slot) or 73mm (2nd PCI-E slot). Adjust bottom fan installation based on GPU thickness and position.
- Pemasangan Sistem Penyejukan:
- Penyejukan Cecair: The top of the case supports 240mm AIO integrated liquid coolers. It can also accommodate a 30mm thick radiator with 30mm fans.
- Penyejukan Udara: Compatible with high-performance dual tower air-cooled radiators with a height of up to 164mm (Intel CPU) or 163mm (AMD CPU).
- Konfigurasi Kipas:
- Top: 2 x 120mm or 2 x 140mm fans
- Bottom: 3 x 120mm or 2 x 140mm fans (forms a high flow intake channel)
- Rear: 1 x 120mm fan
- Pemasangan Pemacu Storan: The case offers flexible storage options. It supports up to three 2.5" SSDs or a combination of two 2.5" SSDs and one 3.5" HDD.
- Pengurusan Kabel: Utilize the provided zip ties and the case's internal routing options to manage cables effectively. For back-connect motherboards, ensure sufficient space for stiffer power supply cables.

Figure 2: Motherboard tray with highlighted areas for back-connect motherboard support.

Figure 3: Power supply installation area and internal airflow design.

Figure 4: Graphics card length and clearance specifications.

Figure 5: Fan installation locations and sizes.

Figure 6: Storage drive installation options.
4. Mengendalikan Casing PC
Once all components are installed and secured, connect your peripherals and power cable. The front I/O panel provides convenient access to USB ports and audio jacks.
4.1 Front I/O Interface
- USB3.2 Gen1 Type-A: 1 port
- USB3.2 Gen2 Type-C: 1 port
- HP MIC 2 in 1 (Headphone & Microphone composite audio port): 1 port

Figure 7: Front I/O panel for easy connectivity.
4.2 Menghidupkan
Press the power button located on the front panel to turn on your system. Ensure all cables are securely connected before powering on.
5. Penyelenggaraan
Penyelenggaraan tetap membantu memastikan prestasi optimum dan jangka hayat komponen PC anda.
- Pengurusan habuk: The case features a magnetic dust-proof net at the bottom. Regularly remove and clean this filter to prevent dust buildup inside the case, which can hinder airflow and component cooling.
- Membersihkan Luaran: Gunakan yang lembut, damp cloth to clean the exterior surfaces of the case. Avoid abrasive cleaners or solvents.
- Pembersihan Dalaman: Periodically open the side panels and use compressed air to remove dust from internal components like fans, heatsinks, and circuit boards. Ensure the system is powered off and unplugged before performing internal cleaning.

Figure 8: Magnetic dust filter for easy cleaning.
6. Penyelesaian masalah
Bahagian ini menangani isu biasa yang mungkin anda hadapi dengan sarung PC anda.
6.1 Sistem Tidak Dihidupkan
- Semak Sambungan Kuasa: Ensure the PSU is properly connected to the wall outlet and the motherboard. Verify the power button cable from the case is correctly connected to the motherboard's front panel header.
- Suis PSU: Confirm the power switch on the PSU itself is in the "ON" position.
- Tempat Duduk Komponen: Reseat the CPU, RAM, and GPU to ensure they are properly seated in their respective slots.
6.2 Isu Terlalu Panas
- Konfigurasi Kipas: Verify that all installed fans are spinning and configured for optimal airflow (e.g., intake at front/bottom, exhaust at top/rear).
- Pengumpulan habuk: Bersihkan semua penapis habuk dan komponen dalaman seperti yang diterangkan dalam bahagian Penyelenggaraan.
- Tampal Terma: Ensure CPU cooler has adequate thermal paste application.
6.3 Port USB Tidak Berfungsi
- Front Panel Header: Check that the USB cables from the front I/O panel are securely connected to the correct headers on your motherboard.
- Isu Pemandu: Ensure your motherboard's chipset drivers are up to date.
7. Spesifikasi
| Ciri | Spesifikasi |
|---|---|
| Model Produk | D32 STD |
| Chassis Size (excluding protruding parts) | 384mm (L) x 207mm (W) x 302mm (H) |
| Chassis Size (including footrest) | 395mm (L) x 207mm (W) x 314mm (H) |
| Sokongan Papan Induk | MINI-ITX / MICRO-ATX / Back-connect MICRO-ATX |
| Slot Pengembangan | 4 |
| Bahan Casis | SPCC steel plate (Thickness: 0.7mm-0.8mm) |
| CPU Air Cooler Height Limit | 164mm MAX (Intel CPU) / 163mm MAX (AMD CPU) |
| CPU Water-cooled Radiator Support | Top 240 AIO |
| GPU Compatible Length | Sehingga 365mm |
| ATX PSU Length Limit | 150mm (GPU in 1st PCI-E slot) / 170mm (GPU in 2nd PCI-E slot) / 200mm (GPU length 288mm) |
| SFX PSU Support | SFX / SFX-L |
| Drive Bays | 3 x 2.5" SSD or 2 x 2.5" SSD + 1 x 3.5" HDD |
| I/O hadapan | 1x USB3.2 Gen1 Type-A, 1x USB3.2 Gen2 Type-C, 1x HP MIC 2-in-1 |
| Sokongan Peminat | Top: 2x120mm/2x140mm, Rear: 1x120mm, Bottom: 3x120mm/2x140mm |
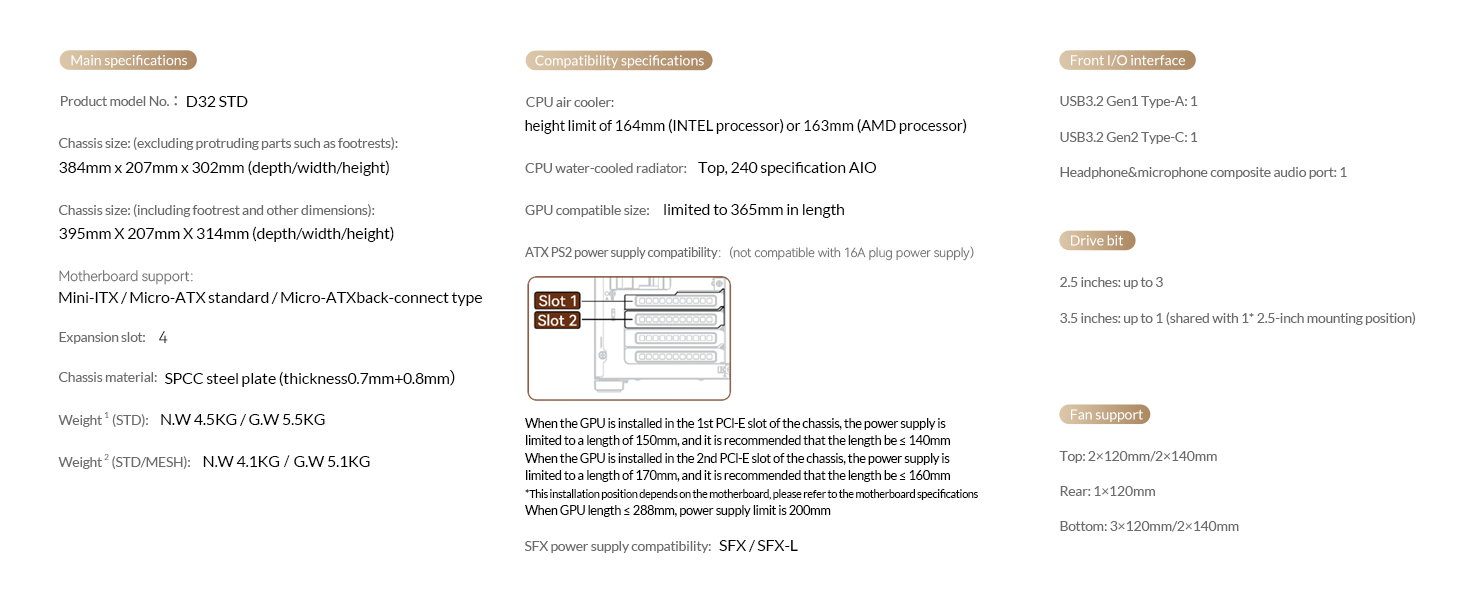
Figure 9: Comprehensive technical specifications.
8. Video Produk Rasmi
JONSBO D32 STD Micro ATX PC Case Overview
Video ini memberikan gambaran menyeluruhview of the JONSBO D32 STD Micro ATX PC Case, highlighting its features, design, and compatibility. It showcases the case from various angles and demonstrates its compact size and internal layout.
9. Waranti dan Sokongan
For warranty information and technical support, please refer to the official JONSBO webtapak atau hubungi perkhidmatan pelanggan mereka. Simpan resit pembelian anda sebagai bukti pembelian untuk tuntutan waranti.
Untuk sokongan tambahan, anda boleh melawati Jonsbo Store on Amazon.