
1. Pengenalan
The Ousmile YS-LSTM Wireless Laser Sprint Timer System is designed for accurate timing of sprints and speed training. It utilizes laser technology to detect start and finish lines, providing precise measurements for athletes and coaches. This system is suitable for various training environments, including track and field, 40-yard dashes, and 60-yard dashes.
Kandungan Pakej
Sila sahkan bahawa semua komponen terdapat dalam pakej anda:
- 1 x Digital Display Unit
- 1 x Laser Emitter Unit
- 2 x Laser Receiver Units
- 4 x Tripod Stands (High Stand)
- 1 x Beg Pembawa Aluminium
- 1 x Kabel Pengecasan
- 1 x Manual Pengguna

Image 1.1: All components included in the Ousmile YS-LSTM Wireless Laser Sprint Timer System package, neatly arranged.
2. Maklumat Keselamatan
Sila baca dan fahami langkah berjaga-jaga keselamatan berikut sebelum mengendalikan peranti ini:
- Keselamatan Laser: The system uses a low-power laser. Avoid direct eye exposure to the laser beam. Do not point the laser at people or animals.
- Keselamatan Bateri: Use only the provided charging cable. Do not attempt to open or modify the battery compartments. Avoid exposing batteries to extreme temperatures or direct sunlight.
- Keadaan Persekitaran: Operate the system within recommended temperature and humidity ranges. Avoid using in heavy rain or extreme dust conditions.
- Kestabilan: Ensure all tripod stands are securely placed on a stable, level surface to prevent tipping.
3. Panduan Persediaan
Follow these steps to set up your Ousmile Wireless Laser Sprint Timer System:
3.1 Mengecas Unit
Before first use, fully charge the Digital Display Unit, Laser Emitter Unit, and Laser Receiver Units. Connect the charging cable to the charging port on each unit and to a suitable USB power source. A full charge typically takes approximately 4 hours and provides up to 10 hours of operation.

Image 3.1: Illustration of the rechargeable battery feature and the charging port location on the timer units.
3.2 Assembling the Tripods and Units
- Extend the legs of each tripod stand to a stable position.
- Mount the Digital Display Unit onto one tripod stand.
- Mount the Laser Emitter Unit onto a second tripod stand.
- Mount the two Laser Receiver Units onto the remaining two tripod stands.
3.3 Positioning the System
For a standard sprint timing setup, position the units as follows:
- Baris Mula: Place one Laser Emitter Unit and one Laser Receiver Unit opposite each other at the starting line. Ensure the laser beam is aligned horizontally and passes through the center of the receiver's detection area.
- Finish Line: Place the second Laser Receiver Unit and the Digital Display Unit opposite each other at the finish line. The laser beam from the Emitter Unit at the start line should pass through the detection area of the Receiver Unit at the finish line.
- Penjajaran: Adjust the height and angle of the units on their tripods to ensure the laser beams are perfectly aligned and unbroken between the emitter and receivers. The system is designed to reject interference from visible light, allowing for reliable operation even in sunlight.

Imej 3.2: Selesaiview of the Ousmile YS-LSTM system setup, illustrating the placement of the display, emitter, and receiver units with laser beams.

Image 3.3: Two common setup configurations for the timer, showing how units are positioned at the start and finish lines.
4. Arahan Operasi
Once the system is set up and charged, follow these steps to begin timing:
4.1 Menghidupkan
- Locate the power switch on each unit (Digital Display, Laser Emitter, Laser Receivers).
- Turn on all units. The Digital Display Unit will illuminate, showing a default time or '00.00'.
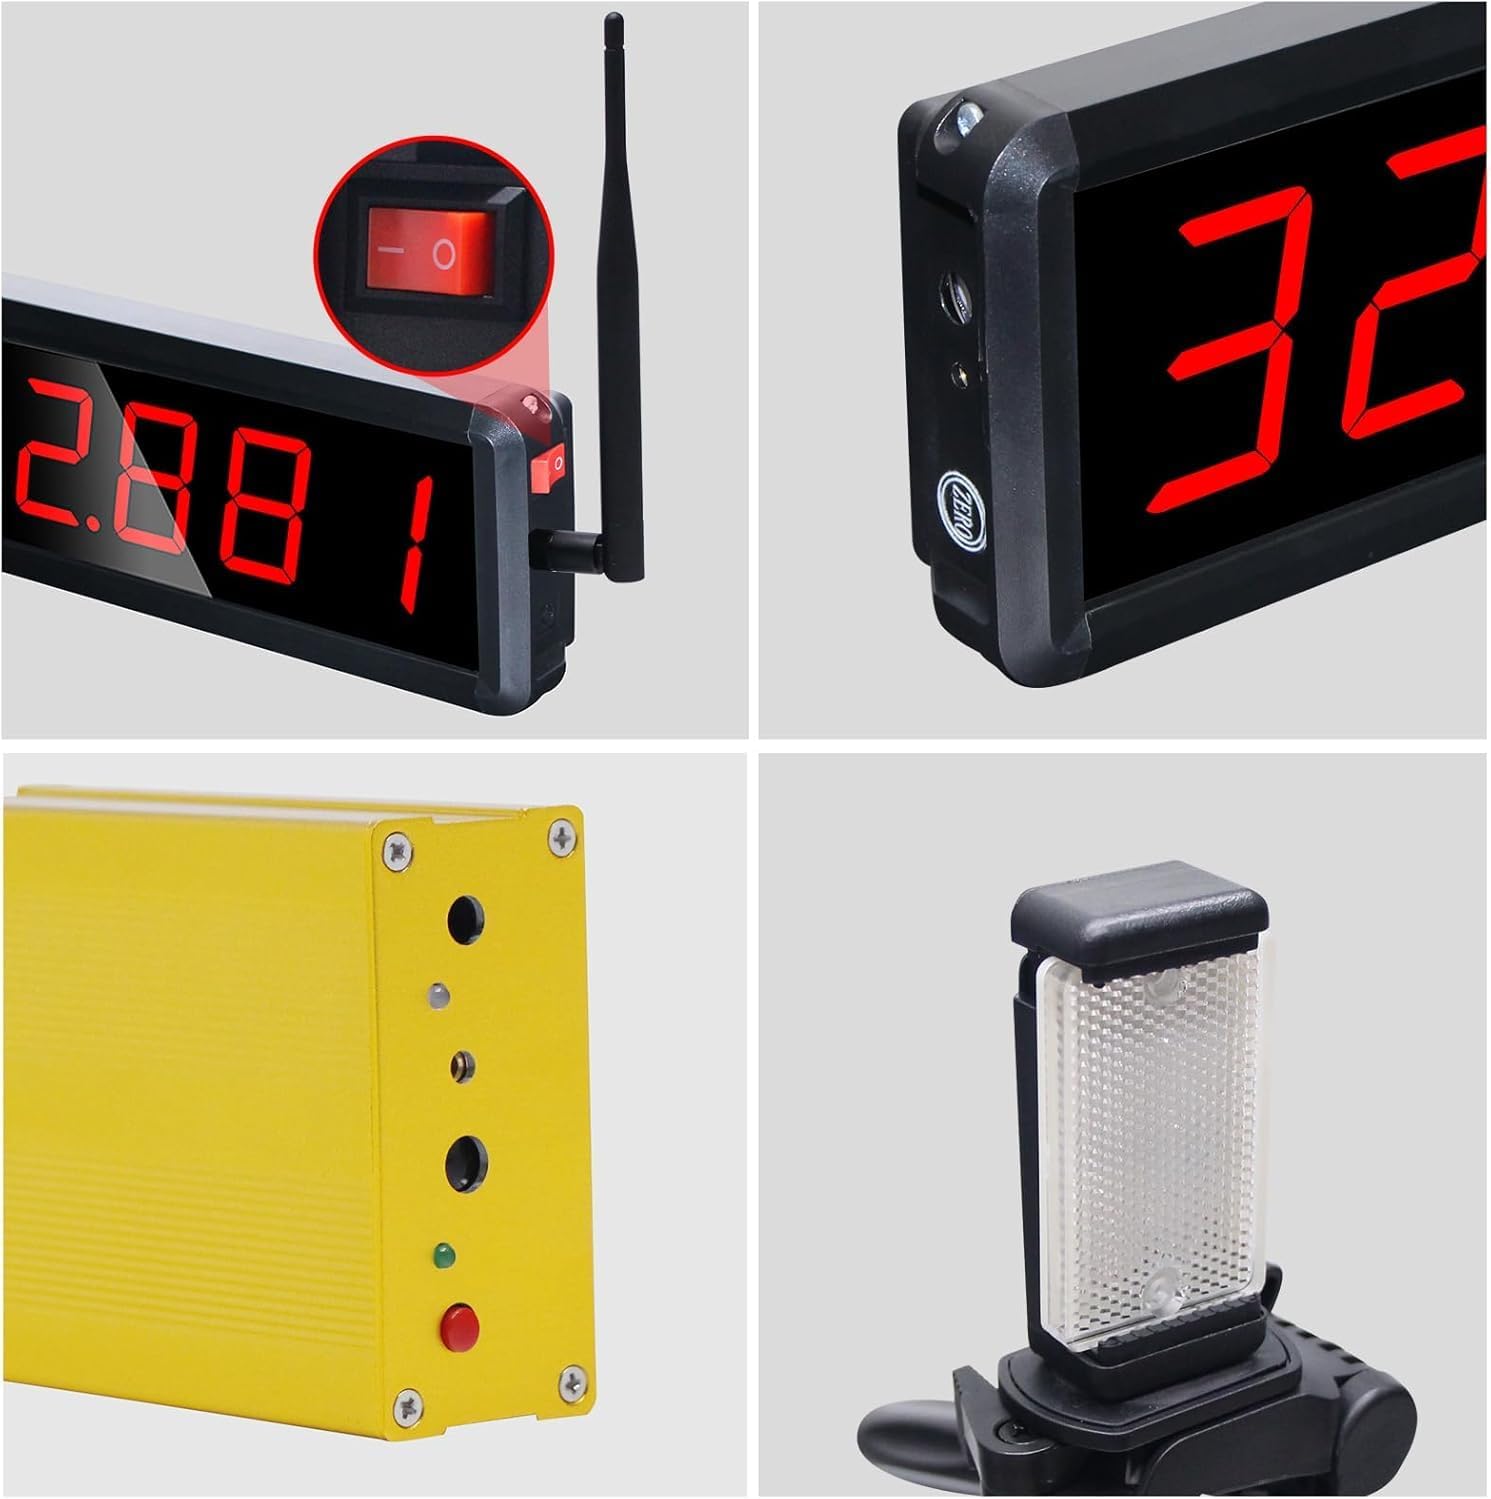
Imej 4.1: Terperinci view of the digital display, power switch, and laser unit components.
4.2 Starting and Stopping the Timer
- The timer automatically starts when the laser beam at the start line is broken (e.g., by an athlete passing through it).
- The timer automatically stops when the laser beam at the finish line is broken.
- The elapsed time will be displayed on the Digital Display Unit.
4.3 Membaca Paparan
The LED digital tube display is designed for clear visibility in various lighting conditions, including indoors, outdoors, day, or night, with no strobe effect.

Image 4.2: The clear and bright LED display is visible in diverse lighting environments.
4.4 Menetapkan Semula Pemasa
Refer to the specific instructions in the included quick start guide for details on resetting the timer for subsequent runs. Typically, the system will automatically reset or have a manual reset button on the display unit.

Image 4.3: An athlete being timed during a sprint using the Ousmile laser timer system.
5. Penyelenggaraan
Proper maintenance ensures the longevity and accuracy of your timer system:
- Pembersihan: Use a soft, dry cloth to clean the display and unit surfaces. For stubborn dirt, a slightly damp cloth can be used. Avoid abrasive cleaners or solvents.
- Penjagaan Bateri: Recharge the units regularly, especially if they will be stored for an extended period. Do not allow batteries to fully discharge for long durations.
- Storan: When not in use, store all components in the provided aluminum carrying case. Store in a cool, dry place away from direct sunlight and extreme temperatures.
- Kanta Laser: Keep the laser emitter and receiver lenses clean and free of dust or smudges to ensure accurate beam detection.
6. Penyelesaian masalah
If you encounter issues with your Ousmile timer system, refer to the following common problems and solutions:
| Masalah | Kemungkinan Punca | Penyelesaian |
|---|---|---|
| Timer not starting/stopping | Misaligned laser beam; low battery; obstruction in beam path. | Check laser alignment and adjust tripods. Ensure units are charged. Clear any obstructions. |
| Display not illuminating | Unit not powered on; low battery; faulty unit. | Ensure power switch is ON. Charge the unit. If problem persists, contact support. |
| Masa yang tidak tepat | Improper setup; external interference. | Review setup instructions for correct unit placement and alignment. Ensure no other devices are causing interference. |
| Units not communicating | Distance too great; signal interference; low battery. | Ensure units are within operational range. Minimize potential signal interference. Charge units. |
If you cannot resolve the issue using the above table, please contact Ousmile customer support.
7. Spesifikasi
| Ciri | Spesifikasi |
|---|---|
| Nama Model | YS-LSTM |
| Jenama | Ousmile |
| bahan | aluminium |
| Dimensi Produk (Paparan) | 3"D x 10"W x 8"H (approximate, based on general product dimensions) |
| Hayat Bateri | Sehingga 10 jam |
| Masa Mengecas | lebih kurang 4 jam |
| Jenis Paparan | Bright LED Digital Tube |
| Kestabilan Isyarat | Rejects visible light interference, works in sunlight |
| Gaya | 1 timer, 1 laser (high stand) |
| Berat Pakej | 3.1 Kilogram |

Image 7.1: Detailed dimensions of the system components, including the display, laser unit, carrying case, and adjustable tripod heights.
8. Waranti dan Sokongan
8.1 Maklumat Waranti
The Ousmile YS-LSTM Wireless Laser Sprint Timer System comes with a Waranti 1 tahun dari tarikh pembelian. Waranti ini meliputi kecacatan dan kerosakan pembuatan di bawah penggunaan biasa. Ia tidak meliputi kerosakan yang disebabkan oleh salah guna, kemalangan, pengubahsuaian tanpa kebenaran atau penyelenggaraan yang tidak betul.
8.2 Sokongan Pelanggan
For technical assistance, warranty claims, or any questions regarding your Ousmile product, please contact our customer support team. Refer to the contact information provided with your purchase or visit the official Ousmile webtapak.