1. Pengenalan
This user manual provides comprehensive instructions for the operation, maintenance, and troubleshooting of your HUNKSTAR Mini Projector. Please read this manual thoroughly before using the product to ensure proper functionality and to maximize your viewpengalaman dalam.

The HUNKSTAR Mini Projector, showcasing its compact design, included remote control, and a vibrant projected image.
2. Kandungan Pakej
Sahkan bahawa semua item yang disenaraikan di bawah disertakan dalam pakej anda:
- Projektor x 1
- Projector Lens Cover x 1
- Kord Kuasa x 1
- Alat kawalan jauh x 1
- Manual Pengguna x 1

All components included in the HUNKSTAR Mini Projector retail package.
3. Produk Lebihview
3.1 Dimensions and Basic Parameters
The projector features a compact design suitable for various environments.

Detailed dimensions and basic parameters of the HUNKSTAR Mini Projector.
3.2 Port Kesambungan
The projector is equipped with multiple ports for wide compatibility with various devices.

Berakhirview of the projector's multiple ports, including AV, USB, HDMI, and Audio, supporting various devices.
4. Persediaan
4.1 Penempatan
Letakkan projektor pada permukaan yang stabil dan rata. Pastikan terdapat pengudaraan yang mencukupi di sekeliling unit. Untuk optimum viewing, position the projector directly in front of the projection surface (screen or wall).
4.2 Sambungan Kuasa
- Sambungkan kord kuasa ke port input kuasa projektor.
- Pasangkan hujung kord kuasa yang satu lagi ke soket elektrik standard.
- Tekan butang kuasa pada projektor atau alat kawalan jauh untuk menghidupkan peranti.
4.3 Adjusting Projection Angle
The projector features a hidden bracket that allows for adjustment of the elevation angle from 0-20 degrees to achieve your desired projection height.

The hidden bracket allows for easy adjustment of the projector's elevation angle.
5. Arahan Operasi
5.1 Hidupkan/Mati Kuasa
Tekan butang kuasa pada projektor atau alat kawalan jauh untuk menghidupkan atau mematikan unit.
5.2 Navigasi
Use the directional buttons and OK/Enter button on the remote control to navigate through the projector's on-screen menu and select options.
5.3 Fokus Auto dan Pembetulan Keystone
The projector features screen adaptive technology with auto-focus and 6D keystone correction for convenient image adjustment. This allows for quick setup and clear projection without manual fine-tuning.
The auto-focus feature ensures a sharp image automatically.

Intelligent auto screen adaptation includes auto-focus, 6D keystone correction, and digital zoom for optimal image display.
6. Ketersambungan
6.1 Wi-Fi Connection (Wi-Fi 6)
The projector utilizes the latest Wi-Fi 6 technology, compatible with both 2.4G and 5G networks, providing faster and more stable wireless transmission for streaming content.
- Navigate to the Wi-Fi settings in the projector's menu.
- Pilih rangkaian Wi-Fi yang anda inginkan daripada senarai.
- Masukkan kata laluan rangkaian jika digesa.
- Sahkan sambungan.
6.2 Bluetooth Connection (Bluetooth 5.2)
With upgraded Bluetooth 5.2 technology, you can connect external speakers or headphones for enhanced audio output.
- Pastikan peranti audio Bluetooth anda berada dalam mod berpasangan.
- Pada projektor, navigasi ke tetapan Bluetooth.
- Pilih peranti anda daripada senarai peranti yang tersedia untuk dipasangkan.
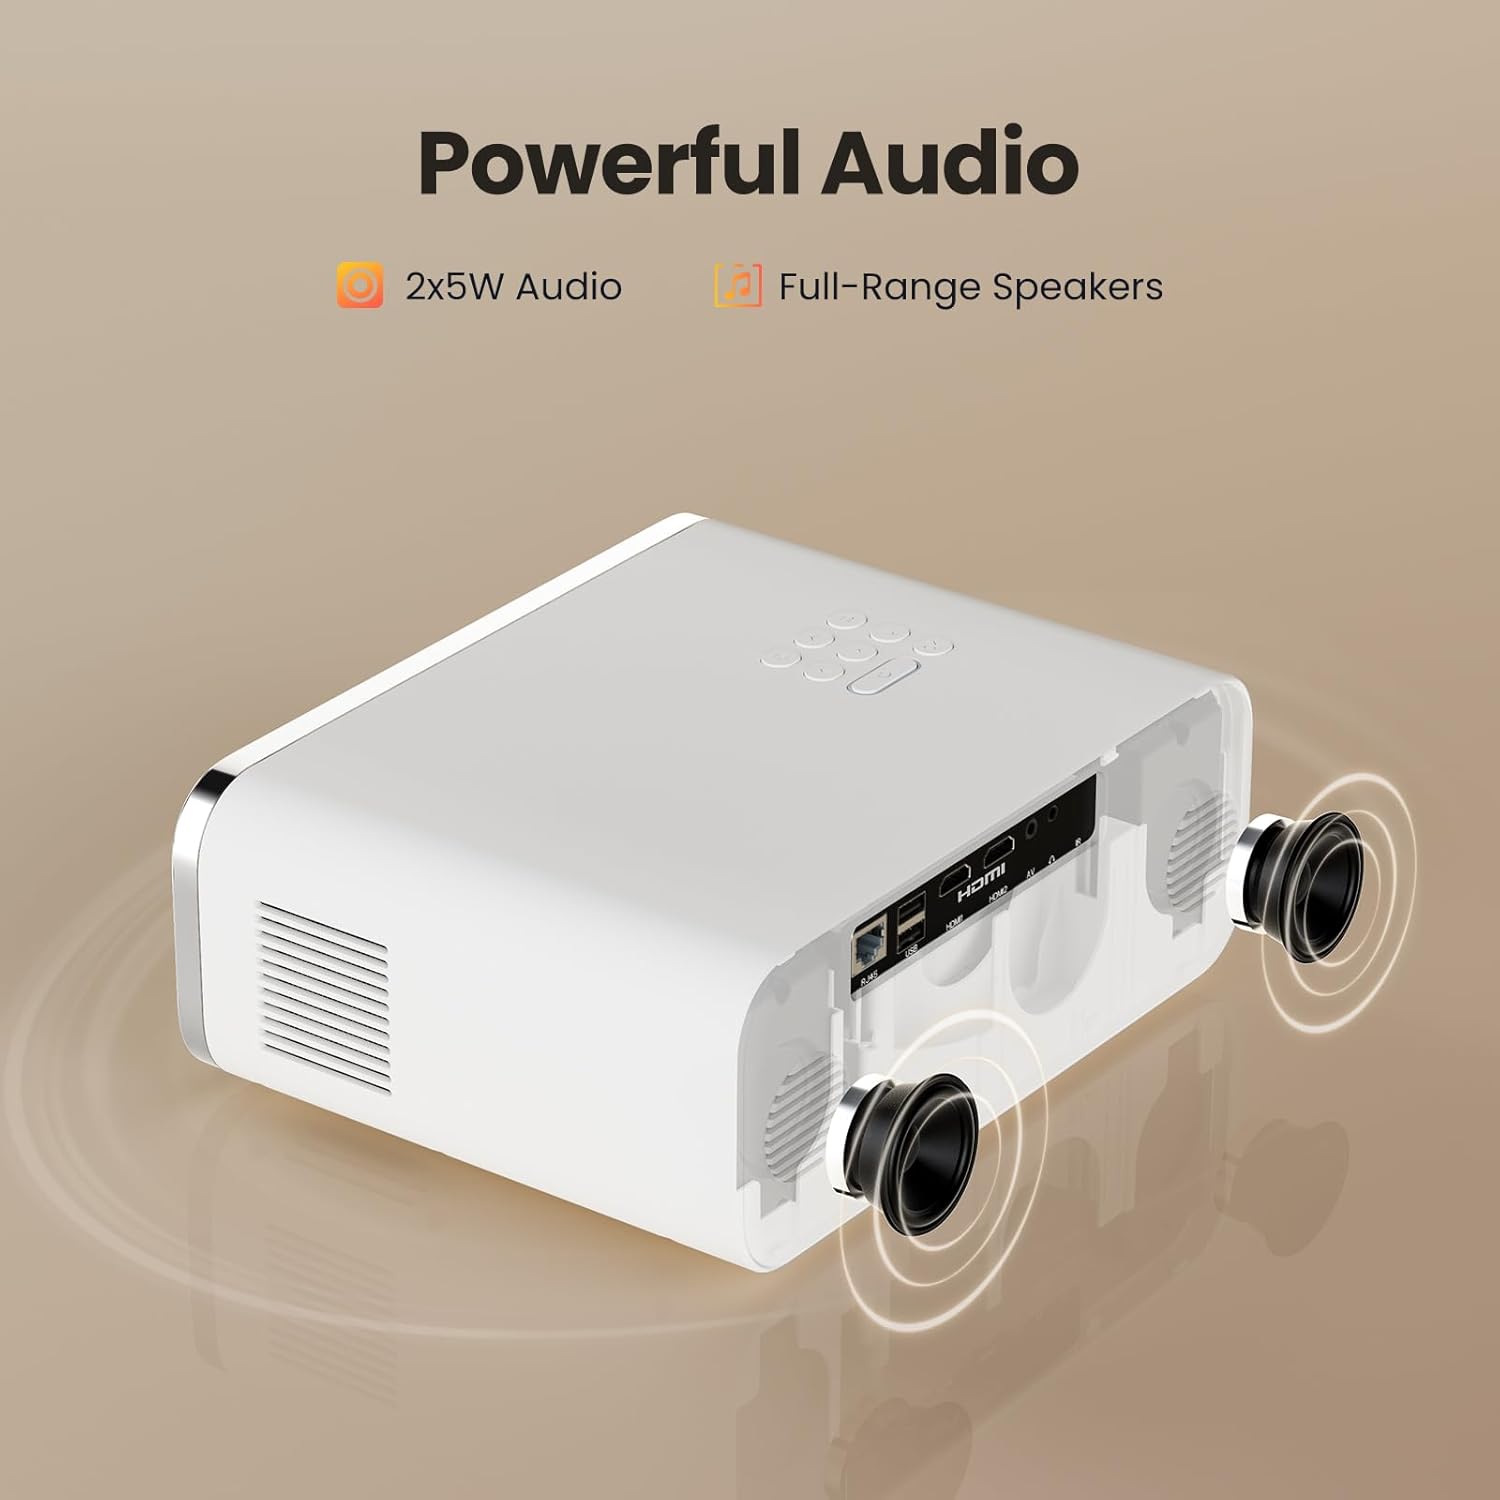
The projector features powerful 2x5W full-range speakers for immersive audio, with Bluetooth connectivity for external audio devices.
6.3 Sambungan Berwayar
Projektor ini menyokong pelbagai sambungan berwayar untuk peranti yang berbeza:
- HDMI: Connect gaming consoles (PS4, PS5, Switch), laptops, or TV sticks via the HDMI ports.
- USB: Sambungkan pemacu USB untuk main balik media secara langsung.
- DARI: Sambungkan peranti lama menggunakan port AV.
- Keluar Audio: Use the 3.5mm audio jack to connect external speakers or headphones.
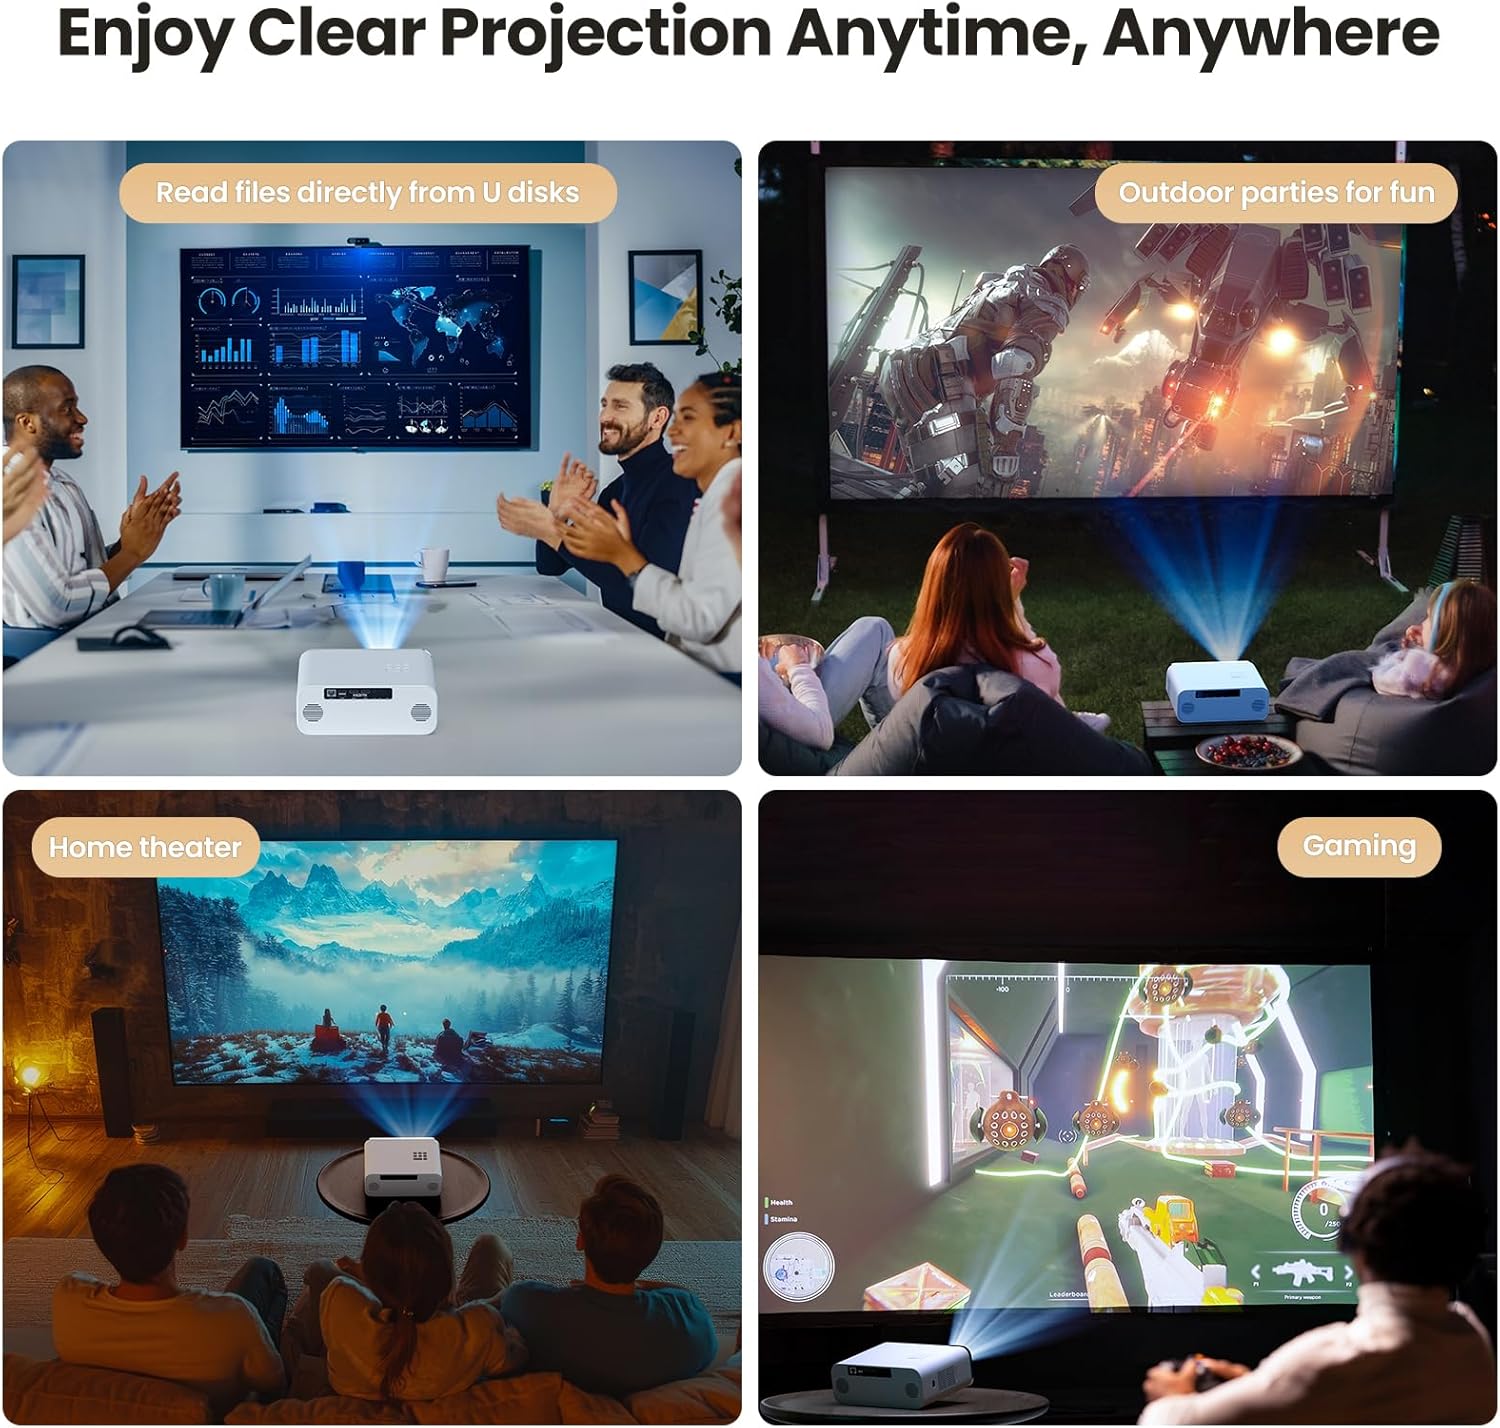
7. Senario Penggunaan
The HUNKSTAR Mini Projector is versatile and suitable for a variety of applications:
- Teater Rumah: Nikmati filem dan rancangan TV pada skrin besar.
- Permainan: Sambungkan konsol permainan anda untuk pengalaman permainan yang mengasyikkan.
- Parti Luar: Perfect for backyard movie nights or events.
- Persembahan: Display content from U disks for business or educational purposes.

The projector can be used for various activities, including home theater, outdoor entertainment, gaming, and presentations.
8. Spesifikasi
| Ciri | Spesifikasi |
|---|---|
| Jenama | HUNKSTAR |
| Nombor Model | HUNKSTAR |
| Resolusi Paparan | 1920 x 1080 (HD Penuh) |
| Kecerahan | 1000 ANSI Lumen |
| Teknologi Ketersambungan | HDMI, USB, AV, Bluetooth 5.2, Wi-Fi 6 |
| Ciri Khas | Auto Focus, Built-In Wi-Fi, 6D Keystone Correction |
| Penggunaan yang Disyorkan | Home Cinema, Business |
| Berat Barang | 3.52 paun |
| Dimensi Pakej | 14.25 x 10.2 x 5.75 inci |
| warna | putih |
9. Penyelesaian masalah
Jika anda menghadapi masalah dengan projektor anda, rujuk kepada masalah dan penyelesaian biasa berikut:
- Tiada Kuasa:
- Ensure the power cord is securely connected to both the projector and the power outlet.
- Periksa sama ada salur keluar kuasa berfungsi dengan betul.
- Tekan butang kuasa dengan kuat.
- Tiada Imej/Isyarat:
- Verify that the correct input source (HDMI, USB, AV) is selected on the projector.
- Check the connection cables between the projector and the source device.
- Pastikan peranti sumber dihidupkan dan mengeluarkan isyarat.
- Imej Kabur:
- Allow the auto-focus feature to adjust. If needed, slightly move the projector to trigger re-focusing.
- Ensure the projection surface is flat and the projector is positioned correctly.
- Check for any obstructions in front of the lens.
- Tiada Bunyi:
- Tingkatkan kelantangan pada kedua-dua projektor dan peranti sumber.
- If using external speakers, ensure they are properly connected via Bluetooth or the audio jack.
- Check if the audio output setting on your source device is configured correctly.
- Alat Kawalan Jauh Tidak Berfungsi:
- Gantikan bateri dalam alat kawalan jauh.
- Pastikan tiada halangan antara alat kawalan jauh dan penerima IR projektor.
10. Penyelenggaraan
- Membersihkan Lensa: Gunakan kain lembut dan bebas bulu yang direka khas untuk kanta optik. Jangan gunakan pembersih atau kain yang kasar.
- Membersihkan Badan Projektor: Lap bahagian luar dengan kain lembut dan kering. Untuk kotoran degil, gunakan sedikit kain lapamp kain dan kemudian keringkan dengan teliti.
- Pengudaraan: Ensure the ventilation vents are clear of dust and debris to prevent overheating. Do not block the vents during operation.
- Storan: Apabila tidak digunakan untuk tempoh yang lama, simpan projektor di tempat yang sejuk dan kering, sebaik-baiknya di dalam pembungkusan asalnya atau bekas pelindung.
11. Waranti dan Sokongan
For warranty information and customer support, please refer to the documentation provided with your purchase or contact HUNKSTAR customer service directly. Protection plans are available for extended coverage.