
pengenalan
This manual provides essential information for the safe operation, assembly, maintenance, and troubleshooting of your new Electric Children's Buggy Can-am Maverick. Please read this manual thoroughly before assembly and use to ensure proper function and safety.

Image: A dynamic side view of the Electric Children's Buggy Can-am Maverick, showcasing its robust design and vibrant blue and black color scheme.
Maklumat Keselamatan Penting
To reduce the risk of injury, adult supervision is required at all times. Never use this vehicle on roadways, near cars, near steep inclines or steps. Do not submerge the vehicle in water or other liquids.
- Always ensure the child is wearing appropriate safety gear, such as a helmet.
- Pastikan semua pengikat diketatkan dengan kukuh sebelum setiap penggunaan.
- Only operate on flat, dry surfaces away from hazards.
- Jauhkan tangan, rambut dan pakaian daripada bahagian yang bergerak.
Persediaan dan Perhimpunan
Assembly is required for this product. Please follow the steps below carefully.
Membongkar dan Pemeriksaan Awal
Carefully remove all components from the packaging. Verify that all parts listed in the packing list are present and undamaged. If any parts are missing or damaged, do not proceed with assembly and contact customer support.
Langkah Perhimpunan
- Pemasangan Roda: Attach the wheels to the axles, ensuring they are securely fastened with the provided hardware.
- Pemasangan Roda Stereng: Connect the steering wheel to the steering column. Ensure it clicks into place or is secured with the designated screw.
- Pemasangan tempat duduk: Place the seats into the designated slots and secure them. Ensure seatbelts are accessible and functional.
- Sambungan Bateri: Connect the battery terminals. Refer to the battery compartment for specific instructions. Ensure the connection is firm.
- Pertuduhan Pertama: Sebelum penggunaan pertama, cas sepenuhnya bateri selama 8-12 jam. Jangan cas berlebihan.

Imej: Belakang view of the electric buggy with the door open, highlighting the spacious interior and robust rear suspension components.
Arahan Operasi
Kawal Selesaiview

Image: The dashboard of the electric buggy, featuring the steering wheel, a digital speedometer display, and a multimedia screen.
- Butang Mula / Berhenti: Located near the key slot, press to turn the vehicle on or off.
- Pedal Pemecut: Press to move forward. Release to brake.
- Roda stereng: Belok kiri atau kanan untuk mengemudi kenderaan.
- Pemilih Gear: (If applicable) Switch between forward, neutral, and reverse.
- Multimedia Screen: Provides entertainment and vehicle information.
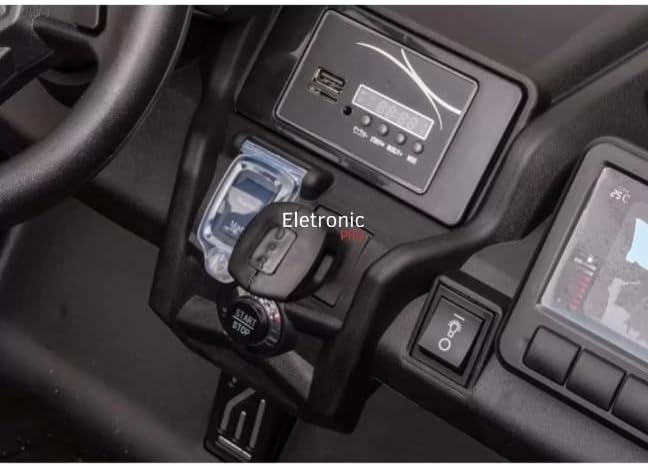
Imej: Dari dekat view of the electric buggy's central console, showing the start/stop button and the key ignition slot.
Memandu Kenderaan
- Ensure the child is seated properly and the seatbelt is fastened.
- Press the Start/Stop button to power on the vehicle.
- Gently press the accelerator pedal to move forward. Release the pedal to stop.
- Use the steering wheel to navigate.
- Always supervise the child during operation.

Image: The interior of the electric buggy, featuring two black, contoured seats equipped with safety seatbelts.
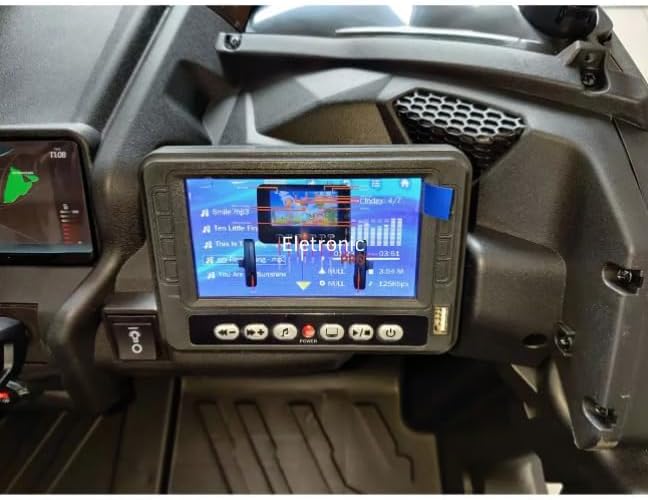
Image: A close-up of the electric buggy's multimedia screen, showing a music playback interface with song titles and an equalizer display.
Penyelenggaraan
Penjagaan Bateri
- Cas bateri selepas setiap penggunaan.
- Jangan benarkan bateri dinyahcas sepenuhnya.
- If storing for extended periods, charge the battery once a month.
- Hanya gunakan pengecas yang disediakan bersama kenderaan.
Pembersihan dan Penyimpanan
- Wipe the vehicle with a damp kain. Jangan gunakan pembersih yang kasar.
- Simpan kenderaan di tempat yang kering dan sejuk, jauh daripada cahaya matahari langsung dan kelembapan.
- Lindungi kenderaan daripada suhu yang melampau.
Menyelesaikan masalah
| Masalah | Kemungkinan Punca | Penyelesaian |
|---|---|---|
| Kenderaan tidak bergerak | Battery is low or disconnected; Loose wire connection; Blown fuse. | Charge battery; Check battery connections; Check fuse and replace if necessary. |
| Kenderaan berjalan perlahan | Battery is low; Overloaded vehicle; Operating on rough terrain. | Recharge battery; Reduce load; Operate on smoother surfaces. |
| No sound from multimedia screen | Volume is too low; Audio cable disconnected. | Increase volume; Check audio connections. |
Spesifikasi
- model: DK-CA001
- Jenama: Generik
- Umur Disyorkan: 36 bulan - 8 tahun
- Bahan: Plastic, Rubber, Steel Alloy
- Dimensi Produk: 145 x 84 x 79 cm
- Berat produk: 42 kg
- Perhimpunan Diperlukan: ya
- Pensijilan: Tidak Berkenaan
Waranti dan Sokongan
This product comes with a return policy of 7 days from the date of purchase. For any issues, questions, or to claim warranty support, please contact the seller directly. Please retain your proof of purchase for any warranty claims.
Penjual: ELETRONIC PRO LTDA