
1. Produk Lebihview
The AITRIP ESP32-C3 MINI Development Board is a compact, high-performance, and low-power IoT development board. It features an ESP32-C3 32-bit RISC-V single-core processor with an integrated FPU, operating at up to 160 MHz. This board is designed for low-power IoT applications and wireless wearable devices, offering WiFi and Bluetooth connectivity.
The package includes the ESP32-C3 development board and an accompanying expansion board, providing a rich set of interfaces for various projects.
Ciri-ciri Utama:
- Pemproses: ESP32-C3, 32-bit RISC-V single-core, up to 160 MHz with FPU.
- Ketersambungan: Integrated WiFi and Bluetooth.
- Ingatan: 400 KB RAM, 4 MB Flash.
- I/O: 11 digital I/Os (PWM capable), 4 analog I/Os (ADC capable).
- Antara muka: UART, I2C, SPI.
- Butang: Reset button and Bootloader mode button.
- Bekalan Kuasa: Supports 3.3V to 6V external power supply.
Permohonan:
The ESP32-C3's low power consumption makes it suitable for various IoT applications, including:
- Peranti Rumah Pintar
- Mesin POS
- Automasi Perindustrian
- Robot Perkhidmatan
- Health Care devices
- Peranti Audio
- Elektronik Pengguna
- Generic Low-power IoT Sensor Hubs
- Smart Agriculture solutions
- Logger Data IoT berkuasa rendah Generik

Image: The AITRIP ESP32-C3 MINI Development Board shown with its accompanying expansion board.
2. Persediaan dan Sambungan
2.1 Bekalan Kuasa
The ESP32-C3 MINI Development Board can be powered via the USB-C port or an external power supply.
- Kuasa USB: Sambungkan papan ke komputer atau penyesuai kuasa USB 5V menggunakan kabel USB-C.
- Bekalan Kuasa Luaran: If using an external power supply, connect the positive (+) terminal of the external supply to the 5V pin on the board and the negative (-) terminal to the GND pin. The external power supply should be between 3.3V and 6V.
Important: When using an external power supply, do not connect the USB cable simultaneously. Only one power source (USB or external) should be connected at a time to prevent damage to the board.
2.2 Gambarajah Pinout
Understanding the pinout is crucial for connecting peripherals and sensors. The board provides various GPIOs, ADC pins, and serial communication interfaces.

Image: Detailed pinout diagram for the ESP32-C3 Super Mini Development Board, showing power, GND, ADC, SPI, Digital, and UART pins.
2.3 Expansion Board Connection
The included expansion board simplifies connections by breaking out the pins into more accessible headers, often with power rails. To connect the ESP32-C3 MINI Development Board to the expansion board:
- Align the pins of the ESP32-C3 MINI Development Board with the corresponding female headers on the expansion board.
- Gently press the development board into the expansion board until it is securely seated. Ensure all pins are correctly aligned to avoid bending or damage.

Image: The ESP32-C3 MINI Development Board securely mounted onto its expansion board, ready for use.
3. Arahan Operasi
3.1 Programming the Board
The AITRIP ESP32-C3 MINI Development Board is compatible with various development environments, including the Arduino IDE and Espressif's ESP-IDF. To program the board:
- Pasang Pemacu: Ensure necessary USB-to-serial drivers are installed on your computer.
- Setup IDE: Configure your chosen IDE (e.g., Arduino IDE) to support ESP32-C3 boards. This typically involves adding the Espressif board manager URL and installing the ESP32 boards package.
- Connect Board: Connect the development board to your computer via the USB-C cable.
- Pilih Papan dan Pelabuhan: In your IDE, select the correct board model (ESP32-C3 Dev Module) and the serial port assigned to your board.
- Kod Muat Naik: Write or load your program (sketch) and click the upload button. The IDE will compile and upload the code to the ESP32-C3.
3.2 Using Buttons
- Butang Tetapkan Semula: Pressing the reset button will restart the program currently running on the ESP32-C3.
- Bootloader Mode Button: This button is typically used in conjunction with the reset button to put the ESP32-C3 into bootloader mode, which is necessary for flashing new firmware. Consult your IDE's documentation for the specific button sequence required for your programming setup.
3.3 Interfacing with Peripherals
The board offers multiple interfaces for connecting external components:
- Pin GPIO: Use the General Purpose Input/Output pins for digital input/output, PWM, and other functions. Refer to the pinout diagram for specific pin capabilities.
- ADC Pins: The Analog-to-Digital Converter pins allow the board to read analog sensor data.
- UART: Universal Asynchronous Receiver/Transmitter for serial communication with other devices or for debugging via a serial monitor.
- I2C: Inter-Integrated Circuit bus for connecting multiple low-speed peripheral devices with two wires (SDA and SCL).
- SPI: Serial Peripheral Interface for high-speed synchronous serial communication with devices like displays or SD card modules.
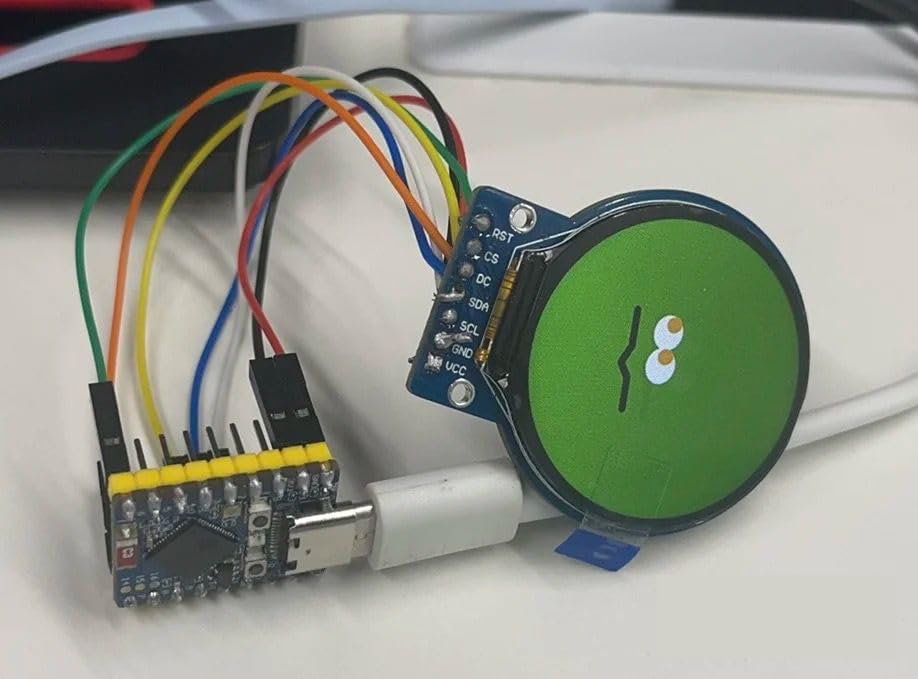
Imej: Bekasample setup showing the ESP32-C3 MINI Development Board connected to an external display via jumper wires.
4. Penyelenggaraan dan Penjagaan
To ensure the longevity and proper functioning of your AITRIP ESP32-C3 MINI Development Board, follow these maintenance guidelines:
- Tangani dengan Berhati-hati: Electronic components are sensitive. Avoid dropping the board or subjecting it to physical shock.
- Pelepasan Statik: Always handle the board in a static-safe environment. Use an anti-static wrist strap if available.
- Keringkan: Protect the board from moisture and liquids. Water can cause short circuits and permanent damage.
- Kebersihan: Keep the board free from dust and debris. Use a soft, dry brush or compressed air for cleaning. Avoid using liquid cleaners.
- Storan: Store the board in its original packaging or an anti-static bag when not in use, away from extreme temperatures.
- Matikan Sebelum Menyambung: Always disconnect power before connecting or disconnecting any wires or components to the board.
5. Penyelesaian masalah
If you encounter issues with your ESP32-C3 MINI Development Board, consider the following troubleshooting steps:
- Papan Tidak Dikesan oleh Komputer:
- Pastikan kabel USB-C dimasukkan sepenuhnya dan berfungsi.
- Verify that the correct USB-to-serial drivers are installed for your operating system.
- Cuba port USB atau kabel lain.
- Code Upload Fails:
- Check that the correct board and serial port are selected in your IDE.
- Ensure the board is in bootloader mode if required by your IDE (often by holding the Boot button while pressing and releasing Reset, then releasing Boot).
- Sahkan kod anda untuk ralat sintaks.
- Tiada Penunjuk Kuasa:
- Confirm the power source (USB or external) is providing the correct voltage.
- Periksa sambungan yang longgar.
- WiFi/Bluetooth Connectivity Issues:
- Ensure your code correctly initializes and configures the WiFi or Bluetooth module.
- Semak gangguan daripada peranti wayarles lain.
- Verify antenna connections if applicable (this board has an integrated antenna).
- Tingkah laku yang tidak dijangka:
- Review your code logic for errors.
- Check all wiring connections to external components.
- Ensure external components are powered correctly and compatible with the ESP32-C3's voltage peringkat.
For more detailed troubleshooting or specific programming issues, refer to the extensive online documentation and community forums available for ESP32-C3 development boards.
6. Spesifikasi
Below are the technical specifications for the AITRIP ESP32-C3 MINI Development Board:
| Ciri | Spesifikasi |
|---|---|
| Jenama | AITRIP |
| Nama Model | ESP32-C3 Mini Development Board |
| Pemproses | ESP32-C3, teras tunggal RISC-V 32-bit |
| Kelajuan CPU | 160 MHz |
| Saiz Terpasang Memori RAM | 400 KB |
| Kapasiti Penyimpanan Memori | 4 MB |
| Teknologi Ketersambungan | Wi-Fi, Bluetooth, I2C, SPI, UART, GPIO |
| Keserasian Tanpa Wayar | 802.11n |
| Keserasian Sistem Pengendalian | Linux (for development environment) |
| Peranti Serasi | Arduino microcontrollers (for programming environment) |
| UPC | 687117740892 |
| ASIN | B0DCZGQMPL |
7. Waranti dan Sokongan
7.1 Maklumat Waranti
The product comes with a 1-year warranty. Please retain your proof of purchase for any warranty claims. The warranty covers manufacturing defects but does not cover damage caused by misuse, accidents, unauthorized modifications, or improper handling.
7.2 Sokongan Teknikal
For technical assistance, programming guides, or further inquiries, please refer to the following resources:
- Pengilang Webtapak: Visit the AITRIP official website for product documentation and support.
- Komuniti Dalam Talian: Engage with the broader ESP32 development community on forums and platforms like GitHub for shared knowledge and troubleshooting tips.
- Sokongan Peruncit: Contact the retailer from whom you purchased the product for assistance with returns or exchanges.