1. Pengenalan dan Lebihview
This manual provides detailed instructions for the installation, operation, and maintenance of your JideTech 4K 8 Channel PoE Network Video Recorder (NVR). This NVR is designed for home security camera systems, supporting up to 12 channels and resolutions up to 12MP. It features Power over Ethernet (PoE) for simplified camera connections, remote access capabilities, and advanced video compression.
2. Apa yang ada di dalam Kotak
Sila semak kandungan pakej anda dengan senarai di bawah:
- 1x 8 Channel NVR PoE Unit
- 1x Manual Pengguna
- 1x NVR Power Adapter
- Kabel Rangkaian 1x 1M
- tetikus
- Screws (for HDD installation)

Image: The JideTech 4K 8 Channel PoE NVR unit.
3. Arahan Persediaan
3.1. Sambungan Fizikal
Follow these steps to connect your NVR to your network and display:
- Sambungkan NVR ke sumber kuasa menggunakan penyesuai kuasa yang disediakan.
- Connect the NVR to your router using the included network cable.
- Sambungkan monitor ke NVR menggunakan port HDMI atau VGA.
- Connect the USB mouse to a USB port on the NVR for local control.
- Connect your PoE cameras to the NVR's PoE ports. For non-PoE cameras, connect them to your network via a router and ensure they are powered separately.
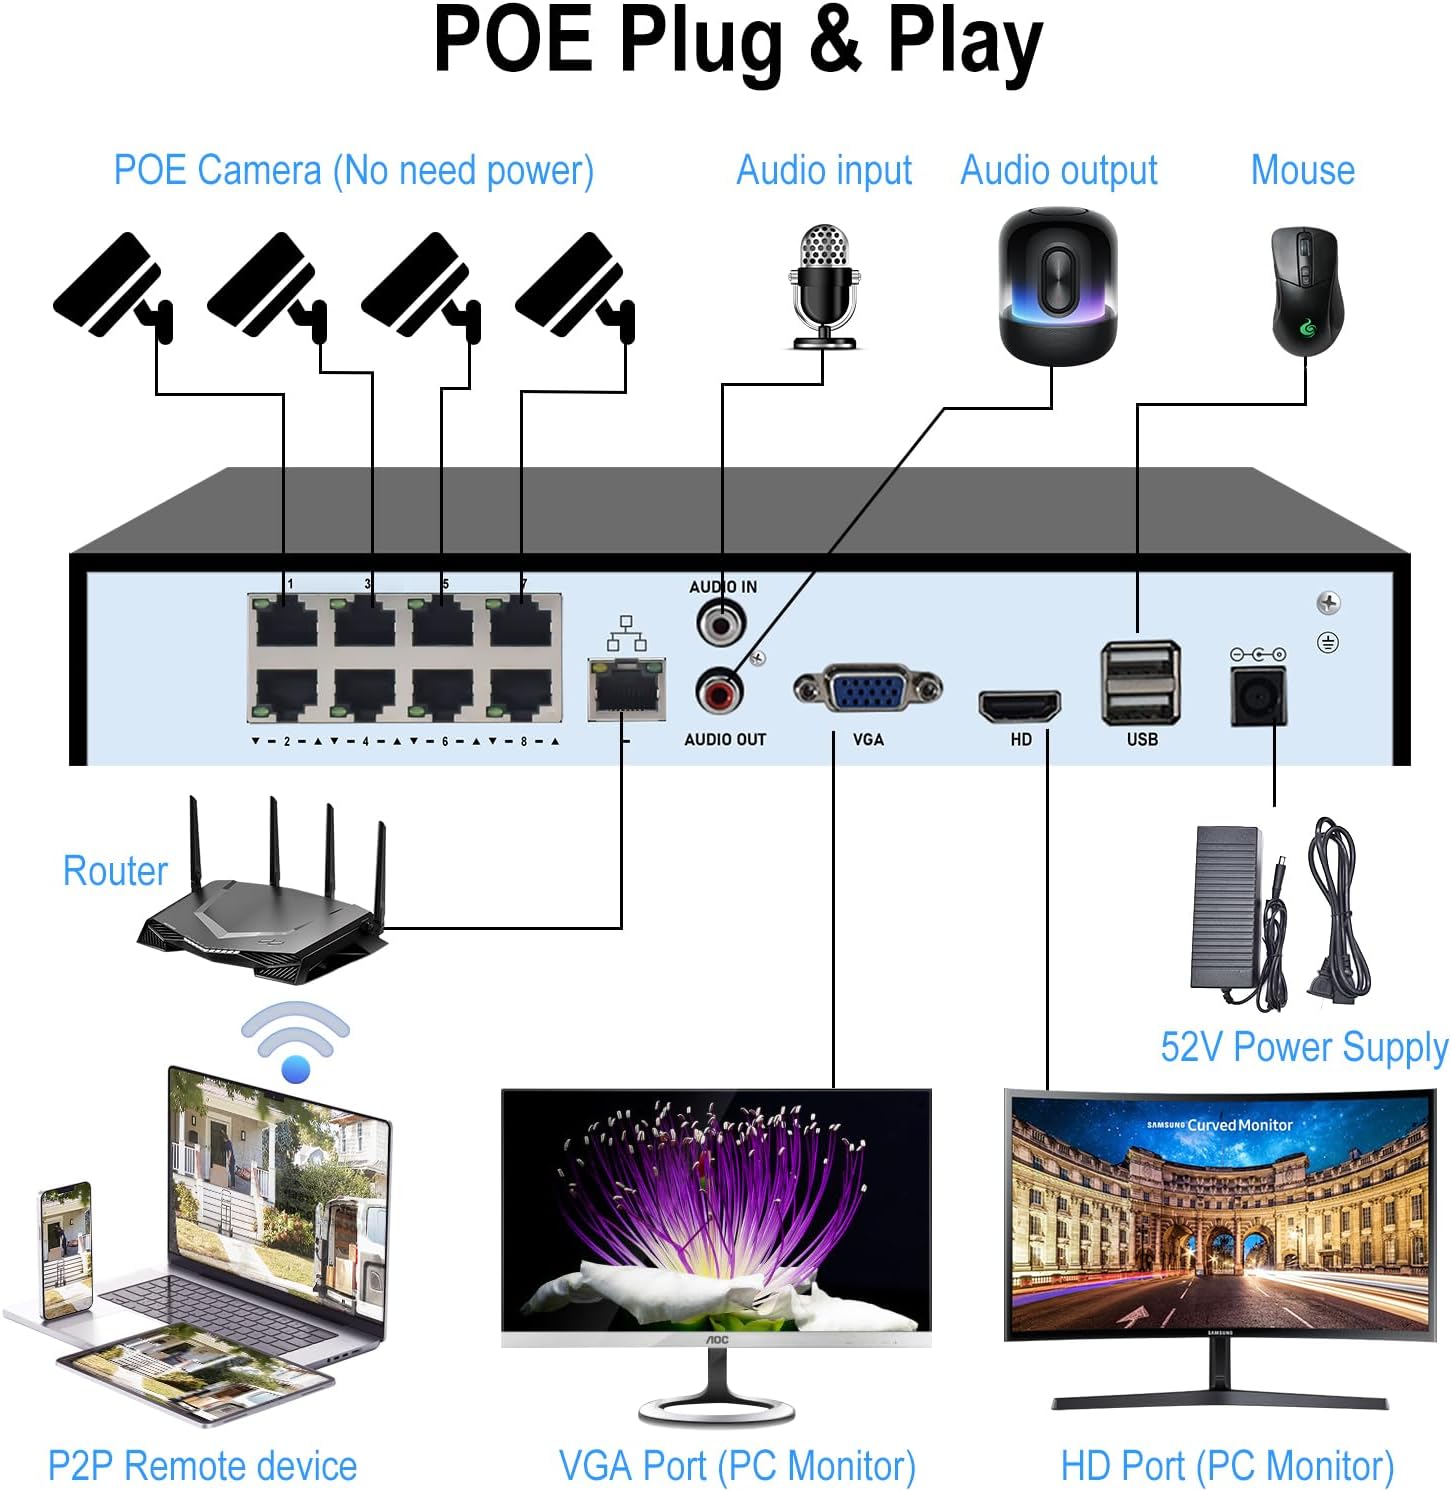
Image: Connection diagram illustrating how to connect PoE cameras, router, monitor, and mouse to the NVR.

Image: Diagram detailing the connection of a wired ONVIF camera to the NVR, requiring a power adapter and Ethernet cable.
3.2. Hard Drive Installation (HDD Not Included)
The NVR requires a 3.5-inch SATA hard drive (up to 14TB) for recording. Please follow these steps to install it:
- Unscrew and remove the top cover of the NVR unit.
- Connect the SATA data cable and power cable from the NVR to the hard drive.
- Secure the hard drive inside the NVR chassis using the provided screws.
- Replace the NVR cover and fasten the screws.
Video: Instructions on how to install a hard drive into the NVR unit.

Image: The NVR unit shown with a hard drive, highlighting its maximum storage capacity of 14TB.
4. Arahan Operasi
4.1. Akses Jauh
The NVR supports remote access via PC/Mac or the Videolink App for Android/iOS. Once connected to the internet, you can view foo masa nyatatage and playback recordings from anywhere.

Image: Illustration of remote access to the NVR system using various devices like a PC, tablet, and smartphone application.
4.2. Motion Detection and Smart Playback
Configure motion detection settings to receive instant notifications and email alerts on your phone when movement is detected. The smart playback feature allows you to quickly review recorded video at up to 16x speed to locate specific events.

Image: Depiction of the smart human detection feature, triggering app alerts when motion is detected.
5. Ciri-ciri Utama
- 4K UltraHD Resolution: Supports recording, playback, and live view up to 12MP resolution. HDMI output up to 4K@30fps, VGA output up to 1080P@30fps.
- 12 Channel Expandable NVR: Built-in 8 PoE ports (IEEE802.3at, up to 30W per port) for 8 PoE cameras. Expandable to 12 channels with additional PoE switches.
- Keserasian ONVIF: Works with most third-party ONVIF IP cameras.
- Pemampatan Video Lanjutan: Supports H.265+/H.265/H.264 formats, reducing storage space and bandwidth by up to 75%.
- Kapasiti Storan Besar: Equipped with 1 SATA interface, supporting a single hard drive up to 14TB (HDD not included).
- Motion Detection & Smart Playback: Instant notifications and email alerts for detected motion. Playback recording at up to 16x speed.
- Local & Remote Access: Easy configuration and control via PC/Mac or Videolink App (Android/iOS).
Video: Demonstration of how to connect a network video recorder surveillance system.
6. Spesifikasi
| Jenama | JideTech |
| Nombor Model | 8CH-NVR |
| Teknologi Ketersambungan | Ethernet, HDMI, USB, VGA |
| Peranti Serasi | IP Camera, PoE Camera |
| Dimensi Produk (L x W x H) | 9.88" x 8.42" x 1.57" |
| Kapasiti Penyimpanan Memori | Sehingga 14 TB (HDD tidak termasuk) |
| Bilangan Saluran | 8 (Boleh dikembangkan kepada 12) |
| Media Format Digital Video | HDD |
| Input Audio | RCA |
| Jumlah Port USB | 2 |
| Input Video | HDMI, VGA |
| Berat Barang | 2.8 paun |
7. Penyelenggaraan
To ensure optimal performance and longevity of your NVR, consider the following maintenance tips:
- Pembersihan tetap: Keep the NVR unit free from dust and debris. Use a soft, dry cloth for cleaning. Ensure ventilation openings are not blocked.
- Kemas kini Firmware: Periksa pengeluar secara berkala website for firmware updates. Keeping your NVR's firmware up-to-date can improve performance, add new features, and enhance security.
- Sandaran Data: Regularly back up important recordings to an external storage device or cloud service to prevent data loss.
- Keadaan Persekitaran: Operate the NVR within recommended temperature and humidity ranges to prevent damage. Avoid direct sunlight and excessive heat.
8. Penyelesaian masalah
If you encounter issues with your JideTech NVR, refer to the following common troubleshooting steps:
- Tiada Kuasa:
- Ensure the power adapter is securely connected to both the NVR and a working power outlet.
- Sahkan alur keluar kuasa berfungsi dengan memasang peranti lain.
- Tiada Output Video:
- Check HDMI/VGA cable connections between the NVR and the monitor.
- Pastikan monitor dihidupkan dan ditetapkan kepada sumber input yang betul.
- Cuba kabel atau monitor HDMI/VGA yang lain jika ada.
- Kamera Tidak Dipaparkan:
- For PoE cameras, ensure they are properly connected to the NVR's PoE ports and receiving power.
- For non-PoE cameras, verify they are powered on and connected to the same local network as the NVR.
- Check camera IP addresses and ensure they are not conflicting.
- Confirm cameras are ONVIF compatible and added correctly to the NVR system.
- Isu Capaian Jauh:
- Pastikan NVR disambungkan ke Internet.
- Verify network settings (IP address, gateway, DNS) on the NVR.
- Check firewall settings on your router that might be blocking access.
- Ensure the Videolink App or PC software is up-to-date.
- Masalah Rakaman:
- Confirm a hard drive is installed and properly formatted by the NVR.
- Check the hard drive status in the NVR's system settings.
- Pastikan jadual rakaman dikonfigurasikan dengan betul.
If these steps do not resolve your issue, please contact JideTech customer support for further assistance.
9. Waranti dan Sokongan
JideTech offers comprehensive support for its products. For specific warranty details, please refer to the documentation included with your purchase or visit the official JideTech webtapak.
Pelan perlindungan tambahan tersedia untuk pembelian:
- Pelan Perlindungan 2 Tahun
- Pelan Perlindungan 3 Tahun
- Perlindungan Lengkap (bil bulanan)
For technical support, troubleshooting, or any product-related inquiries, please contact JideTech customer service.