1. Pengenalan
This manual provides essential information for the safe and effective operation of your Mastech MS8301A Digital Multimeter. Please read this manual thoroughly before using the device to ensure proper functionality and to prevent potential hazards. Keep this manual for future reference.
2. Maklumat Keselamatan
Always adhere to the following safety precautions to avoid electric shock or personal injury, and to prevent damage to the multimeter or the equipment under test.
- Baca Arahan: Understand all instructions and safety information before use.
- Dinilai Voltage: Jangan gunakan lebih daripada vol yang dinilaitage, seperti yang ditanda pada multimeter, antara terminal atau antara mana-mana terminal dan pembumian.
- Petunjuk Ujian: Inspect test leads for damaged insulation or exposed metal. Replace if damaged.
- Pemotongan Litar: Putuskan sambungan kuasa litar dan nyahcas semua voltan tinggitage kapasitor sebelum menguji rintangan, kesinambungan, diod atau kemuatan.
- Pemilihan Fungsi: Pastikan suis fungsi berada di kedudukan yang betul untuk pengukuran yang sedang dilakukan.
- Litar Langsung: Do not measure current on a live circuit with the test leads connected in parallel.
- Persekitaran Operasi: Do not operate the multimeter in explosive gas, vapor, or damp persekitaran.
- Peralatan Pelindung Diri: Always wear appropriate personal protective equipment, such as safety glasses, when working with electrical circuits.
- Penilaian Keselamatan: This device is rated for CAT III 600V. Do not exceed this rating.
3. Produk Lebihview
3.1 Ciri-ciri
The Mastech MS8301A Digital Multimeter offers a range of features for various electrical measurements:
- paparan: 2000 Kiraan
- Pegangan Data: Membekukan bacaan yang dipaparkan untuk rakaman yang mudah.
- Penguji Bateri: For 1.5V and 9V batteries.
- Reka bentuk padat: Product Size: 150mm x 74mm x 48mm (5.9" x 2.9" x 1.7")
- ringan: Product Weight: 220g (0.48lb)

Image: Detailed features and specifications of the Mastech MS8301A multimeter, including display count, data hold, battery test function, and physical dimensions.
3.2 Komponen
The Mastech MS8301A package typically includes the following components:
- Mastech MS8301A Digital Multimeter Unit
- Petunjuk Ujian (Merah dan Hitam)
- AAA Batteries (2x1.5V)
- Calibration Certificate (if applicable)
- Panduan Mula Pantas
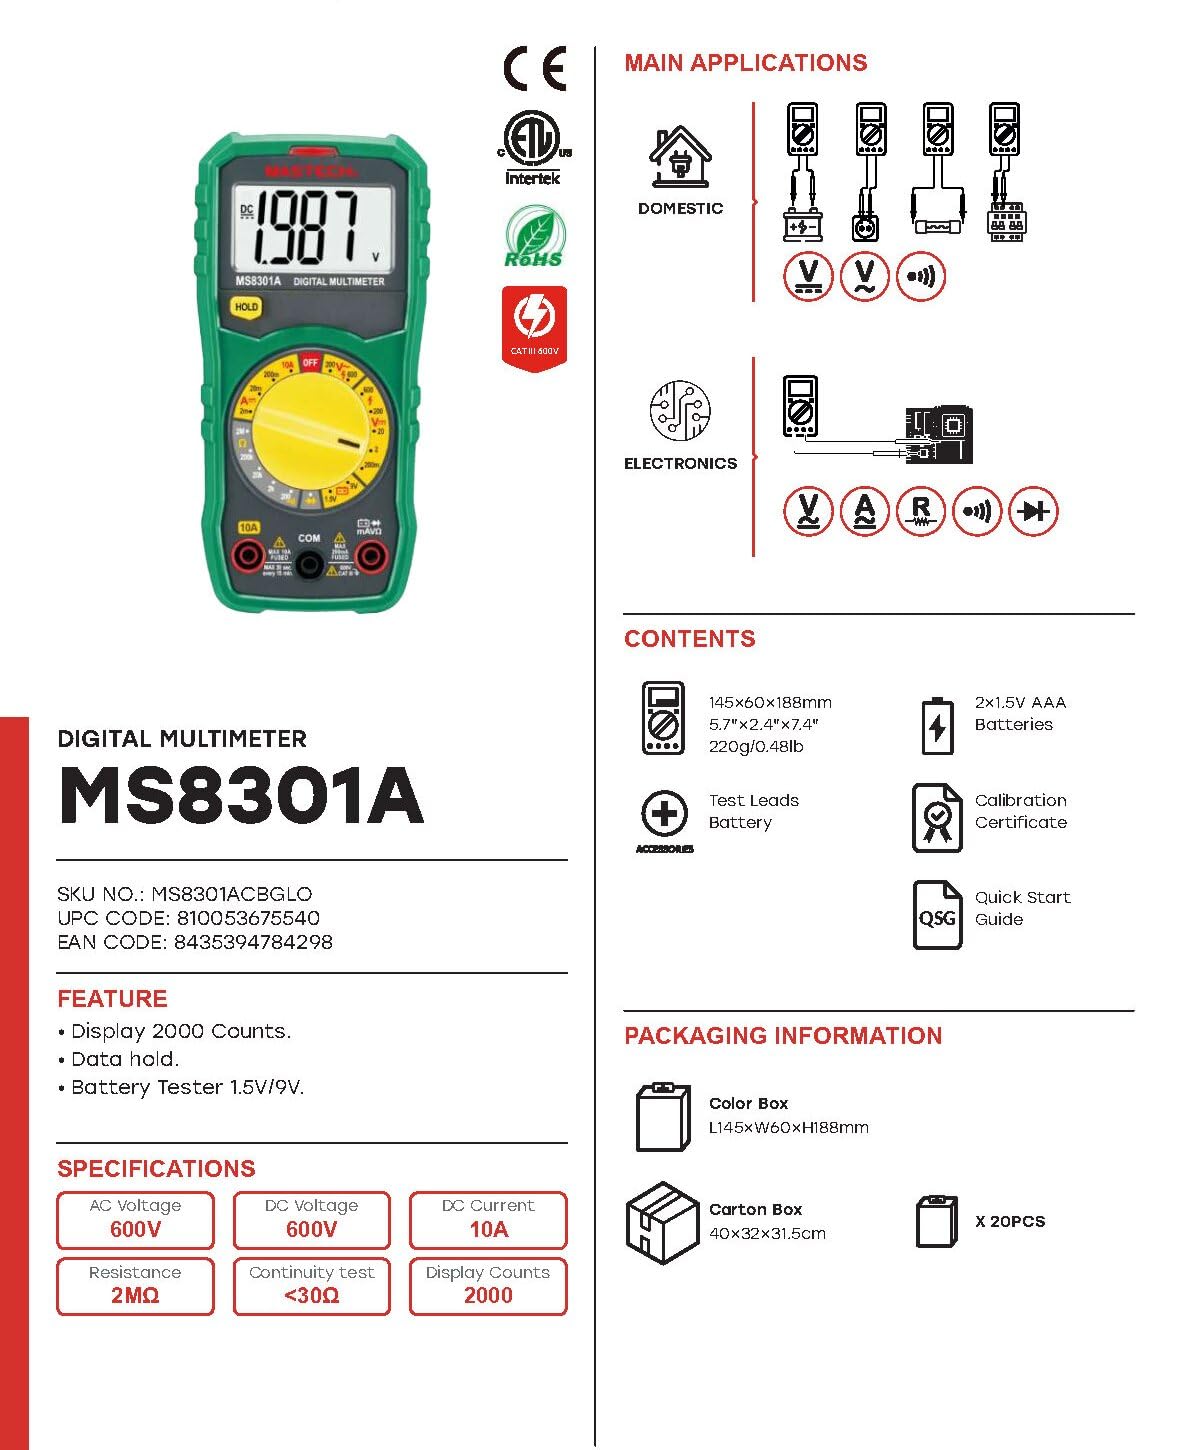
Image: The Mastech MS8301A Digital Multimeter showing its front panel, rotary switch, display, input jacks, and a list of included accessories such as test leads and batteries.
4. Persediaan
4.1 Pemasangan Bateri
- Pastikan multimeter dimatikan dan putuskan sambungan sebarang kabel ujian.
- Cari penutup petak bateri di belakang multimeter.
- Tanggalkan skru penahan dan tanggalkan penutup.
- Masukkan dua bateri AAA 1.5V, dengan memerhatikan kekutuban (+ dan -) yang betul seperti yang ditunjukkan di dalam petak.
- Gantikan penutup petak bateri dan kencangkannya dengan skru.
4.2 Menghubungkan Petunjuk Ujian
Sambungkan wayar ujian ke bicu input yang sesuai pada multimeter:
- Masukkan hitam petunjuk ujian ke dalam COM jek (biasa).
- Untuk kebanyakan ukuran (Voltage, Resistance, Diode, Continuity, Temperature, Battery Test), insert the merah petunjuk ujian ke dalam VΩmA jek.
- For high current measurements (up to 10A), insert the merah petunjuk ujian ke dalam 10A jek.
5. Arahan Operasi
Before taking any measurement, ensure the test leads are correctly connected and the rotary switch is set to the desired function.
5.1 Mengukur DC Voltage (V=)
- Set the rotary switch to the desired V= range (e.g., 20V for measuring up to 20V DC).
- Sambungkan petunjuk ujian merah ke sisi positif (+) litar dan petunjuk ujian hitam ke sisi negatif (-).
- Baca voltagnilai e pada paparan.
5.2 Mengukur Vol ACtage (V~)
- Set the rotary switch to the desired V~ range (e.g., 200V for measuring up to 200V AC).
- Sambungkan petunjuk ujian merentasi vol ACtage sumber.
- Baca voltagnilai e pada paparan.
5.3 Measuring DC Current (A=)
- Penting: Disconnect power to the circuit before connecting the multimeter in series.
- Set the rotary switch to the desired A= range (e.g., 200mA or 10A). Remember to move the red lead to the 10A jack for high current.
- Buka litar di mana arus hendak diukur.
- Connect the multimeter in series with the circuit, ensuring the current flows through the multimeter.
- Apply power to the circuit and read the current value on the display.
5.4 Mengukur Rintangan (Ω)
- Penting: Pastikan litar dinyahtenagakan dan semua kapasitor dinyahcas sebelum mengukur rintangan.
- Set the rotary switch to the desired Ω julat.
- Sambungkan petunjuk ujian merentasi komponen yang akan diukur.
- Baca nilai rintangan pada paparan.
5.5 Ujian Diod (→|)
- Penting: Pastikan diod dicabut dari litar.
- Tetapkan suis putar ke Ujian Diod kedudukan.
- Sambungkan wayar ujian merah ke anod dan wayar ujian hitam ke katod diod. Paparan akan menunjukkan voltan hadapantage penurunan.
- Balikkan petunjuk. Paparan harus menunjukkan "OL" (Gelung Terbuka) untuk diod yang baik.
5.6 Ujian Kesinambungan ())))
- Penting: Pastikan litar dinyahtenagakan.
- Tetapkan suis putar ke Ujian Kesinambungan kedudukan.
- Connect the test leads across the component or wire to be tested.
- Jika rintangan berada di bawah kira-kira 30Ω, buzzer akan berbunyi, menunjukkan kesinambungan. Paparan juga akan menunjukkan nilai rintangan.
5.7 Battery Test (1.5V/9V)
- Tetapkan suis putar ke 1.5V or 9V battery test position, corresponding to the battery type.
- Sambungkan wayar ujian merah ke terminal positif (+) bateri dan wayar ujian hitam ke terminal negatif (-).
- Baca vol. bateritage di paparan.
5.8 Pegangan Data
Press the "HOLD" button to freeze the current reading on the display. Press it again to release the hold function and resume live readings.
6. Spesifikasi
| Pengukuran | Julat | Resolusi |
|---|---|---|
| DC Voltage | 200mV / 2V / 20V / 200V / 600V | 100µV / 1mV / 10mV / 100mV / 1V |
| Vol. ACtage | 200V / 600V | 100mV / 1V |
| Arus DC | 2mA / 20mA / 200mA / 10A | 1µA / 10µA / 100µA / 10mA |
| Rintangan | 200Ω / 2kΩ / 20kΩ / 200kΩ / 2MΩ | 0.1Ω / 1Ω / 10Ω / 100Ω / 1kΩ |
| Ujian Kesinambungan | Buzzer sounds at <30Ω | — |
| Ujian Diod | Maju voltage penurunan | — |
| Ujian Bateri | 1.5V / 9V | — |
Spesifikasi Umum
- paparan: 2000 Kiraan
- Bekalan Kuasa: 2 x Bateri AAA 1.5V
- Dimensi: 150mm x 74mm x 48mm (5.9 "x 2.9" x 1.7 ")
- Berat: 220g (0.48 paun)
- Penilaian Keselamatan: CAT III 600V
- Bahan: Akrilonitril Butadiena Stirena (ABS)
- warna: Biru

Image: A table detailing manual ranging specifications for various Mastech digital multimeters, including the MS8301A, showing display counts, safety ratings, and measurement capabilities.
7. Penyelenggaraan
7.1 Penggantian Bateri
When the battery low indicator appears on the display, replace the batteries immediately to ensure accurate readings. Follow the steps outlined in Section 4.1 for battery installation.
7.2 Pembersihan
Lap kes dengan iklanamp kain dan detergen ringan. Jangan gunakan bahan kasar atau pelarut. Pastikan multimeter kering sepenuhnya sebelum digunakan.
7.3 Penyimpanan
If the multimeter is not used for an extended period, remove the batteries to prevent leakage and damage to the device. Store in a cool, dry place away from direct sunlight.
8. Penyelesaian masalah
| Masalah | Kemungkinan Punca | Penyelesaian |
|---|---|---|
| Tiada paparan atau paparan malap | Dead or low batteries; incorrect battery polarity. | Replace batteries; check battery orientation. |
| "OL" (Lebihan) dipaparkan | Measurement exceeds selected range; open circuit. | Select a higher range; check for open circuit in the component or leads. |
| Bacaan yang salah | Incorrect function selected; poor test lead connection; damaged test leads. | Verify function switch position; ensure secure lead connection; inspect and replace damaged leads. |
| Tiada bip kesinambungan | Open circuit; resistance too high. | Check for breaks in the circuit; ensure resistance is below 30Ω. |
9. Waranti dan Sokongan
Mastech products are designed for reliability and performance. For specific warranty information, please refer to the warranty card included with your product or contact Mastech customer support. Keep your purchase receipt as proof of purchase.
For technical support or service inquiries, please visit the official Mastech webtapak atau hubungi pusat perkhidmatan mereka yang dibenarkan.