
pengenalan
This manual provides detailed instructions for the safe and efficient operation, maintenance, and troubleshooting of your Hamilton Beach FlexBrew and 2-Way Programmable Coffee Makers. Please read all instructions carefully before using your appliance.
Maklumat Keselamatan Penting
- Baca semua arahan.
- Jangan sentuh permukaan panas. Gunakan pemegang atau tombol.
- Untuk melindungi daripada renjatan elektrik, jangan rendamkan kord, palam atau pembuat kopi di dalam air atau cecair lain.
- Pengawasan rapi diperlukan apabila sebarang perkakas digunakan oleh atau berhampiran kanak-kanak.
- Cabut plag dari soket apabila tidak digunakan dan sebelum membersihkan. Biarkan sejuk sebelum memakai atau menanggalkan bahagian, dan sebelum membersihkan perkakas.
- Jangan kendalikan sebarang perkakas dengan kord atau palam yang rosak, atau selepas perkakas tidak berfungsi atau rosak dalam apa jua cara.
- Penggunaan lampiran aksesori yang tidak disyorkan oleh pengilang perkakas boleh menyebabkan kecederaan.
- Jangan gunakan di luar rumah.
- Jangan biarkan kord tergantung di tepi meja atau kaunter, atau menyentuh permukaan panas.
- Jangan letakkan pada atau berhampiran gas panas atau penunu elektrik, atau dalam ketuhar yang dipanaskan.
- Untuk memutuskan sambungan, putar sebarang kawalan kepada 'mati', kemudian tanggalkan palam dari soket dinding.
- Jangan gunakan perkakas untuk kegunaan selain daripada yang dimaksudkan.
Pengenalan Bahagian
Familiarize yourself with the components of your coffee makers:


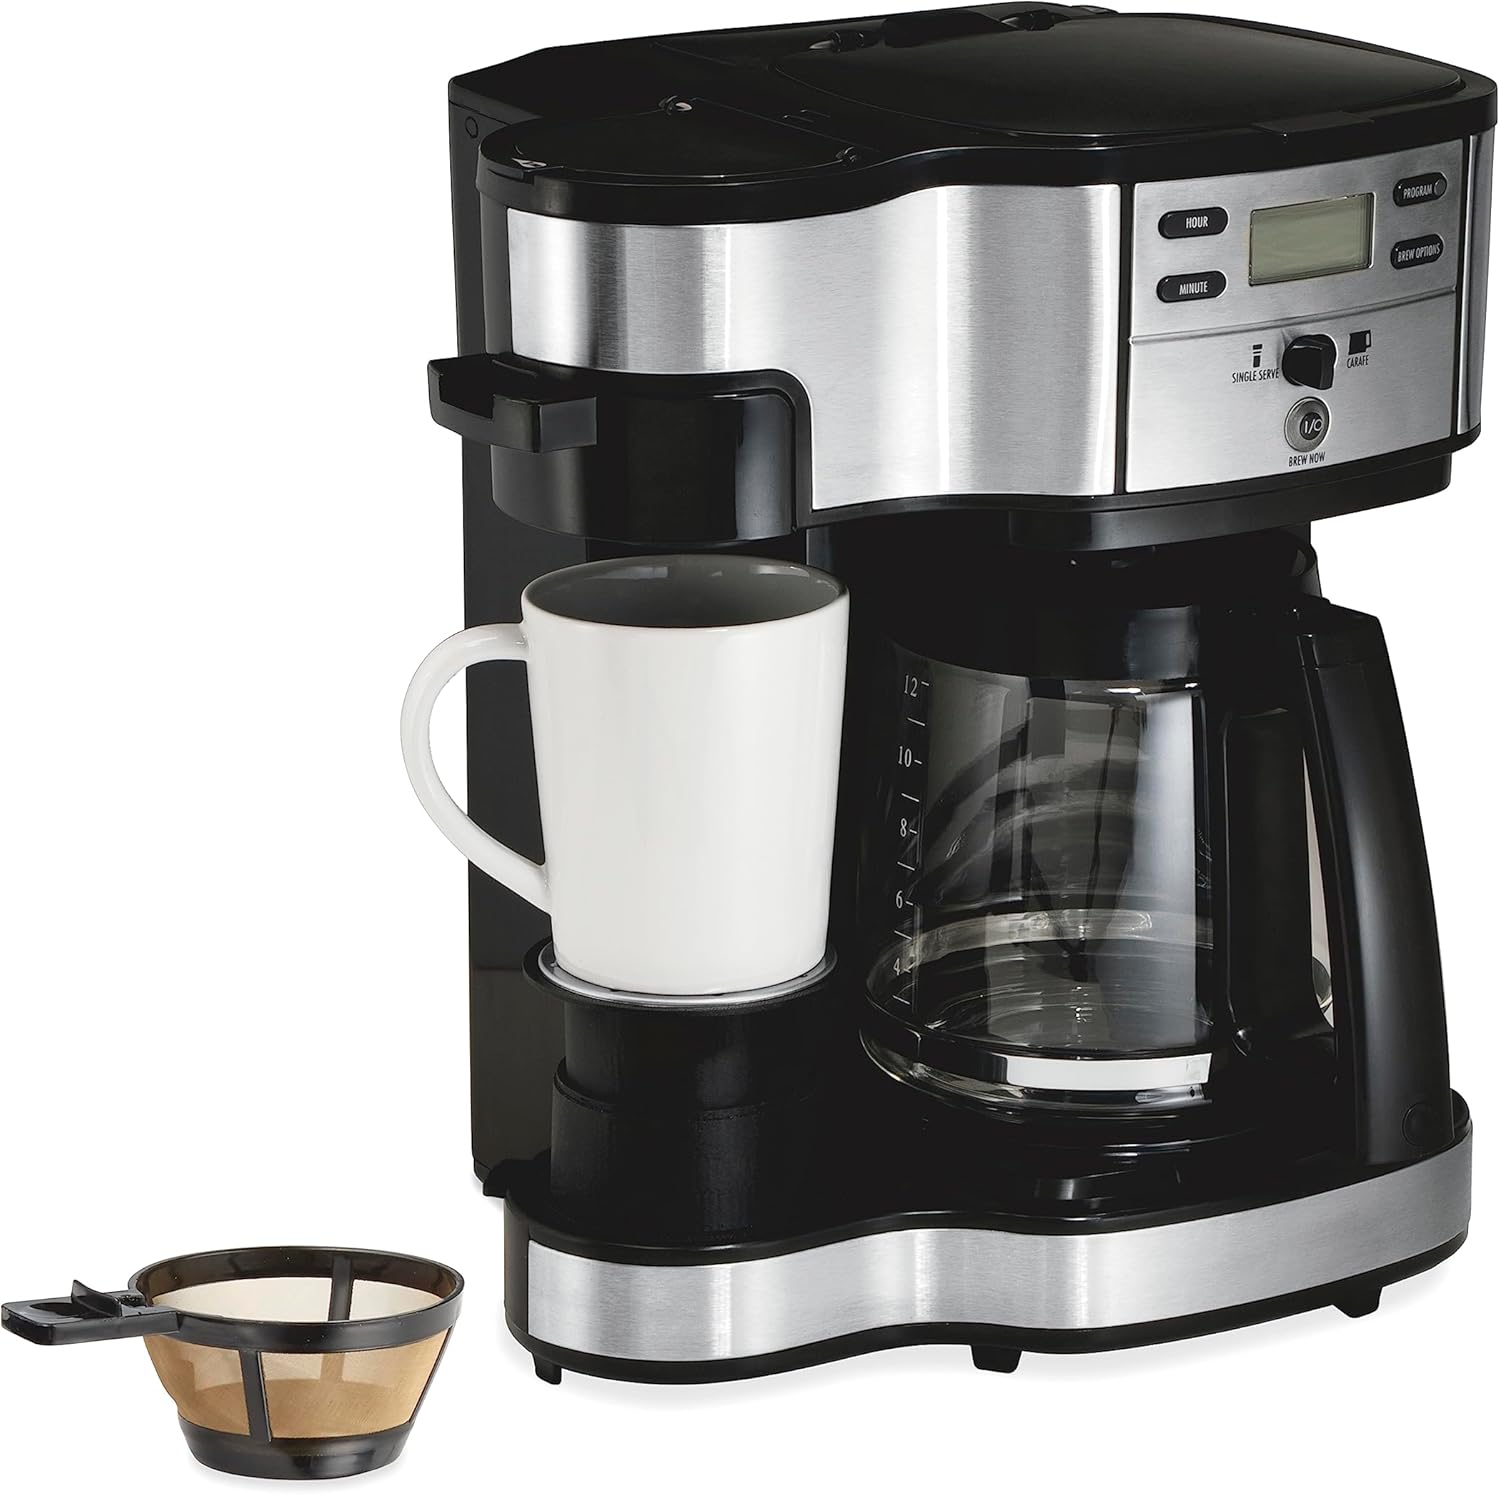
FlexBrew Coffee Maker Components:
- Takungan Air: Menampung air untuk dibancuh.
- Single-Serve Brew Head: For K-Cup pods or ground coffee.
- Carafe Brew Basket: For 12-cup brewing with ground coffee.
- Panel Kawalan: Buttons for time, delay brew, cup size, brew strength, and power.
- Teko Kaca: 12-cup capacity.
- Pemegang Pod K-Cup: For single-serve pods.
- Ground Coffee Filter Basket: For single-serve ground coffee.
2-Way Programmable Coffee Maker Components:
- Takungan Air: Shared for both single-serve and carafe.
- Bahagian Satu Hidangan: For ground coffee with mesh scoop.
- 12-Cup Carafe Side: For ground coffee.
- Panel Kawalan: Buttons for programming and brew selection.
- Teko Kaca: 12-cup capacity.
- Mesh Scoop Filter: For single-serve ground coffee.
Persediaan
- Bongkar: Keluarkan semua bahan pembungkusan dan aksesori dengan berhati-hati.
- Bersih: Wash the carafe, brew baskets, K-Cup pod holder, and reusable ground coffee filter in warm, soapy water. Rinse thoroughly.
- Kitaran Penggunaan Pertama: Before brewing coffee for the first time, run two or three brewing cycles with water only to clean the internal components. Fill the water reservoir to the MAX line, place an empty carafe or mug, and run a brew cycle. Discard the water.
- penempatan: Place the coffee maker on a flat, stable surface away from the edge of the counter. Ensure adequate ventilation.
Arahan Operasi
A. FlexBrew Single-Serve Brewing (Models 49902, 49980R)
The FlexBrew allows brewing a single cup using either a K-Cup pod or ground coffee.


1. Using K-Cup Pods:
- Lift the single-serve brew head lid.
- Insert a K-Cup pod into the K-Cup pod holder. Close the lid firmly.
- Fill the water reservoir with the desired amount of water for your cup size. Do not exceed the MAX fill line.
- Letakkan mug anda di atas dulang titisan.
- Press the 'SINGLE' button. The coffee maker will begin brewing.
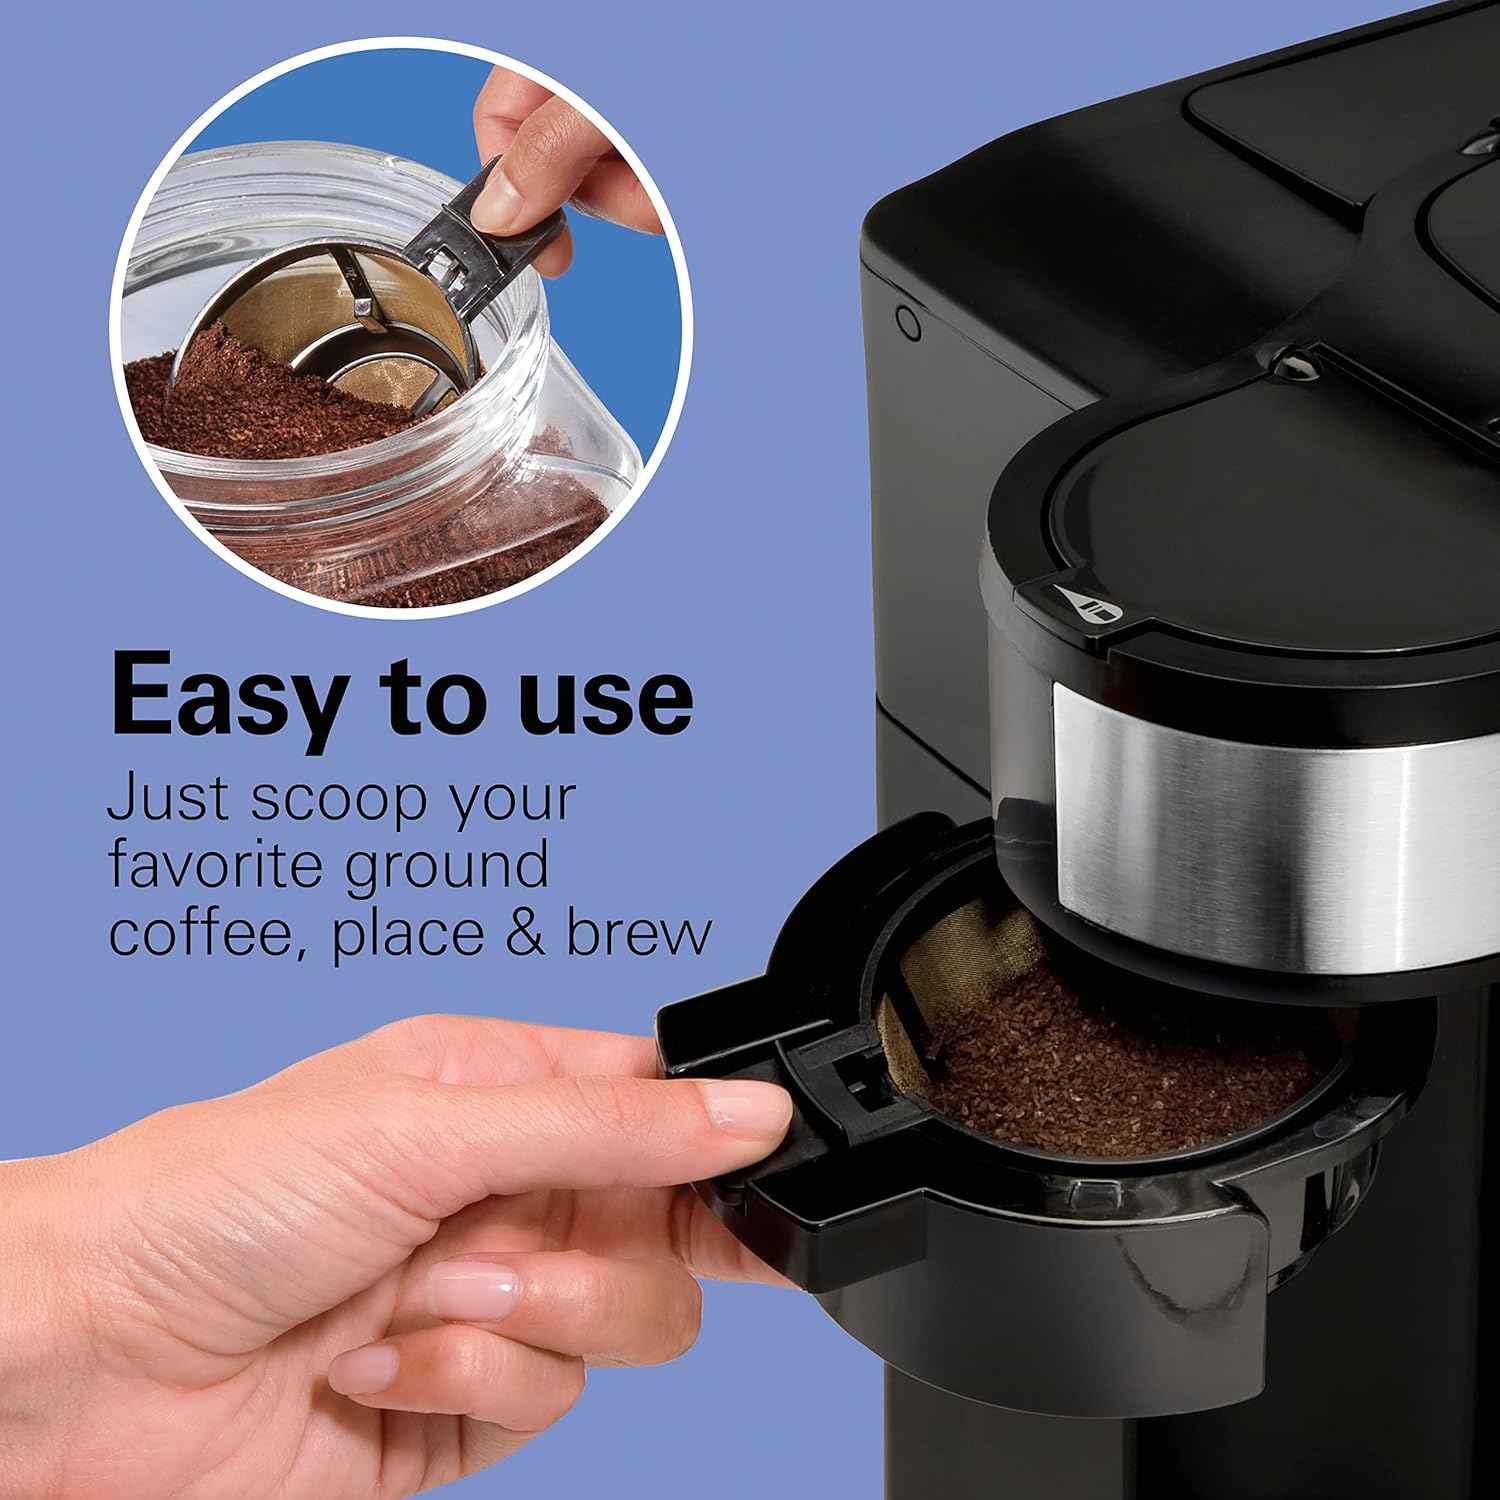
2. Using Ground Coffee (Single-Serve):
- Lift the single-serve brew head lid.
- Place the reusable ground coffee filter basket into the K-Cup pod holder.
- Add 1 to 3 tablespoons of ground coffee to the filter basket. Do not overfill. Close the lid firmly.
- Fill the water reservoir with the desired amount of water for your cup size.
- Letakkan mug anda di atas dulang titisan.
- Press the 'SINGLE' button.
3. Setting Brew Strength (FlexBrew):
- After selecting 'SINGLE' or 'CARAFE', press the 'BREW STRENGTH' button to cycle through Regular or Bold options. The selected strength will display on the screen.
4. Setting Cup Size (FlexBrew Single-Serve):
- After selecting 'SINGLE', press the 'CUP SIZE' button to choose from 6, 8, 10, 12, or 14 ounces.
5. Programmable Brewing (FlexBrew):

- Set the current time using the 'SET TIME' button.
- Prepare your coffee (pod or grounds) and fill the water reservoir.
- Press the 'DELAY BREW' button. The display will flash 'START TIME'.
- Use the 'HOUR' and 'MINUTE' buttons to set your desired brew time.
- Press 'DELAY BREW' again to confirm. The indicator light will illuminate, and the coffee maker will brew at the set time.
B. 12-Cup Carafe Brewing (Both Models)
Both coffee makers offer a 12-cup carafe brewing option.

1. Using Ground Coffee (Carafe):
- Open the carafe brew basket.
- Place a paper filter (basket style) or the permanent filter (if included) into the brew basket.
- Add the desired amount of ground coffee (approximately 1 tablespoon per cup).
- Fill the water reservoir with cold water to the desired cup marking.
- Letakkan bekas kaca di atas pinggan pemanasan.
- Press the 'CARAFE' or 'BREW NOW I/O' button to start brewing.
2. Programmable Brewing (12-Cup Carafe):
- Prepare the coffee maker with ground coffee and water as described above.
- Set the current time (if not already set).
- Press the 'DELAY BREW' button (FlexBrew) or 'PROGRAM' button (2-Way).
- Set your desired brew time using the 'HOUR' and 'MINUTE' buttons.
- Confirm the setting. The indicator light will show that the delay brew is active.
3. Automatic Shutoff:
- The 2-Way Programmable Coffee Maker features an automatic 2-hour shutoff for safety and energy saving.
Penyelenggaraan dan Pembersihan
A. General Cleaning
- Sentiasa cabut plag pembuat kopi sebelum membersihkan dan biarkan ia sejuk sepenuhnya.
- Wash the carafe, brew baskets, K-Cup pod holder, and reusable ground coffee filter in warm, soapy water. These parts are generally top-rack dishwasher safe.
- Lap bahagian luar pembuat kopi dengan damp kain. Jangan gunakan pembersih yang melelas atau pad penyental.
- Bersihkan plat pemanasan dengan iklanamp kain. Jangan gunakan bahan yang melelas.
B. Descaling
Mendapan mineral (kalsium) boleh terkumpul di dalam pembuat kopi anda dari semasa ke semasa, yang menjejaskan prestasi. Tanggalkan kerak pembuat kopi anda setiap 1-3 bulan, bergantung pada kekerasan air.
- Tuangkan 1 cawan cuka putih dan 2 cawan air sejuk ke dalam takungan air.
- Letakkan bekas kosong di atas pinggan pemanasan.
- Run a brew cycle. After about 30 seconds, turn the coffee maker off and let it soak for 30 minutes.
- Turn the coffee maker back on and let the brew cycle complete.
- Buang larutan cuka.
- Run 2-3 cycles with clean, cold water to rinse out any remaining vinegar.
Menyelesaikan masalah
| Masalah | Kemungkinan Punca | Penyelesaian |
|---|---|---|
| Kopi tidak dibancuh. | No water in reservoir; coffee maker not plugged in; brew cycle not initiated. | Fill reservoir; ensure plug is secure; press appropriate brew button. |
| Kopi terasa lemah. | Not enough coffee grounds; coarse grind; brew strength set to regular. | Add more coffee; use finer grind; select 'Bold' brew strength. |
| Kopi melimpah dari penapis. | Too much coffee grounds; filter not seated correctly; clogged brew basket. | Reduce coffee amount; ensure filter is properly placed; clean brew basket. |
| Air bocor dari unit. | Water reservoir not properly seated; overfilled reservoir. | Ensure reservoir is securely in place; do not exceed MAX fill line. |
| Programmable brew does not start. | Delay brew not activated; incorrect time set. | Ensure 'DELAY BREW' indicator is lit; verify programmed time. |
Spesifikasi
| Ciri | Perincian |
|---|---|
| Jenama | Pantai Hamilton |
| model | 49902, 49980R |
| Capacity (FlexBrew) | Single-serve (6-14 oz), 12-cup carafe |
| Capacity (2-Way) | Single-serve, 12-cup carafe |
| Jenis Input Kopi | Pod K-Cup, Kopi Kisar |
| Ciri Khas | Programmable, Auto Shutoff (2-Way), Brew Strength Selector (FlexBrew), Cup Size Selector (FlexBrew) |
| bahan | Logam, Plastik |
| warna | Hitam |
| Komponen yang Disertakan | Cleaning Brush, Mesh Scoop |
Waranti dan Sokongan
Untuk maklumat jaminan atau sokongan produk, sila rujuk kad jaminan yang disertakan dengan pembelian anda atau lawati laman web rasmi Hamilton Beach. weblaman web. Anda juga boleh menghubungi khidmat pelanggan secara langsung untuk mendapatkan bantuan.
- Webtapak: www.hamiltonbeach.com
- Perkhidmatan Pelanggan: Refer to your product registration or included documentation for specific contact numbers and hours of operation.