
1. Pengenalan
The Brilagi VELVET SMART LED Ceiling Light is a high-efficiency, dimmable LED lighting solution designed for indoor use. With 24 watts of power and 230 volts, it offers significant energy savings. Its modern black and gold design complements various interior styles. Featuring Wi-Fi Tuya technology, this ceiling light allows remote control of brightness and color temperature (2700-6500K) via an application, and also includes a remote control for convenience. The light has a 45 cm diameter and comes with mounting hardware.
2. Arahan Keselamatan Penting
- Baca semua arahan dengan teliti sebelum pemasangan dan penggunaan.
- Ensure the power supply is disconnected at the main circuit breaker before installation or maintenance.
- Pemasangan hendaklah dilakukan oleh juruelektrik bertauliah jika anda tidak pasti.
- Jangan ubah suai produk dalam apa jua cara.
- Produk ini direka untuk kegunaan dalaman sahaja. Jangan dedahkan kepada kelembapan atau suhu yang melampau.
- Jauhkan bahan pembungkus daripada kanak-kanak.
3. Kandungan Pakej
Sahkan bahawa semua komponen hadir sebelum memulakan pemasangan.
- Brilagi VELVET SMART LED Ceiling Light (1 unit)
- Alat Kawalan Jauh (1 unit)
- Perkakasan Pemasangan (skru, sauh)
- Manual Pengguna (dokumen ini)
4. Persediaan & Pemasangan
The Brilagi VELVET SMART LED Ceiling Light is designed for flush ceiling mounting and does not require assembly.
4.1. Mounting the Ceiling Light
- Matikan kuasa: Sebelum memulakan, pastikan bekalan kuasa ke kawasan pemasangan dimatikan sepenuhnya pada pemutus litar utama.
- Sediakan permukaan pelekap: Mark the drilling points on the ceiling using the light fixture's mounting bracket as a template.
- Lubang gerudi: Drill holes at the marked points and insert appropriate wall anchors if necessary.
- Sambungkan pendawaian: Connect the household electrical wires to the light fixture's wires according to local electrical codes (Live to Live, Neutral to Neutral, Ground to Ground). Ensure connections are secure.
- Secure fixture: Attach the light fixture to the ceiling using the provided mounting hardware. Ensure it is securely fastened.
- Pulihkan kuasa: Setelah pemasangan selesai, sambungkan semula kuasa pada pemutus litar utama.

Image: The Brilagi VELVET SMART LED Ceiling Light seamlessly integrated into a modern living room setting, showcasing its aesthetic appeal when installed.
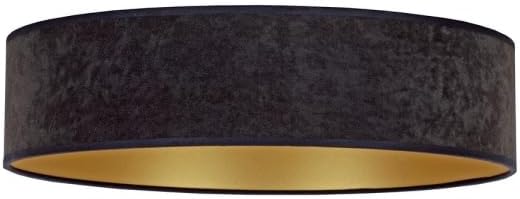
Imej: A terperinci view of the Brilagi VELVET SMART LED Ceiling Light, highlighting its black exterior finish and the contrasting gold interior, which enhances light reflection.
4.2. Pasangan Alat Kawalan Jauh
The remote control is typically pre-paired. If not, or if you need to re-pair:
- Pastikan lampu dihidupkan.
- Within 5 seconds of turning on the light, press and hold the "ON/OFF" button on the remote control until the light flashes, indicating successful pairing.

Image: The included white remote control, featuring buttons for power, brightness adjustment, color temperature control, and preset scene selections for convenient operation.
4.3. Wi-Fi (Tuya App) Setup
- Muat turun Aplikasi Tuya Smart: Download and install the "Tuya Smart" app from your smartphone's app store (iOS or Android).
- Daftar/Log Masuk: Buka aplikasi dan daftar untuk akaun baharu atau log masuk jika anda sudah memilikinya.
- Tambah Peranti: Ketik ikon "+" di penjuru kanan sebelah atas aplikasi untuk menambah peranti baharu.
- Pilih Pencahayaan: Choose "Lighting" or "Light Source (Wi-Fi)" from the device categories.
- Enter Wi-Fi details: Pastikan telefon anda disambungkan ke rangkaian Wi-Fi 2.4GHz. Masukkan kata laluan Wi-Fi anda dalam aplikasi.
- Reset Light for Pairing Mode: Turn the light ON-OFF-ON-OFF-ON (with 2-second intervals) until the light starts blinking rapidly. This indicates it's in pairing mode.
- Sahkan Berkelip: In the app, confirm that the indicator light is blinking rapidly.
- Sambung: The app will search for and connect to the light. Once connected, you can rename the device.
5. Arahan Operasi
5.1. Menggunakan Alat Kawalan Jauh
The remote control provides convenient access to the light's primary functions:
- HIDUP/MATI: Press the central button to turn the light on or off.
- Pelarasan Kecerahan: Use the "+" and "-" buttons to increase or decrease the light intensity.
- Suhu Warna: Adjust the color temperature from warm white (2700K) to cool white (6500K) using the dedicated buttons.
- Adegan Pratetap: Select from various pre-programmed lighting scenes (e.g., night mode, reading mode) using the scene buttons.
Image: The remote control layout, illustrating the functions of each button for controlling the ceiling light's features.
5.2. Menggunakan Tuya Smart App
The Tuya Smart app offers advanced control and customization options:
- Jauh HIDUP/MATI: Control the light from anywhere with an internet connection.
- Peredupan Tanpa Langkah: Precisely adjust brightness levels.
- Kawalan Suhu Warna: Fine-tune the color temperature across the 2700K-6500K range.
- Penyesuaian Pemandangan: Create and save your own custom lighting scenes.
- Penjadualan: Set timers and schedules for the light to turn on/off or change settings automatically.
- Kawalan Suara: Integrate with voice assistants like Amazon Alexa or Google Assistant (requires compatible device and setup within the Tuya app).
6. Penyelenggaraan
- Pembersihan: Ensure the power is off before cleaning. Wipe the light fixture with a soft, dry cloth. Do not use abrasive cleaners or solvents.
- LED: Sumber cahaya LED bersepadu direka untuk kegunaan jangka panjang dan tidak boleh digantikan oleh pengguna.
- Kawalan Jauh: Replace batteries (type not specified, assume standard AAA or button cell) when the remote's range decreases or it stops responding.
7. Penyelesaian masalah
| Masalah | Kemungkinan Punca | Penyelesaian |
|---|---|---|
| Cahaya tidak menyala. | Tiada bekalan kuasa; pendawaian longgar; suis rosak. | Check circuit breaker. Verify wiring connections. Test with another switch if possible. |
| Alat kawalan jauh tidak berfungsi. | Batteries depleted; remote not paired. | Replace remote control batteries. Re-pair the remote control (see Section 4.2). |
| Cannot connect to Wi-Fi (Tuya app). | Incorrect Wi-Fi password; 5GHz Wi-Fi network; light not in pairing mode; network interference. | Ensure correct 2.4GHz Wi-Fi network and password. Reset light to pairing mode (Section 4.3). Move closer to router. |
| Cahaya berkelip atau malap tanpa diduga. | Unstable power supply; loose connection; incompatible dimmer (if external). | Check power supply stability. Verify wiring. This light is internally dimmable; do not use with external dimmers. |
8. Spesifikasi Produk
| Ciri | Perincian |
|---|---|
| Jenama | Brilagi |
| Nama Model | BUDUL |
| Nombor Model | BG0436 |
| Dimensi | 45L x 45W x 10H cm |
| warna | Hitam, Emas |
| bahan | Glass (Shade) |
| Jenis Sumber Cahaya | LED |
| Wattage | 24 watt |
| Voltage | 230 Volt |
| Suhu Warna | 2700K - 6500K (Boleh Laras) |
| Ketersambungan | Wi-Fi (Tuya Smart App), Remote Control |
| Jenis Pemasangan | Flush Mount, Ceiling Mount |
| Label Kecekapan Tenaga | High / Excellent (EU Label) |
| Perhimpunan Diperlukan | Tidak |
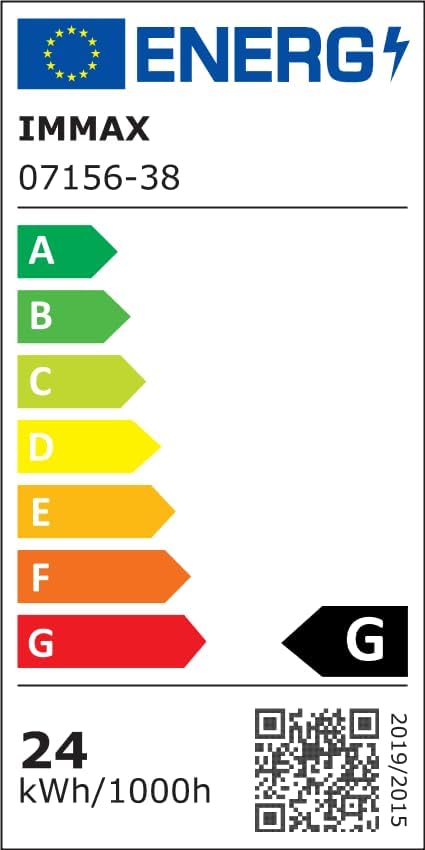
Image: The EU Energy Efficiency Label, indicating the product's energy consumption and efficiency class. For more details, refer to the official EPREL database via the QR code or link.
Pautan Pangkalan Data Rasmi EPREL: https://eprel.ec.europa.eu/qr/1294167
9. Waranti & Sokongan
For warranty information and customer support, please refer to the documentation provided with your purchase or contact Brilagi customer service. Keep your proof of purchase for warranty claims.