1. Pengenalan
This manual provides detailed instructions for the safe and effective operation of your MASTECH MY74 Digital Multimeter. Please read this manual thoroughly before using the device and retain it for future reference. The MY74 is a compact, handheld digital multimeter designed for measuring AC/DC voltage, AC/DC current, resistance, capacitance, frequency, temperature, diode, continuity, and transistor hFE.
2. Maklumat Keselamatan
WARNING: To avoid electric shock or personal injury, read and understand all safety information before using this multimeter.
- Always ensure the multimeter is in good working condition and free from damage.
- Jangan gunakan lebih daripada vol yang dinilaitage, seperti yang ditandakan pada meter, antara terminal atau antara mana-mana terminal dan tanah bumi.
- Berhati-hati apabila bekerja dengan voltagadalah melebihi 30V AC RMS, puncak 42V atau 60V DC. Ini voltagia menimbulkan bahaya kejutan.
- Sentiasa putuskan sambungan petunjuk ujian daripada litar sebelum menukar fungsi.
- Jangan gunakan meter jika penutup bateri tidak ditutup dengan betul.
- Gantikan bateri sebaik sahaja penunjuk bateri lemah muncul.
- Adhere to the measurement category (CAT III 600V) for safe operation.
3. Produk Lebihview
The MASTECH MY74 Digital Multimeter features a clear display, a rotary function switch, and input jacks for test leads. Familiarize yourself with the components shown below.

Komponen utama termasuk:
- Paparan LCD: Menunjukkan bacaan ukuran, unit dan penunjuk fungsi.
- Suis Fungsi Putar: Memilih fungsi pengukuran yang dikehendaki.
- Butang HIDUP/MATI: Menghidupkan atau mematikan peranti.
- Butang TAHAN: Membekukan bacaan paparan semasa.
- Bicu Input:
- COM: Terminal biasa untuk semua ukuran.
- VΩHz: Input untuk voltage, rintangan, kekerapan, kemuatan, diod, dan ukuran kesinambungan.
- mAµA: Input untuk miliampere dan mikroampsebelum pengukuran semasa.
- 10A: Input untuk 10 Ampsebelum pengukuran semasa.
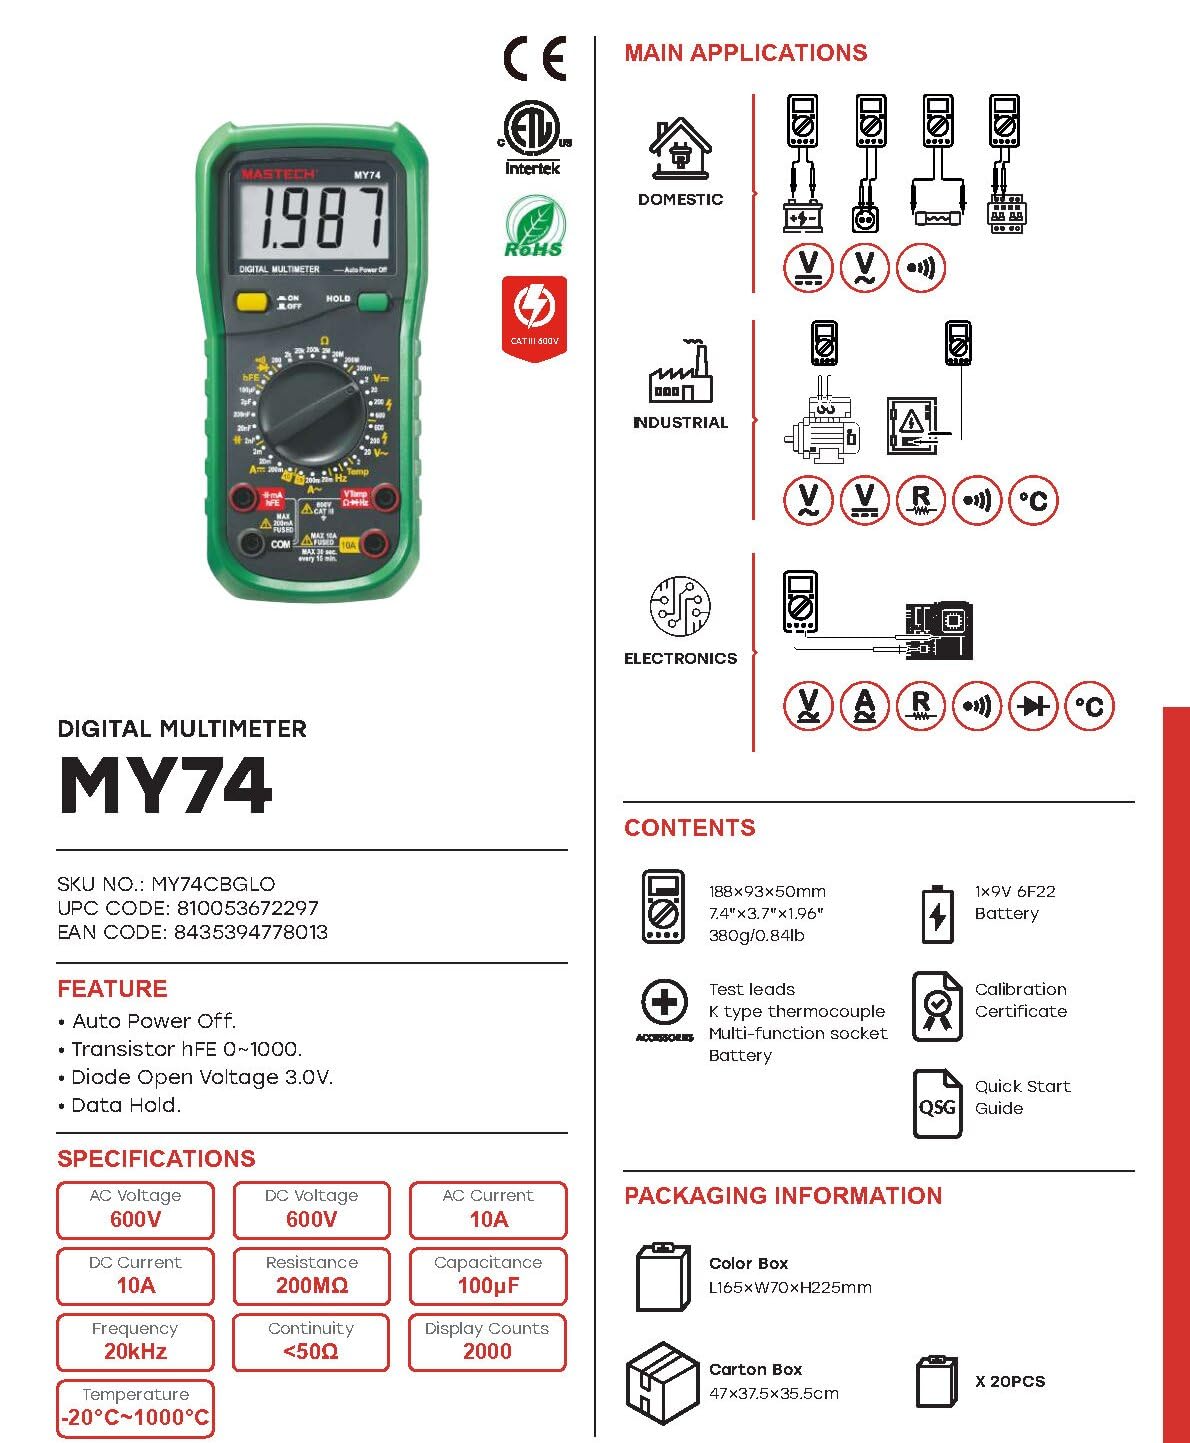
4. Ciri-ciri
The MASTECH MY74 Digital Multimeter offers the following key features:
- Paparan: 2000 kiraan
- Fungsi Auto Matikan
- Transistor hFE measurement (0~1000)
- Diod Voltan Terbukatage: 3.0V
- Continuity Buzzer: Activates below 50Ω
- Fungsi Pegangan Data
- Penunjuk Paparan Bateri Rendah
5. Persediaan
5.1 Pemasangan Bateri
The MASTECH MY74 requires 2 LR44 batteries (included). To install or replace batteries:
- Pastikan multimeter dimatikan dan putuskan sambungan semua kabel ujian.
- Cari petak bateri di belakang meter.
- Tanggalkan penutup petak bateri.
- Insert the batteries, observing correct polarity (+ and -).
- Gantikan penutup petak bateri dan kencangkannya dengan skru.
5.2 Menghubungkan Petunjuk Ujian
Always connect the black test lead to the COM jack. Connect the red test lead to the appropriate input jack based on the measurement function:
- VΩHz: Untuk voltage, resistance, frequency, capacitance, diode, and continuity.
- mAµA: For current measurements up to 200mA.
- 10A: Untuk pengukuran arus sehingga 10A.
6. Arahan Operasi
Before taking any measurement, ensure the test leads are correctly connected and the rotary switch is set to the desired function.
6.1 DC Jldtage Pengukuran (V–)
- Connect the red test lead to the VΩHz jack and the black test lead to the COM jack.
- Tetapkan suis putar kepada Vol DC yang dikehendakitagjulat e (cth, 200mV, 2V, 20V, 200V, 600V).
- Sambungkan wayar ujian secara selari dengan litar atau komponen yang diuji.
- Baca voltagnilai e pada paparan.
6.2 AC Jldtage Pengukuran (V∼)
- Connect the red test lead to the VΩHz jack and the black test lead to the COM jack.
- Tetapkan suis putar kepada Vol AC yang dikehendakitagjulat e (cth, 2V, 20V, 200V, 750V).
- Connect the test leads in parallel to the AC circuit or component.
- Baca voltagnilai e pada paparan.
6.3 Pengukuran Arus DC (A–)
CAUTION: Never connect the multimeter in parallel to a voltage sumber semasa mengukur arus. Ini boleh meniup fius atau merosakkan meter.
- Sambungkan petunjuk ujian hitam ke bicu COM.
- For currents up to 200mA, connect the red test lead to the mAµA jack. For currents up to 10A, connect the red test lead to the 10A jack.
- Set the rotary switch to the appropriate DC Current range (e.g., 2mA, 20mA, 200mA, 10A).
- Open the circuit and connect the multimeter in series with the load.
- Baca nilai semasa pada paparan.
6.4 AC Current Measurement (A∼)
CAUTION: Never connect the multimeter in parallel to a voltage sumber semasa mengukur arus. Ini boleh meniup fius atau merosakkan meter.
- Sambungkan petunjuk ujian hitam ke bicu COM.
- For currents up to 200mA, connect the red test lead to the mAµA jack. For currents up to 10A, connect the red test lead to the 10A jack.
- Set the rotary switch to the appropriate AC Current range (e.g., 2mA, 20mA, 200mA, 10A).
- Open the circuit and connect the multimeter in series with the load.
- Baca nilai semasa pada paparan.
6.5 Pengukuran Rintangan (Ω)
AWAS: Pastikan litar dinyahtenagakan dan semua kapasitor dinyahcas sebelum mengukur rintangan.
- Connect the red test lead to the VΩHz jack and the black test lead to the COM jack.
- Tetapkan suis berputar kepada julat Rintangan yang dikehendaki (cth, 200Ω, 2kΩ, 20kΩ, 200kΩ, 2MΩ, 200MΩ).
- Sambungkan petunjuk ujian merentasi komponen yang akan diukur.
- Baca nilai rintangan pada paparan.
6.6 Ujian Diod (→|–)
- Connect the red test lead to the VΩHz jack and the black test lead to the COM jack.
- Set the rotary switch to the Diode Test position.
- Sambungkan plumbum ujian merah ke anod dan plumbum ujian hitam ke katod diod.
- Paparan akan menunjukkan vol ke hadapantage drop. Reverse the leads; the display should show "OL" (Open Loop) for a good diode.
6.7 Ujian Kesinambungan (♫)
- Connect the red test lead to the VΩHz jack and the black test lead to the COM jack.
- Set the rotary switch to the Continuity Test position.
- Sambungkan petunjuk ujian merentasi litar atau komponen.
- If the resistance is less than approximately 50Ω, the buzzer will sound, indicating continuity.
6.8 Ujian hFE Transistor
- Tetapkan suis putar ke kedudukan hFE.
- Masukkan wayar Pemancar, Tapak dan Pengumpul transistor ke dalam lubang yang sepadan dalam soket berbilang fungsi (NPN atau PNP).
- Baca nilai hFE pada paparan.
6.9 Pengukuran Kapasitans (F)
CAUTION: Ensure the capacitor is fully discharged before measuring capacitance to avoid damage to the meter.
- Connect the red test lead to the VΩHz jack and the black test lead to the COM jack.
- Set the rotary switch to the Capacitance range (e.g., 2nF, 20nF, 200nF, 2µF, 20µF, 100µF).
- Sambungkan petunjuk ujian merentasi kapasitor.
- Baca nilai kapasitans pada paparan.
6.10 Pengukuran Kekerapan (Hz)
- Connect the red test lead to the VΩHz jack and the black test lead to the COM jack.
- Set the rotary switch to the Frequency range (20kHz).
- Connect the test leads in parallel to the signal source.
- Baca nilai kekerapan pada paparan.
6.11 Pengukuran Suhu (°C/°F)
- Connect the K-type thermocouple to the VΩHz and COM jacks, observing polarity.
- Set the rotary switch to the Temperature range.
- Letakkan prob termogandingan pada titik di mana suhu hendak diukur.
- Baca nilai suhu pada paparan.
7. Penyelenggaraan
7.1 Pembersihan
Lap kes dengan iklanamp kain dan detergen lembut. Jangan gunakan bahan pelelas atau pelarut. Pastikan meter kering sepenuhnya sebelum digunakan.
7.2 Penggantian Bateri
Refer to section 5.1 for battery replacement instructions. Replace batteries promptly when the low battery indicator appears to ensure accurate readings.
7.3 Penggantian Fius
Jika fungsi pengukuran semasa gagal, fius mungkin memerlukan penggantian. Rujuk spesifikasi untuk jenis fius dan kadaran yang betul. Penggantian fius hanya boleh dilakukan oleh kakitangan yang berkelayakan.
8. Penyelesaian masalah
| Masalah | Kemungkinan Punca | Penyelesaian |
|---|---|---|
| Meter tidak dihidupkan. | Bateri mati atau tidak dipasang dengan betul. | Periksa kekutuban bateri atau gantikan bateri. |
| "OL" (Lebihan) dipaparkan. | Pengukuran melebihi julat atau litar terbuka yang dipilih. | Select a higher range or check for open circuit. |
| Incorrect current reading. | Blown fuse or incorrect input jack. | Check fuse and ensure test lead is in the correct current input jack (mAµA or 10A). |
| Tiada bip kesinambungan. | Resistance is too high or circuit is open. | Check the circuit for breaks. Ensure resistance is below 50Ω. |
9. Spesifikasi
The following table details the technical specifications for the MASTECH MY74 Digital Multimeter.

| Fungsi | Julat | Resolusi | Ketepatan |
|---|---|---|---|
| DC Voltage | 200mV/2V/20V/200V | 0.1mV/1mV/10mV/0.1V | ±(0.5%+2) |
| 600V | 1V | ±(0.8%+2) | |
| Vol. ACtage | 2V/20V/200V | 1mV/10mV/100mV | ±(0.8%+3) |
| 750V | 1V | ±(1.2%+3) | |
| Arus DC | 2mA | 1µA | ±(0.8%+1) |
| 20mA | 10µA | ±(1.5%+1) | |
| 200mA | 0.1mA | ±(1.5%+1) | |
| 10A | 10mA | ±(2.0%+5) | |
| AC Semasa | 20mA | 10µA | ±(1.0%+5) |
| 200mA | 0.1mA | ±(1.8%+5) | |
| 10A | 0.01A | ±(3.0%+7) | |
| Rintangan | 200Ω | 0.1Ω | ±(0.8%+3) |
| 2kΩ/20kΩ/200kΩ/2MΩ | 1Ω/10Ω/100Ω/1kΩ | ±(0.8%+2) | |
| 20MΩ | 10kΩ | ±(1.0%+2) | |
| 200MΩ | 0.1MΩ | ±(6.0%+10) | |
| Diod Voltan Terbukatage | 3.0V | T/A | T/A |
| Kapasitansi | 2nF/20nF/200nF/2µF | 1pF/10pF/0.1nF/1nF | ±(4.0%+3) |
| 20µF | 10nF | ±(5.0%+3) | |
| 100µF | 0.1µF | ±(6.0%+10) | |
| Kekerapan | 20kHz | 0.01kHz | ±(2.0%+5) |
| Suhu | -20°C~0°C | 1°C | ±(5.0%+4) |
| 1°C~400°C | 1°C | ±(2.0%+3) | |
| 401°C~1000°C | 1°C | ±(2.0%+5) | |
| Transistor hFE | 0~1000 | T/A | T/A |
| Paparan | 2000 kiraan | ||
| Auto Matikan | ya | ||
| Buzzer kesinambungan | <50Ω | ||
| Pegangan Data | ya | ||
| Paparan Bateri Rendah | ya | ||
| Sumber Kuasa | 2 bateri LR44 (termasuk) | ||
| Dimensi Produk | 16 x 9 x 5 cm | ||
| Berat Barang | 0.5 Kilogram | ||
| Penilaian Keselamatan | CAT III 600V, CE, RoHS | ||
Note: Accuracy specifications are given for one year after calibration, at 18°C to 28°C (64°F to 82°F), with relative humidity up to 75%.
10. Waranti dan Sokongan
MASTECH products are designed for reliability and performance. For warranty information and technical support, please refer to the documentation included with your purchase or visit the official MASTECH website. The EU Spare Part Availability Duration is 1 year.