
OS1 Resonance Pickup
SFT Praamplifier Pickup System User Manual
Model: OS1 Resonance Pickup
1. Pengenalan
Thank you for choosing the SFT Preamplifier Pickup System. This innovative device is designed to significantly enhance the acoustic properties of your guitar, providing rich, resonant tones and versatile effects. This manual will guide you through the installation, operation, and maintenance of your new preampsistem penguat.
2. Ciri-ciri Utama
- SFT (Same Frequency Trans) Technology: Drives the guitar body to phonate, increasing frequency response and making the sound more resonant, solid, and dynamic, even without an external amplebih hidup.
- Kesan Bersepadu: Features built-in Reverb, Chorus, and Delay effects for creative sound shaping.
- Dual-Pickup System: Combines a piezo pickup and a microphone to capture comprehensive details of your playing, adding extensiveness and dynamics.
- Kesambungan Bluetooth: Allows connection to a mobile phone for playing along with background music or tracks.
- Bateri boleh dicas semula: Equipped with a 2000mAh rechargeable Li-ion battery for portable use.
- Pembinaan Tahan Lama: Diperbuat daripada bahan Akrilonitril Butadiena Stirena (ABS).
3. Kandungan Pakej
Sila sahkan bahawa semua item terdapat dalam pakej:
- 1 x SFT Preamplifier Pickup
- 1 x Bicu Pin Akhir
- 1 x Tanduk Bergetar
- 1 x Wayar Pickup
- 1 x Kabel Jenis-C
- 2 x Klip
4. Persediaan dan Pemasangan
Nota Penting: Ini adalah pra on-boardamplifier system that requires opening holes in your guitar for proper installation. Professional installation by a qualified luthier or guitar technician is highly recommended to avoid damage to your instrument.
4.1. Komponen Selesaiview

Gambar 4.1: Lebihview of the SFT Preamplifier Pickup System's controls and interfaces.
4.2. Langkah Pemasangan (Pemasangan Profesional Disyorkan)
- Sediakan Gitar: Carefully mark the locations for the preamplifier unit, end-pin jack, and vibrating horn on your guitar.
- Lubang gerudi: Precisely drill the necessary holes for mounting the components. Ensure correct sizing to prevent damage.
- Install End-Pin Jack: Secure the end-pin jack at the designated location, typically at the bottom of the guitar.
- Mount Vibrating Horn: Install the vibrating horn inside the guitar body, ensuring it has clear contact with the soundboard for optimal resonance transmission.
- Connect Pickup Wire: Connect the pickup wire from the piezo pickup (usually under the saddle) to the preampunit yang lebih hidup.
- Pasang Praamplifier Unit: Mount the preamplifier unit securely, ensuring all connections are firm.
- Masukkan Bateri: Open the battery compartment and insert the 2000mAh rechargeable battery. Ensure correct polarity.

Figure 4.2: Battery compartment with 2000mAh battery.
5. Arahan Operasi
5.1. Menghidupkan/Mematikan
Locate the power button or switch on the preamplifier unit. Press and hold (or toggle) to power the unit on or off. The Dial LED Lamp will illuminate when the unit is active.
5.2. Adjusting Effects
Praamplifier features dedicated controls for Reverb, Chorus, and Delay effects. Rotate the corresponding knobs to adjust the intensity of each effect. Experiment with different settings to find your desired sound.
5.3. Bluetooth (BT) Connection
The unit is equipped with Bluetooth functionality (BT5.0). To connect to your mobile phone or other Bluetooth-enabled device:
- Memastikan praamppenyambung dihidupkan.
- Aktifkan Bluetooth pada peranti mudah alih anda.
- Cari untuk available devices. The preamplifier sepatutnya muncul sebagai peranti yang boleh ditemui.
- Pilih praamplifier from the list to pair. Once paired, you can play background music through the system, which will be mixed with your guitar sound.

Figure 5.1: Bluetooth and other features.
5.4. Penggunaan Mikrofon
The system includes a microphone as part of its dual-pickup setup. For the microphone to be effective and audible, the preamplifier must be connected to an external speaker or amplifier. Adjust the 'Mic' control knob to blend the microphone signal with the piezo pickup signal.
6. Penyelenggaraan
6.1. Mengecas Bateri
Praamplifier is equipped with a 2000mAh rechargeable battery. When the battery indicator shows low power, connect the provided Type-C cable to the charging port on the unit and to a suitable USB power source. The charging rate is increased by 50% with the Type-C interface.

Rajah 6.1: Mengecas praamplifier via Type-C cable.
6.2. Pembersihan
Wipe the unit with a soft, dry cloth. Do not use abrasive cleaners or solvents, as these may damage the finish or internal components.
6.3. Penyimpanan
When not in use for extended periods, store the preamplifier in a cool, dry place away from direct sunlight and extreme temperatures. It is advisable to fully charge the battery before long-term storage.
7. Penyelesaian masalah
- Tiada Keluaran Bunyi:
- Ensure the unit is powered on and fully charged.
- Check all cable connections (pickup wire, end-pin jack to amplebih hidup).
- Verify that the volume on your amplifier/speaker is turned up.
- Mikrofon Tidak Berfungsi:
- The microphone requires connection to an external speaker or amplifier to be effective. Ensure your system is connected.
- Adjust the 'Mic' control knob to increase the microphone signal.
- Isu Sambungan Bluetooth:
- Memastikan praamplifier is in pairing mode or discoverable.
- Matikan dan hidupkan Bluetooth pada peranti mudah alih anda.
- Move closer to the preamplifier to ensure you are within Bluetooth range.
- Poor Resonance/Effects:
- Ensure the vibrating horn is properly installed and making good contact with the guitar's soundboard.
- Adjust the Reverb, Chorus, and Delay knobs to desired levels.
8. Spesifikasi
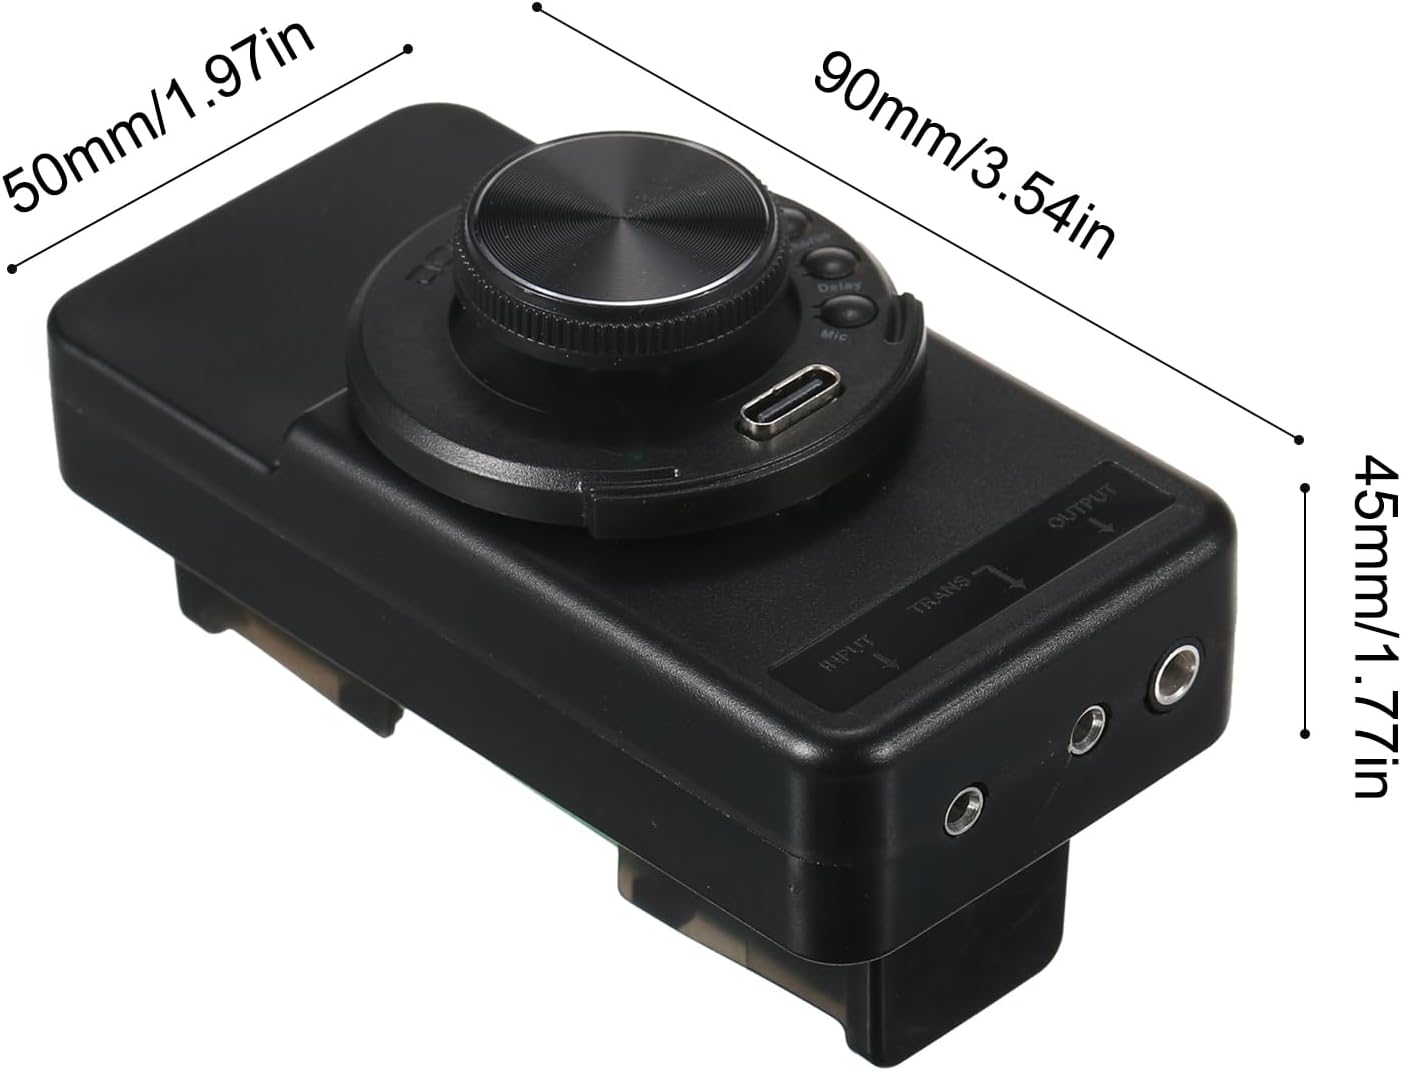
Rajah 8.1: Dimensi Produk.
| Ciri | Spesifikasi |
|---|---|
| Model | OS1 Resonance Pickup |
| bahan | Akrilonitril Butadiena Stirena (ABS) |
| Bateri | 1 x 2000mAh bateri Li-ion boleh dicas semula |
| Saiz Barang | 90 x 50 x 45 mm (3.54 x 1.97 x 1.77 inci) |
| Berat Barang | 207 g (7.30 oz) |
| Peranti Serasi | Gitar |
| warna | Hitam |
| Negara Asal | China |
9. Waranti dan Sokongan
Specific warranty information for this product is not provided in the available documentation. For details regarding warranty coverage, technical support, or service, please refer to the manufacturer's official website or contact the retailer from whom you purchased the product. Please retain your proof of purchase for any warranty claims.
Dokumen Berkaitan - OS1 Resonance Pickup
 |
Manual Pengguna Perkakasan Penderia Ouster OS1 Rev7 Lidar Manual pengguna perkakasan yang komprehensif untuk penderia lidar Ouster OS1 Rev7, meliputi keselamatan, antara muka mekanikal dan elektrik, garis panduan pelekap, suhu operasi dan penyegerakan GPS/GNSS. Termasuk spesifikasi terperinci dan maklumat pematuhan untuk model OS1-128, OS1-64 dan OS1-32. |
 |
Ouster OS1 Gen1 User Guide: High Resolution Imaging Lidar Comprehensive user guide for the Ouster OS1 Gen1 High Resolution Imaging Lidar sensor. Covers setup, configuration, data formats, networking, troubleshooting, and API references for OS1-64, OS1-32, and OS1-16 models. |
 |
Ouster OS1 Gen1 High Resolution Imaging Lidar User Guide Comprehensive user guide for the Ouster OS1 Gen1 High Resolution Imaging Lidar sensor, detailing its features, specifications, setup, and operation for various applications. |
 |
Panduan Rujukan Pantas SciCan OPTIM OS1 Wipes Panduan rujukan cepat untuk menggunakan SciCan OPTIM OS1 Wipes dan OPTIM OS1 SOLUTION Cecair Spray untuk membasmi kuman bahan dan permukaan kesan elastomer PVS. |
 |
Roxcore OS1 Outdoor Speaker User Manual User manual for the Roxcore OS1 Outdoor Speaker (Item 99812). Includes setup, wiring, mounting, safety information, and technical specifications. |
 |
Olex OS1 Echosounder Module: Warning and Installation Guide This document provides essential warnings and installation instructions for the Olex OS1 Echosounder module, detailing its technical specifications, package contents, connection schemes, and compliance information. |
Ask a question about this manual
Ask about setup, troubleshooting, compatibility, parts, safety, or missing instructions. Manuals+ will review the question and use this page’s manual context to help answer it.