
AITRIP ESP-WROOM-32 ESP32 ESP-32S CP2102
AITRIP ESP-WROOM-32 ESP32 ESP-32S CP2102 Development Board User Manual
Comprehensive instructions for setup, operation, and technical specifications.
1. Pengenalan
The AITRIP ESP-WROOM-32 ESP32 ESP-32S CP2102 Development Board is a versatile microcontroller unit designed for a wide range of applications, from IoT projects to embedded systems. It integrates a powerful ESP32 chip with dual-mode Wi-Fi and Bluetooth capabilities, making it ideal for wireless communication and networking. This board features a CP2102 USB-to-UART bridge for easy programming and communication via a Type-C interface. Its compact design and rich set of GPIO pins provide flexibility for various hardware integrations.
2. Ciri-ciri Utama
- Integrated ESP-WROOM-32 Module: Features the ESP32-D0WD-V3 chip, offering 2.4GHz dual-mode Wi-Fi (802.11b/g/n) and Bluetooth (Classic and BLE) connectivity.
- Dual-Core Microcontroller: Equipped with two Xtensa LX6 microprocessors, providing robust processing power for complex tasks.
- CP2102 USB-to-UART Bridge: Facilitates reliable serial communication for programming and debugging via the USB Type-C port.
- 30-Pin Design: Offers a comprehensive set of GPIO pins for connecting various sensors, actuators, and other peripherals.
- Flexible Operating Modes: Supports AP (Access Point), STA (Station), and AP+STA coexistence modes for diverse networking applications.
- Komponen Bersepadu: Includes antenna, RF balun, power amppenguat, bunyi rendah amplifier, filters, and power management modules for optimized performance.
- Keserasian Luas: Compatible with popular development environments such as Arduino IDE and ESP-IDF.
3. Spesifikasi Teknikal

Image: Detailed specifications of the ESP32 development board, highlighting the ESP-32 (CP2102) module, 30-pin configuration, and Type-C interface.
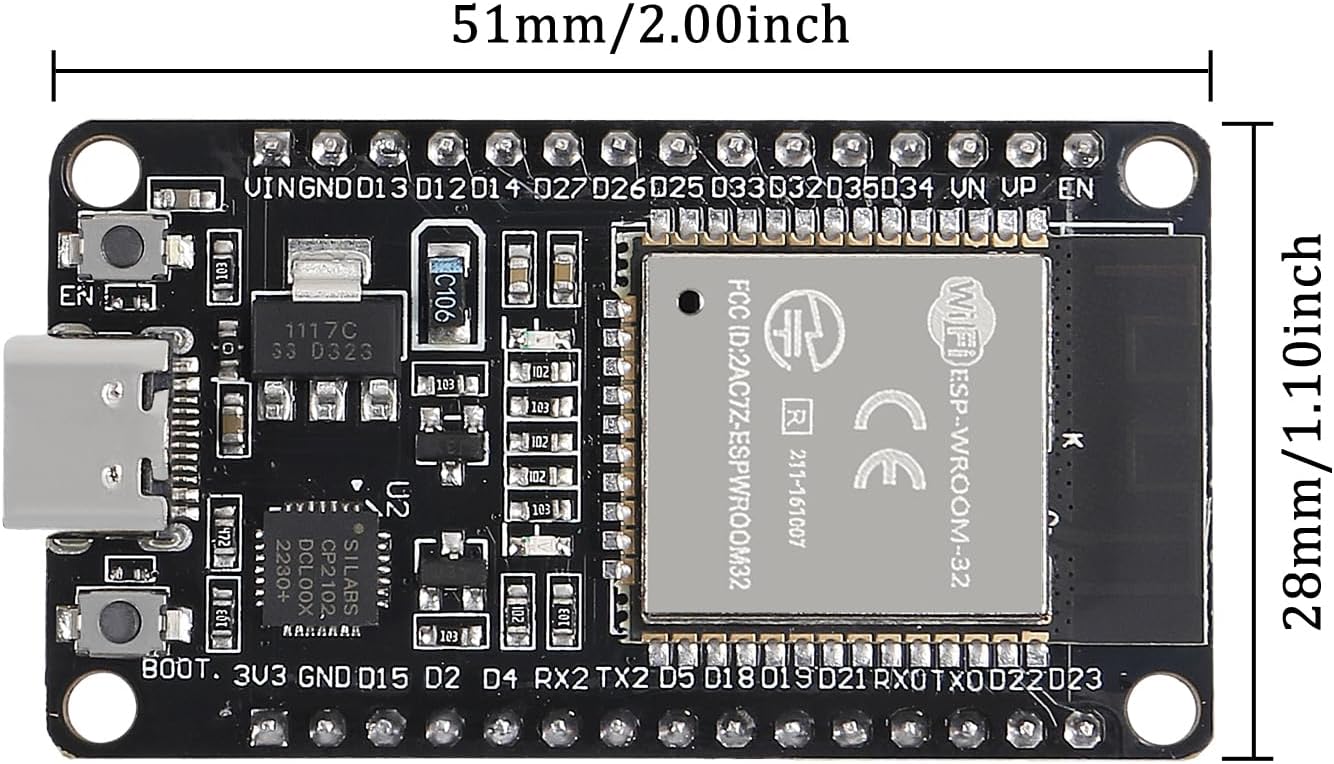
Image: Diagram illustrating the physical dimensions of the ESP32 development board, showing a length of 51mm (2.00 inches) and a width of 28mm (1.10 inches).
| Spesifikasi | Nilai |
|---|---|
| Nama Model | ESP-WROOM-32 ESP32 ESP-32S Development Board |
| Pengawal mikro | ESP32-D0WD-V3 |
| Jambatan USB-ke-UART | CP2102 |
| Antara muka | USB Jenis-C |
| Kesambungan Wayarles | 2.4GHz Wi-Fi (802.11b/g/n), Bluetooth (Classic and BLE) |
| Sokongan Sistem Pengendalian | PercumaRTOS |
| Bilangan Pemproses | 2 (Dual-Core) |
| RAM | LPDDR4 |
| Kiraan Pin | 30 Pin |
| Dimensi | 51mm x 28mm (lebih kurang 2.00 x 1.10 inci) |
| Berat Barang | 1.76 auns |
4. Kandungan Pakej

Image: A package containing five AITRIP ESP-WROOM-32 ESP32 ESP-32S CP2102 Development Boards, as typically supplied in a multi-pack.
Setiap pakej mengandungi:
- AITRIP ESP-WROOM-32 ESP32 ESP-32S CP2102 Development Board (quantity as purchased, e.g., 5 pieces)
5. Panduan Persediaan
5.1. Pemasangan Pemandu
The ESP32 development board uses a CP2102 USB-to-UART bridge chip for communication with your computer. Before programming, you may need to install the appropriate drivers.
- Identify the Chip: The board typically uses a Silicon Labs CP2102 chip.
- Muat Turun Pemacu: Visit the official Silicon Labs webtapak (silabs.com/developers/usb-to-uart-bridge-vcp-drivers) to download the latest CP210x Universal Windows Driver (or equivalent for your operating system).
- Pasang Pemacu: Follow the on-screen instructions to install the drivers. Restart your computer if prompted.
- Sahkan Pemasangan: Connect the ESP32 board to your computer using a USB Type-C cable. Check your device manager (Windows) or system information (macOS/Linux) to confirm the COM port or serial device is recognized.
5.2. Integrated Development Environment (IDE) Setup
The ESP32 board can be programmed using various IDEs. Arduino IDE is a popular choice for its ease of use.
- Pasang Arduino IDE: Muat turun dan pasang Arduino IDE dari Arduino rasmi webtapak (arduino.cc/ms/perisian).
- Add ESP32 Board Manager URL: Dalam Arduino IDE, pergi ke File > Keutamaan. In the "Additional Boards Manager URLmedan s", tambah:
https://raw.githubusercontent.com/espressif/arduino-esp32/gh-pages/package_esp32_index.json - Install ESP32 Boards: Pergi ke Alatan > Papan > Pengurus Papan... Cari untuk "ESP32" and install the "esp32 by Espressif Systems" package.
- Pilih Papan: Selepas pemasangan, pergi ke Tools > Board > ESP32 Arduino and select "ESP32 Dev Module".
5.3. Menghubungkan Lembaga
Connect the ESP32 development board to your computer using a high-quality USB Type-C data cable. Ensure the cable is capable of both power and data transfer.
Video: An official product video demonstrating the unboxing and initial handling of the ESP-32 Development Board with a USB-C interface, showing the board being removed from its anti-static packaging and inspected.
6. Arahan Operasi
6.1. Basic Programming and Upload
Once your IDE is set up and the board is connected, you can upload your first program.
- Open an Example Sketch: Dalam Arduino IDE, pergi ke File > Cthamples > 01.Asas > Berkelip to open a simple LED blinking program.
- Pilih Port: Pergi ke Alatan > Pelabuhan and select the COM port corresponding to your ESP32 board.
- Upload Sketch: Click the "Upload" button (right arrow icon) in the Arduino IDE. The IDE will compile the code and upload it to the board. During upload, you might need to press and hold the "BOOT" button on the ESP32 board, then press "EN" (reset), and release "BOOT" when the upload starts.
- Monitor Serial Output: Open the Serial Monitor (magnifying glass icon) to view output from your program. Ensure the baud rate matches your sketch.
6.2. WiFi and Bluetooth Configuration
The ESP32's core functionality lies in its wireless capabilities. Refer to the extensive documentation and examples available for ESP32 on how to configure Wi-Fi in STA (connect to an existing network), AP (create its own network), or AP+STA modes, and how to use Bluetooth Classic or Bluetooth Low Energy (BLE).
6.3. Pinout Reference

Imej: Depan dan belakang views of a single ESP32 development board, showing the ESP-WROOM-32 module, CP2102 chip, USB-C port, and pin labels on the front, and the 'ESP32 DEVKIT V1 TYPE-C' label on the back.

Imej: Dari dekat view of the ESP32 development board, detailing the USB-C port, reset and boot buttons, the CP2102 chip, and the ESP-WROOM-32 module with its metallic shield.
The ESP32 development board features 30 pins, including GPIOs, power pins (3.3V, 5V, GND), and communication pins (UART, SPI, I2C). Consult the official ESP32 documentation or community-generated pinout diagrams for detailed information on each pin's function and capabilities. Proper understanding of the pinout is crucial for connecting external components and designing circuits.
7. Penyelenggaraan
To ensure the longevity and reliable operation of your AITRIP ESP32 Development Board, follow these maintenance guidelines:
- Tangani dengan Berhati-hati: Elakkan daripada menjatuhkan papan atau menyebabkannya terkena kejutan fizikal.
- Prevent Electrostatic Discharge (ESD): Always handle the board by its edges and consider using an anti-static wrist strap, especially when working in dry environments.
- Jaga kebersihan: Protect the board from dust, dirt, and debris. Use compressed air or a soft brush to gently clean the surface if necessary.
- Elakkan Kelembapan: Keep the board away from liquids and high humidity to prevent short circuits and corrosion.
- Storan yang Betul: When not in use, store the board in its original anti-static packaging or a protective enclosure.
- Bekalan Kuasa: Always use a stable and appropriate power supply (typically 5V via USB-C) to prevent damage.
8. Penyelesaian masalah
Berikut ialah beberapa isu biasa dan potensi penyelesaiannya:
- Papan Tidak Dikesan oleh Komputer:
- Ensure CP2102 drivers are correctly installed (refer to Section 5.1).
- Try a different USB Type-C cable; some cables are charge-only.
- Uji dengan port USB yang berbeza pada komputer anda.
- Mulakan semula komputer anda.
- Failed to Upload Sketch:
- Verify the correct board type ("ESP32 Dev Module") and COM port are selected in the Arduino IDE.
- Ensure the baud rate for upload is set correctly (e.g., 115200).
- During upload, press and hold the "BOOT" button, then press "EN" (reset), and release "BOOT" when the upload process begins.
- Check for any error messages in the Arduino IDE console for specific clues.
- WiFi/Bluetooth Connection Issues:
- Double-check your network credentials (SSID, password) in your code.
- Ensure the ESP32 is within range of the Wi-Fi access point or Bluetooth device.
- Verify that your code correctly initializes and manages the Wi-Fi/Bluetooth modules.
- Reset the board by pressing the "EN" button.
- Unexpected Behavior/Crashes:
- Review your code for logical errors or memory issues.
- Ensure your power supply is stable and sufficient for the board and any connected peripherals.
- Check for loose connections or faulty wiring if external components are used.
9. Waranti dan Sokongan
AITRIP products are designed for reliability and performance. For specific warranty information, please refer to the terms and conditions provided at the time of purchase or contact your retailer. If you encounter any issues or require technical assistance, please reach out to AITRIP customer support through the vendor's official channels or the platform where the product was purchased. Provide your product model and a detailed description of the issue for efficient support.
Ask a question about this manual
Ask about setup, troubleshooting, compatibility, parts, safety, or missing instructions. Manuals+ will review the question and use this page’s manual context to help answer it.