1. Pengenalan
This manual provides essential information for the safe and effective operation of the FNNEMGE MY2600D Digital Clamp Meter. This versatile instrument is designed for precise measurement of AC/DC voltage, AC/DC current, resistance, capacitance, frequency, duty cycle, diode, continuity, and temperature. It features True RMS measurement, Non-Contact Voltage (NCV) detection, Low Pass Filter (LPF), and Low Impedance (LowZ) functions, making it suitable for industrial, automotive, household, and educational applications.

Image 1.1: The FNNEMGE MY2600D Digital Clamp Meter, including test leads and a protective carrying case.
2. Maklumat Keselamatan
To ensure safe operation and prevent damage to the meter, please read and follow all safety instructions carefully. This device complies with IEC 61010-1, CAT III 600V, and CE standards.
- Keselamatan Umum: Always use the meter according to the instructions. Do not operate the meter if it appears damaged or if the insulation is compromised.
- Voltage Had: Jangan gunakan lebih daripada vol yang dinilaitage, as marked on the meter, between the terminals or between any terminal and earth ground. The maximum operating voltage ialah 600 Volt.
- Pengukuran Semasa: Ensure the circuit is de-energized before connecting the clamp meter for current measurements, especially when measuring high currents.
- Petunjuk Ujian: Use only the test leads provided with the meter. Inspect test leads for damage before each use.
- Litar Langsung: Exercise extreme caution when working with live circuits. Avoid contact with bare conductors or terminals.
- Persekitaran: Jangan gunakan meter dalam gas meletup, wap atau persekitaran berdebu.
- Perlindungan Lebihan: The meter features overload protection, double ceramic fuses, and thermistors to protect the circuit. However, always operate within specified ranges.
- Penggantian Bateri: Gantikan bateri dengan segera apabila penunjuk bateri lemah muncul untuk memastikan bacaan yang tepat.

Image 2.1: Illustration of the internal overload protection mechanism within the clamp meter, designed to prevent damage from misuse.
3. Produk Lebihview
Familiarize yourself with the components of your FNNEMGE MY2600D Digital Clamp meter:

Image 3.1: Detailed diagram of the clamp meter indicating its various parts and controls.
- Clamp: Digunakan untuk pengukuran arus AC/DC tanpa sentuhan.
- Penghalang Keselamatan: Indicates the safe limit for hand placement.
- Function Range Switch: Rotary dial to select measurement functions.
- Butang Tahan Data (H): Membekukan bacaan semasa pada paparan.
- Butang lampu suluh: Mengaktifkan lampu suluh LED terbina dalam.
- Skrin LCD: Paparan digital untuk bacaan, unit dan penunjuk.
- Terminal Input: Input positif untuk petunjuk ujian.
- Terminal Input COM: Input biasa (negatif) untuk petunjuk ujian.
- Backlight Reset Button: Mengawal lampu latar paparan.
- Function Selection Button (SEL): Toggles between functions within a rotary switch position (e.g., AC/DC, Diode/Continuity).
- Penunjuk Amaran: Visual alert for certain conditions (e.g., NCV detection).
- Pencetus: Membuka dan menutup clamp Rahang.
- Pencahayaan Lamp: Provides light for the measurement area.
- NCV Detection Probe: Area for Non-Contact Voltagpengesanan e.
4. Persediaan
4.1 Pemasangan Bateri
The FNNEMGE MY2600D requires two AAA batteries (included). To install or replace batteries:
- Pastikan meter dimatikan.
- Cari penutup petak bateri di belakang meter.
- Gunakan pemutar skru untuk melonggarkan skru dan tanggalkan penutupnya.
- Masukkan dua bateri AAA, perhatikan polariti (+ dan -) yang betul seperti yang ditunjukkan di dalam petak.
- Gantikan penutup petak bateri dan kencangkannya dengan skru.

Imej 4.1: Klamp meter package contents, including the meter, manual, test leads, and AAA batteries.
5. Arahan Operasi
Before operating, ensure the meter is in good condition and the batteries are properly installed.
5.1 Hidupkan/Mati Kuasa
Rotate the Function Range Switch to any desired measurement function to turn the meter ON. Rotate it to the "OFF" position to turn the meter OFF. The meter features an automatic shutdown function to conserve battery life after a period of inactivity.
5.2 AC/DC Current Measurement (0-600A)
Untuk mengukur arus menggunakan clamp:
- Rotate the Function Range Switch to the "600A" or "60A" position for AC/DC current.
- Press the "SEL" button to switch between AC and DC current measurement if necessary.
- Tekan picu untuk membuka clamp Rahang.
- Enclose only one conductor (not a cable with multiple conductors) within the clamp Rahang.
- Release the trigger to close the jaw. The current reading will appear on the LCD.

Imej 5.1: Klamp jaw open, demonstrating how to enclose a single conductor for current measurement. The jaw opening is 26mm.
5.3 AC/DC Jldtage Pengukuran
Untuk mengukur voltage:
- Insert the red test lead into the "INPUT" terminal and the black test lead into the "COM" terminal.
- Rotate the Function Range Switch to the "V~" (AC Voltage) atau "V-" (Vol DCtage) position. The meter may automatically detect AC or DC.
- Press the "SEL" button to switch between AC and DC voltage jika diperlukan.
- Sambungkan petunjuk ujian secara selari dengan litar atau komponen yang ingin anda ukur.
- Baca voltagnilai e pada LCD.

Image 5.2: Measuring voltage by inserting test leads into a power outlet.
5.4 Resistance, Diode, Continuity, Capacitance, Frequency, Duty Cycle Measurement
For these measurements, connect the test leads as described for voltage pengukuran.
- Rintangan (Ω): Rotate the switch to the "Ω" position. Connect leads across the component.
- Diode (→|): Rotate the switch to the "Ω" position and press "SEL" until the diode symbol appears. Connect leads across the diode.
- Continuity (🔊): Rotate the switch to the "Ω" position and press "SEL" until the continuity symbol appears. Connect leads across the circuit. An audible beep indicates continuity.
- Kapasitansi (F): Rotate the switch to the "F" position. Connect leads across the capacitor.
- Kekerapan (Hz) / Kitaran Tugas (%): Rotate the switch to the "Hz%" position. Press "SEL" to toggle between frequency and duty cycle. Connect leads to the signal source.

Imej 5.3: Cthamples of various measurements including voltage, resistance, battery, and diode testing using the meter and its test leads.
5.5 Pengukuran Suhu
Untuk mengukur suhu:
- Rotate the Function Range Switch to the "°C/°F" position.
- Insert the temperature probe into the "INPUT" and "COM" terminals, observing polarity.
- Letakkan hujung probe suhu pada atau berhampiran objek yang suhunya ingin diukur.
- Read the temperature on the LCD. Press "SEL" to switch between Celsius and Fahrenheit.
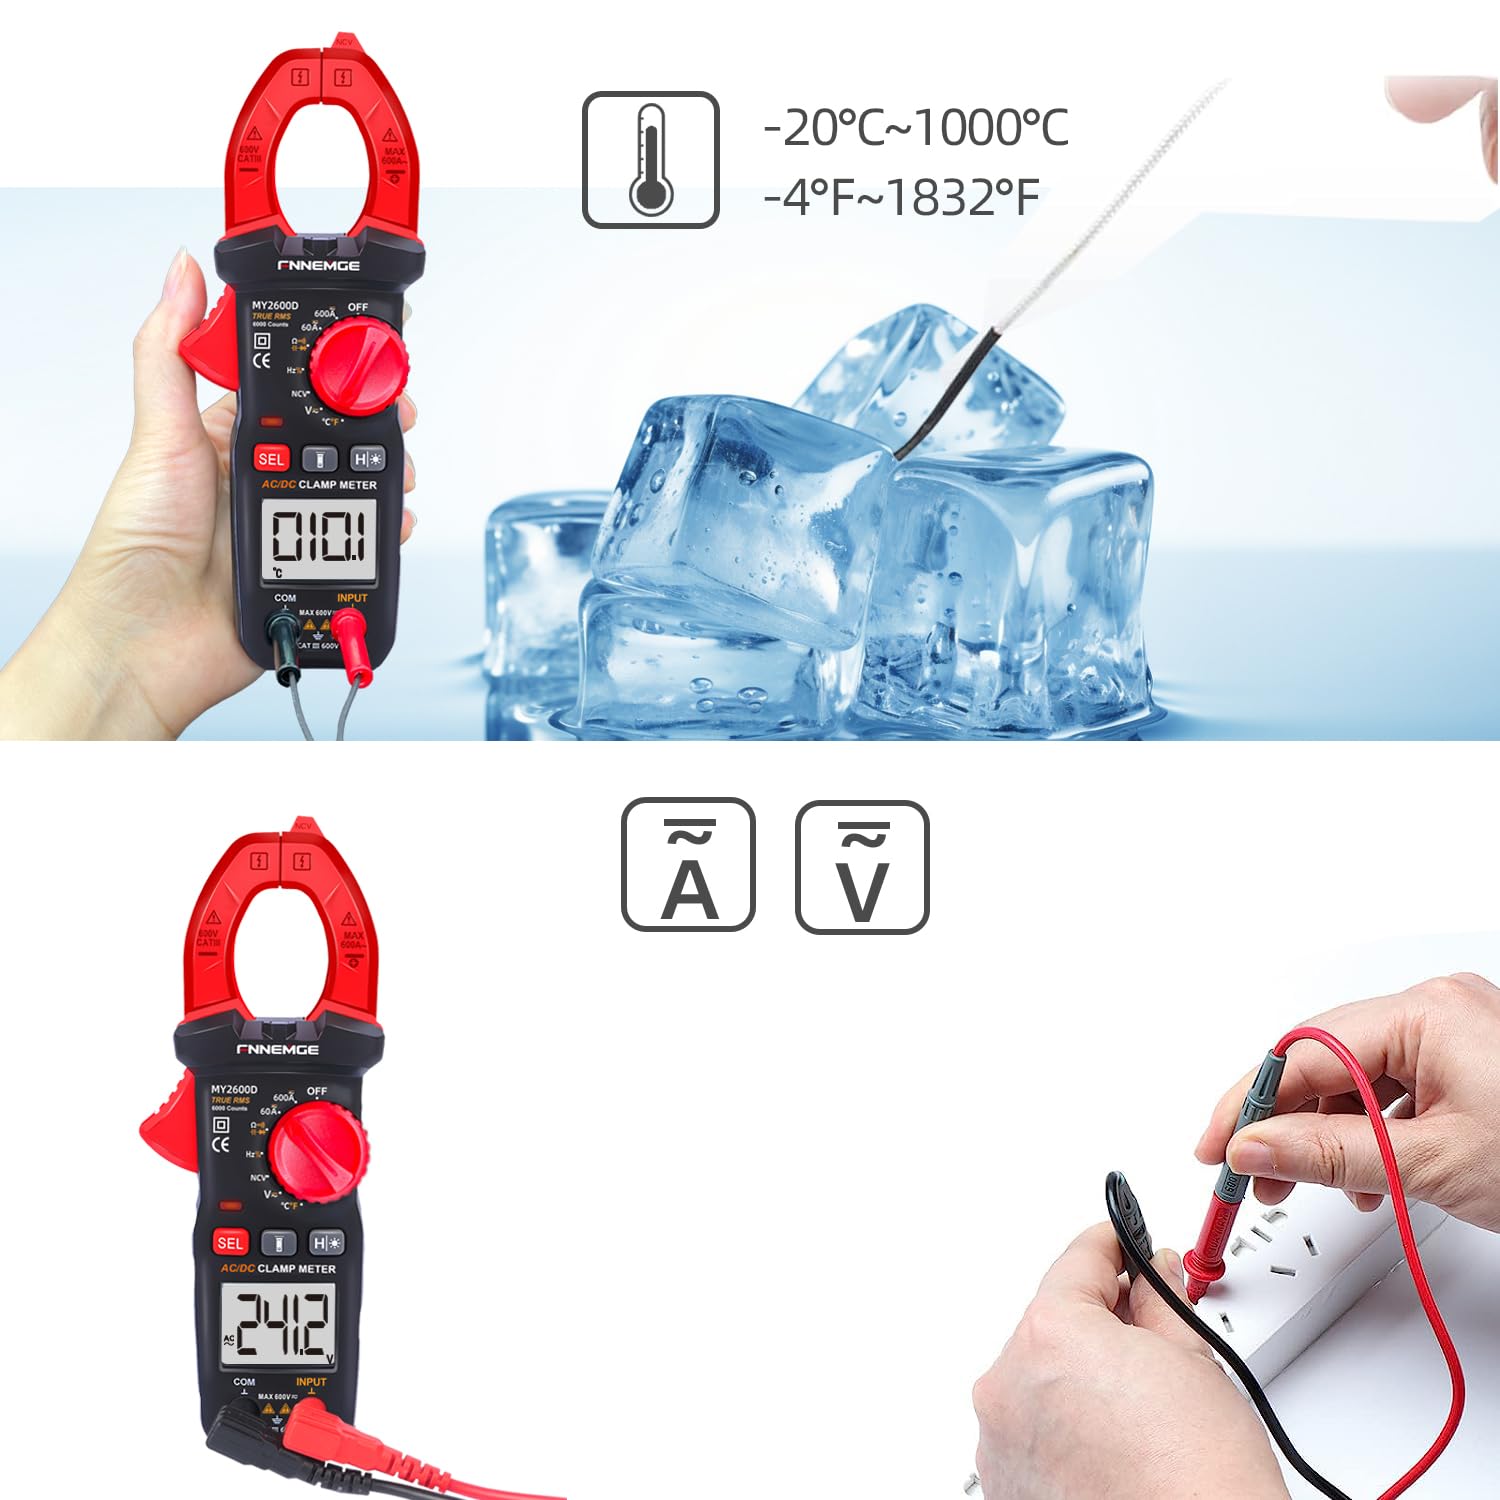
Image 5.4: Using the temperature probe to measure the temperature of ice, demonstrating the meter's temperature function.
5.6 Fungsi Khas
- Vol. Bukan Kenalantage (NCV): Rotate the switch to the "NCV" position. Bring the NCV detection probe (top of the clamp jaw) near a live AC voltage source. The meter will indicate the presence of voltage with an audible alarm and visual warning.
- Penapis Lulus Rendah (LPF): Semasa mengukur AC voltage or current in circuits with variable frequency drives or other noise sources, activate LPF by pressing the dedicated button (if available, or via SEL in AC V/A mode). This filters out high-frequency interference for more accurate True RMS readings.
- Low Impedance (LowZ): This function helps prevent ghost voltages by providing a low impedance input, which drains away stray capacitance. Activate LowZ by selecting the appropriate function on the rotary switch or via the "SEL" button.
- True RMS (TRMS): The meter automatically measures True RMS for AC voltage and current, providing accurate readings for non-sinusoidal waveforms.
- Pegangan Data (H): Press the "H" button to freeze the current reading on the display. Press it again to release.
- Lampu latar/lampu suluh: Press the backlight button to turn on the LCD backlight. Press the flashlight button to activate the LED flashlight for illuminating the measurement area.

Imej 5.5: Klamp meter's flashlight in use, illuminating a dark area for easier measurement, with the NCV indicator visible.
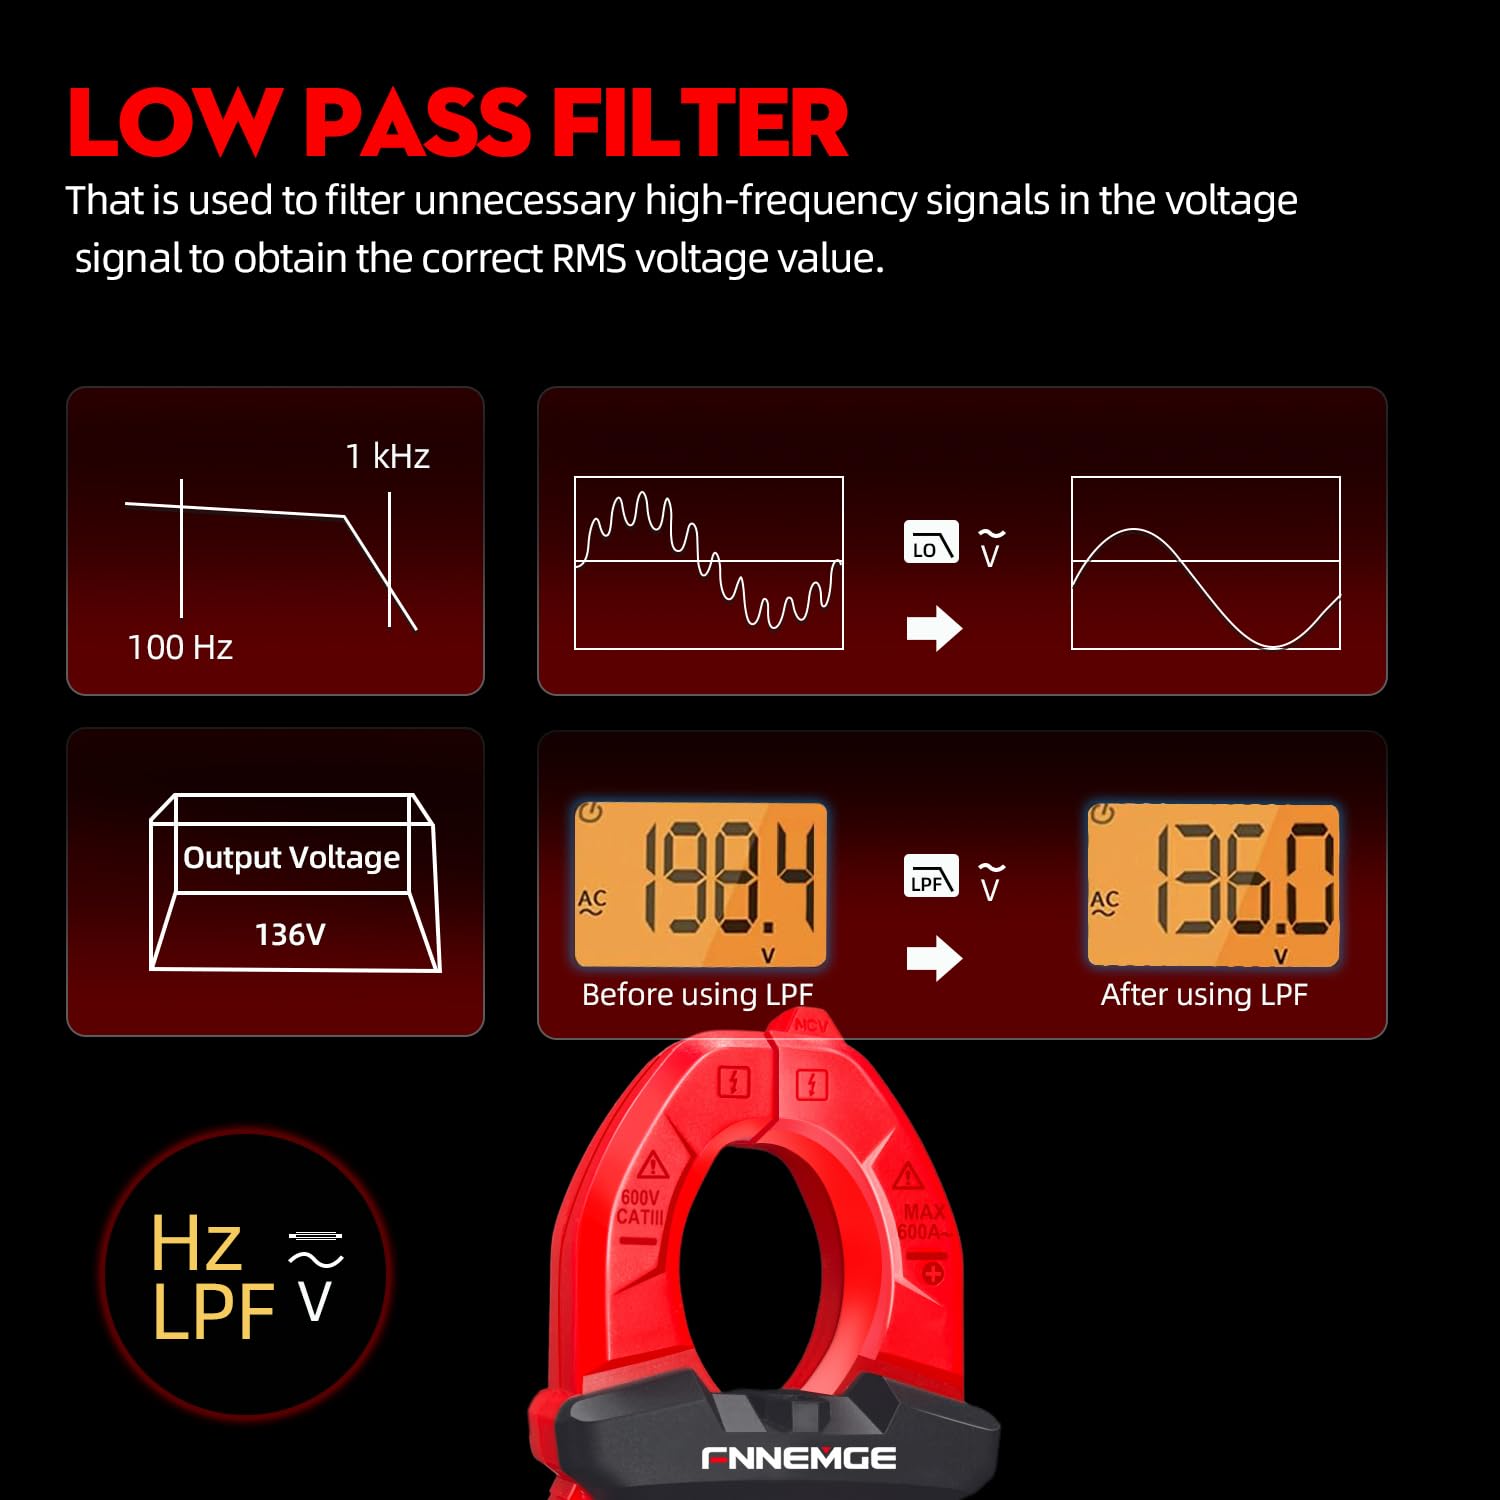
Image 5.6: An illustration detailing the function of the Low Pass Filter (LPF) in filtering out high-frequency noise for accurate voltage bacaan.
6. Penyelenggaraan
6.1 Pembersihan
Wipe the meter with a dry, soft cloth. Do not use abrasives or solvents. Keep the terminals free of dirt and moisture.
6.2 Penggantian Bateri
Apabila penunjuk bateri rendah muncul pada LCD, gantikan bateri seperti yang diterangkan dalam Bahagian 4.1. Tanggalkan bateri jika meter tidak digunakan untuk tempoh yang lama.
6.3 Penyimpanan
Store the meter in a cool, dry place, away from direct sunlight and extreme temperatures. Use the provided carrying case for protection.
7. Penyelesaian masalah
If you encounter issues with your FNNEMGE MY2600D, refer to the following common problems and solutions:
- Tiada Paparan/Meter Tidak Dihidupkan:
- Periksa pemasangan bateri dan pastikan kekutuban yang betul.
- Gantikan bateri jika ia kehabisan kuasa.
- Ensure the Function Range Switch is not in the "OFF" position.
- Bacaan Tidak Tepat:
- Verify the correct measurement function is selected.
- Pastikan wayar ujian disambungkan dengan betul dan tidak rosak.
- For current measurement, ensure only one conductor is within the clamp Rahang.
- Check for external interference or strong magnetic fields.
- For AC measurements, consider using the LPF function if high-frequency noise is suspected.
- "OL" or Overload Indication:
- The measured value exceeds the meter's range for the selected function. Switch to a higher range if available, or ensure the input is within the meter's capabilities.
- NCV Tidak Mengesan Voltage:
- Ensure the NCV function is selected.
- Bring the NCV probe closer to the live AC source.
- Sahkan voltage source is active.
Jika masalah berterusan, hubungi sokongan pelanggan untuk mendapatkan bantuan.
8. Spesifikasi
| Ciri | Spesifikasi |
|---|---|
| Jenama | FNNEMGE |
| Nombor Model | MY2600D |
| Paparan | 6000 Kiraan |
| Jenis Pengukuran | True RMS Digital Clamp Meter |
| AC/DC Current Range | 0-600A |
| Vol. Operasi Makstage | 600 Volt |
| Julat Rintangan | Sehingga 60 MΩ |
| Julat Kapasiti | Up to 100 mF |
| Julat Suhu | -20°C hingga 1000°C (-4°F hingga 1832°F) |
| Fungsi Khas | NCV, LowZ, LPF, Data Hold, Auto Ranging, Backlight, Flashlight |
| Piawaian Keselamatan | IEC 61010-1, CAT III 600V, CE |
| Sumber Kuasa | 2 x Bateri AAA (termasuk) |
| Dimensi Produk (L x W x H) | 18 x 6.4 x 3.4 cm |
| Berat Produk | 400 gram |
| Negara Asal | China |
9. Waranti dan Sokongan
FNNEMGE provides a 36-month after-sales service and lifetime technical support for the MY2600D Digital Clamp Meter. If you have any questions, require technical assistance, or need to claim warranty service, please contact FNNEMGE customer support through your purchase platform or the official FNNEMGE webtapak.