1. Pengenalan
The SoundBeast Video Capture Box 2.0 is a standalone device designed to convert analog video and audio signals into digital formats without the need for a computer. It allows you to preserve old memories from various sources such as VCRs, VHS tapes, camcorders, Hi8, DVD players, cassette tape players, stereos, and turntables. Recordings are saved directly to a USB flash drive or MicroSD memory card.
Video 1: Perkenalan sudah tamatview of the SoundBeast Video Capture Box 2.0, highlighting its key features and purpose.
2. Kandungan Pakej
Verify that all items are present in your SoundBeast Video Capture Box 2.0 package:
- SoundBeast Video Capture Box 2.0
- Kabel Kuasa USB
- Kabel Pemindahan Video 3-RCA
- 3.5mm Audio Transfer Cable
- Alat Kawalan Jauh
- Panduan Mula Pantas

Imej 1: The complete package contents of the SoundBeast Video Capture Box 2.0, showing the main unit, various cables, remote control, and user manual.
3. Produk Lebihview
The SoundBeast Video Capture Box 2.0 features a compact design with a 3-inch LCD screen for previewing recordings. It includes various ports for connecting analog video and audio sources, as well as for power and storage.
Susun Atur dan Port Peranti

Imej 2: Menghadap ke hadapan view of the SoundBeast Video Capture Box 2.0, displaying its integrated LCD screen and the top-mounted RCA input ports.
Peranti ini merangkumi port berikut:
- Port USB: For connecting a USB flash drive (not included) to save recordings.
- Keluar HDMI: For connecting to a TV or monitor for playback.
- AV In (RCA): Red, White, and Yellow ports for connecting analog video and stereo audio sources.
- S-Video In: For connecting S-Video sources for improved video quality.
- Slot Kad MicroSD: For inserting a MicroSD memory card (not included) to save recordings.
- DC Dalam: For connecting the USB power cable.
- Audio Dalam 3.5mm: For connecting audio-only sources like cassette players or turntables.
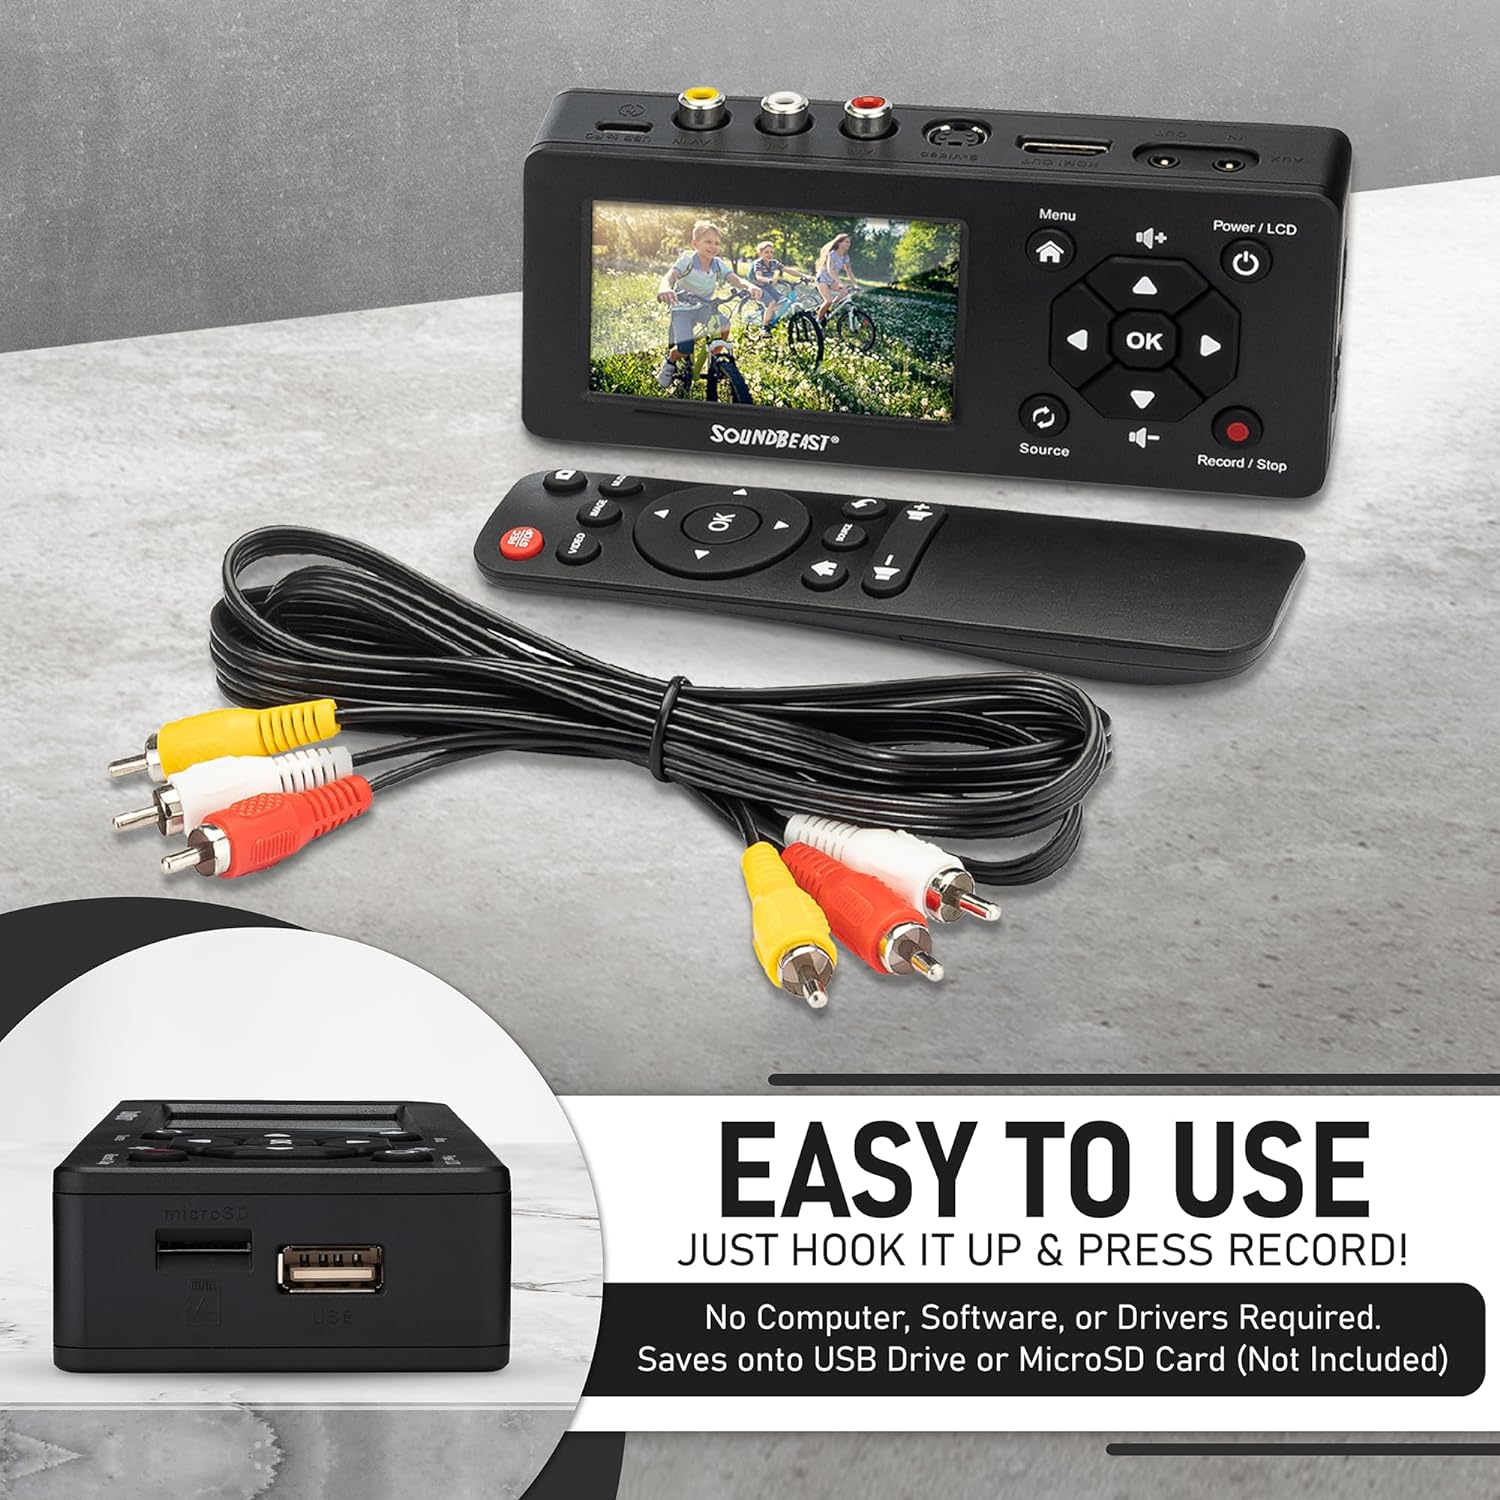
Imej 3: A terperinci view of the SoundBeast Video Capture Box 2.0, highlighting the USB and MicroSD card slots on the side, along with the included remote control and RCA cables.
4. Persediaan
Before beginning, ensure you have a USB flash drive or MicroSD card (up to 128GB, FAT32 format recommended) inserted into the device. No computer, drivers, or software are required for recording.
Connecting Video Sources (VCR, Camcorder, DVD Player, Gaming System)
- Connect the 3-RCA Video Transfer Cable (yellow, white, red) to the KELUAR AV ports of your video source (e.g., VCR, camcorder).
- Connect the other end of the 3-RCA Video Transfer Cable to the AV IN ports (yellow for video, white for left audio, red for right audio) on the top of the SoundBeast Video Capture Box 2.0.
- Alternatively, if your source has an S-Video output, connect an S-Video cable (not included) from your source to the S-VIDEO DI port on the device. Then connect the white and red RCA cables for audio.
- Plug the USB Power Cable into the DC Masuk port on the device and connect the other end to a USB power adapter (not included) or a powered USB port.
Connecting Audio Sources (Cassette Player, Stereo, Turntable)
- Connect the 3.5mm Audio Transfer Cable to the headphone jack or audio output of your audio source.
- Connect the other end of the 3.5mm Audio Transfer Cable to the Audio Masuk 3.5mm port on the side of the SoundBeast Video Capture Box 2.0.
- Plug the USB Power Cable into the DC Masuk port on the device and connect the other end to a USB power adapter (not included) or a powered USB port.

Imej 4: The SoundBeast Video Capture Box 2.0 positioned on top of a VCR, with RCA cables connected. A boombox is also shown, illustrating audio recording capabilities.
Video 2: A demonstration of how to connect and operate a similar video to digital converter, showcasing the process of digitizing analog media.
5. Arahan Operasi
Recording Video or Audio
- Power on the SoundBeast Video Capture Box 2.0 by pressing and holding the Power/LCD button.
- Ensure your video or audio source is playing. You should see the live feed on the 3-inch LCD screen (for video) or an audio level meter (for audio).
- Tekan ke Rekod/Berhenti button once to begin recording. A red indicator will appear on the screen.
- Tekan ke Rekod/Berhenti button again to stop recording. The recording will be saved to your inserted USB drive or MicroSD card.
Ciri Auto Henti
The device includes an Auto Stop feature that automatically stops recording after a preset time, ideal for long tapes.
- Access the device menu using the Menu button.
- Navigate to the "Auto Stop Recording" option.
- Select a preset time (e.g., 60, 90, 120, 150 minutes) or set a custom duration.
- Confirm your selection. The device will now stop recording automatically after the specified time.

Imej 5: The SoundBeast Video Capture Box 2.0 connected to a laptop, illustrating its auto-stop and optional live streaming capabilities. The screen displays a family enjoying a meal.
Rakaman Main semula
- From the main menu, select "Playback" or navigate to your recorded files.
- Use the navigation buttons to select the desired video or audio file.
- Press the "OK" button to start playback on the 3-inch LCD screen.
- Kepada view on a larger screen, connect an HDMI cable (not included) from the device's HDMI Keluar port to your TV or monitor.
6. Memindahkan Rakaman
To transfer your digitized files ke komputer atau peranti lain:
- Safely remove the USB flash drive or MicroSD card from the SoundBeast Video Capture Box 2.0 after recording is complete.
- Insert the USB flash drive or MicroSD card (using a card reader if necessary) into your computer.
- Your computer will recognize the drive as a storage device. You can then access, copy, edit, or share your MP4 video files or MP3 audio files.
7. Penyelesaian masalah
- No Signal on Screen: Ensure all cables are securely connected to both the source device and the SoundBeast Video Capture Box 2.0. Verify the source device is powered on and playing. Try connecting the source directly to a TV to confirm it is outputting a signal.
- Jerky or Blurry Video: This often indicates an issue with the video source (VCR, camcorder) itself, not the converter. Ensure the source device is functioning correctly and the tape is in good condition.
- Rakaman Berhenti Secara Tidak Dijangka: Check if the Auto Stop feature is enabled and set to a specific time. Ensure the USB drive or MicroSD card has sufficient free space and is formatted correctly (FAT32).
- Tiada Audio: Verify that the audio cables (white/red RCA or 3.5mm) are correctly connected. Check the volume settings on both the source device and the SoundBeast Video Capture Box 2.0.
- Peranti Tidak Dihidupkan: Ensure the USB power cable is securely connected to the DC In port and a working power source.
8. Spesifikasi
| Ciri | Perincian |
|---|---|
| Jenama | SoundBeast |
| Nama Model | Video Capture Box 2.0 |
| Berat Barang | 14.9 auns |
| Dimensi Produk | 5.6 x 2.4 x 1.1 inci |
| Resolusi Tangkapan Video | 1080p (Upscaled) |
| Antara Muka Perkakasan | USB, AV In, S-Video In, HDMI Out, MicroSD |
| Keserasian Sistem Pengendalian | Windows, Linux (for file pemindahan) |
9. Waranti & Sokongan
The SoundBeast Video Capture Box 2.0 comes with a Waranti 1 Tahun and dedicated Tech Support from SoundBeast, a USA-Based Small Business. For any issues or assistance, please refer to the contact information provided in your Quick Start Guide or visit the official SoundBeast webtapak.