1. Pengenalan
This manual provides instructions for the safe and effective use of your AquilaPro KL02060 Laser Measuring Tool. This compact device is designed for accurate distance measurements up to 197 feet (60 meters) with an accuracy of ±0.078 inches (2mm). It features multiple measurement modes, unit switching, and a USB rechargeable battery.
2. Maklumat Keselamatan
WARNING: Read all safety warnings and instructions before using this product.
- This device is a Class II laser product with a power output of less than 1mW.
- Jangan merenung terus ke pancaran laser.
- Jangan halakan pancaran laser kepada orang atau haiwan.
- Jangan buka atau ubah suai peranti ini. Pembaikan hanya boleh dilakukan oleh kakitangan servis yang dibenarkan.
- Jauhkan peranti daripada capaian kanak-kanak.
- Use only the specified charging method (USB).
- Avoid using the device in explosive atmospheres or near flammable materials.
3. Produk Lebihview
Familiarize yourself with the components and controls of your AquilaPro KL02060 Laser Measuring Tool.

Rajah 3.1: Depan view of the AquilaPro KL02060 Laser Measuring Tool with key components labeled. Labels include: screen, single measurement/unit switch button, addition/subtraction measurement button, function/front/rear reference button, history/preset value setting button, and power/backlight button.
- Skrin: Displays measurements, modes, battery status, and other information.
- Single Measurement / Unit Switch Button: Initiates a single measurement or cycles through measurement units (m/in/ft).
- Addition / Subtraction Measurement Button: Activates addition or subtraction functions for measurements.
- Function / Front/Rear Reference Button (FUNC): Cycles through measurement modes (e.g., length, area, volume, Pythagorean) and switches the measurement reference point (front or rear of the device).
- History / Preset Value Setting Button (PRESET): Accesses measurement history or sets preset values.
- Power / Backlight Button: Turns the device on/off and controls the screen backlight.
4. Persediaan
4.1 Mengecas Bateri
The AquilaPro KL02060 is equipped with a rechargeable Lithium-ion battery. Before first use, fully charge the device.
- Cari port pengecasan USB pada peranti.
- Connect the device to a standard USB power source (e.g., computer, wall adapter) using the provided USB cable.
- Penunjuk bateri pada skrin akan menunjukkan status pengecasan.
- Setelah dicas sepenuhnya, cabut kabel USB.
5. Arahan Operasi
5.1 Hidupkan/Mati Kuasa
- Untuk menghidupkan: Tekan dan tahan butang Power / Backlight Button () selama lebih kurang 2 saat.
- Untuk mematikan kuasa: Tekan dan tahan butang Power / Backlight Button for approximately 3 seconds. The device will also automatically power off after a period of inactivity to conserve battery.
5.2 Penukaran Unit
The device supports measurements in meters (m), inches (in), and feet (ft).
- While the device is on, short press the Single Measurement / Unit Switch Button to cycle through the available units. The current unit will be displayed on the screen.
5.3 Benchmark Switching (Front/Rear Reference)
The measurement can be taken from the front edge or the rear edge of the device. The default setting is typically the rear edge.

Rajah 5.1: Illustration of switching between front and rear measurement reference points. The icon on the screen indicates the active reference point.
- Tekan pendek Function / Front/Rear Reference Button (FUNC) to toggle between front and rear reference points.
- An icon on the display will indicate whether the measurement is taken from the front or rear of the device.
- Front Reference: Measurement starts from the front edge of the device.
- Rear Reference: Measurement starts from the rear edge of the device (includes the length of the device itself).
5.4 Mod Pengukuran
The AquilaPro KL02060 offers various measurement functions. Press the Function / Front/Rear Reference Button (FUNC) repeatedly to cycle through the modes.

Rajah 5.2: Visual representation of the different measurement modes available on the device.
- Pengukuran Tunggal: Tekan ke Single Measurement / Unit Switch Button once to emit the laser, then press again to take a single distance measurement.
- Pengukuran Berterusan (Penjejakan): In this mode, the device continuously measures and displays the distance as you move it. This is useful for finding minimum/maximum distances or for real-time positioning.
- Pengukuran Kawasan:
- Select Area mode.
- Ukur panjang.
- Ukur lebar.
- Peranti akan mengira dan memaparkan kawasan secara automatik.
- Pengukuran Isipadu:
- Select Volume mode.
- Ukur panjang.
- Ukur lebar.
- Ukur ketinggian.
- Peranti akan mengira dan memaparkan volum secara automatik.
- Pythagorean Measurement (Indirect Measurement): Used to calculate inaccessible distances using the Pythagorean theorem.
- Select Pythagorean mode (e.g., two-point or three-point).
- Follow the on-screen prompts to measure the required sides (hypotenuse and one leg).
- The device will calculate the unknown leg or height.
5.5 Penambahan dan Penolakan
You can add or subtract measurements directly on the device.
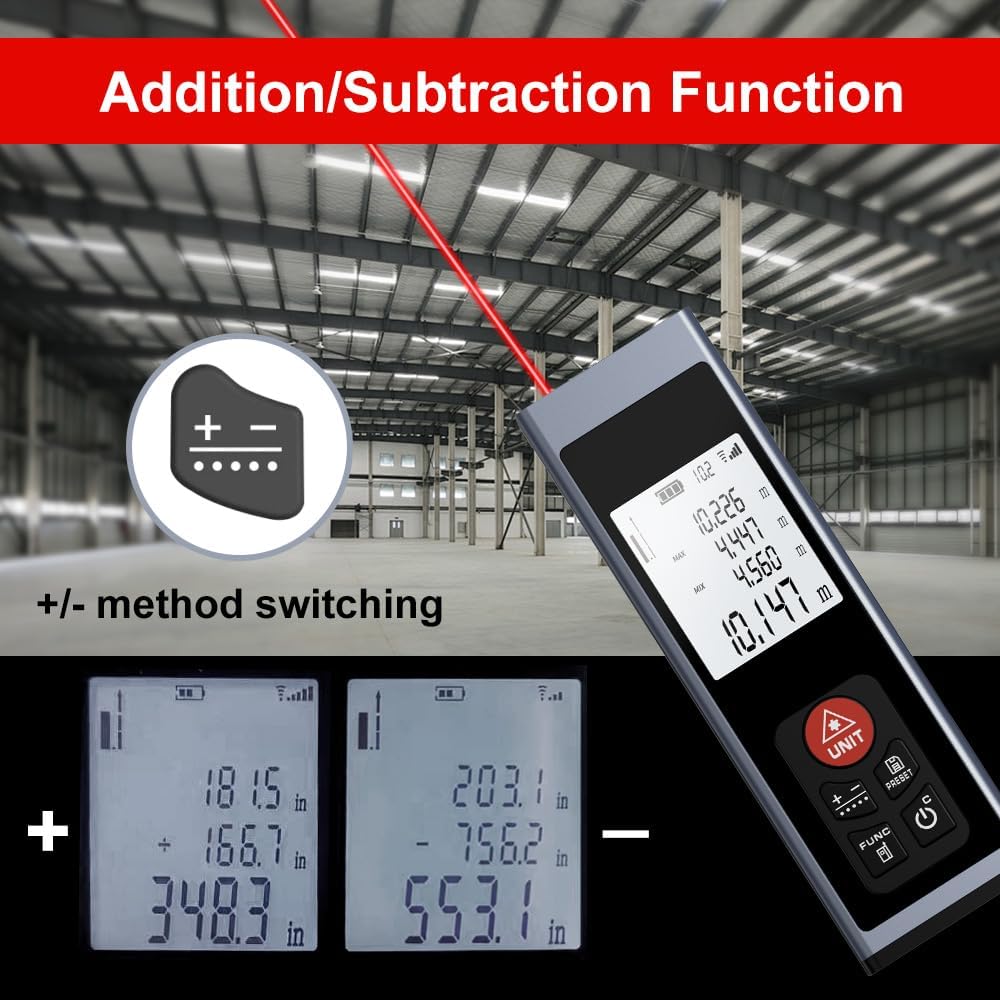
Rajah 5.3: Examples of addition and subtraction operations displayed on the device screen.
- Take your first measurement.
- Tekan ke Addition / Subtraction Measurement Button () to select either addition (+) or subtraction (-).
- Take your second measurement.
- The device will display the calculated sum or difference.
5.6 Measurement History and Preset Values
- Tekan ke History / Preset Value Setting Button (PRESET) untuk kembaliview previous measurements or to set specific preset values for quick recall. Refer to the on-screen prompts for detailed usage.
6. Penyelenggaraan
- Pembersihan: Gunakan yang lembut, damp cloth to clean the device. Do not use abrasive cleaners or solvents. Ensure the laser lens and display are kept clean for optimal performance.
- Storan: Store the device in a cool, dry place, away from direct sunlight and extreme temperatures. If storing for an extended period, ensure the battery is partially charged (around 50%) to prolong its lifespan.
- Penjagaan Bateri: Cas bateri dengan kerap, walaupun peranti tidak kerap digunakan, untuk mengekalkan kesihatan bateri.
7. Penyelesaian masalah
If you encounter issues with your AquilaPro KL02060, refer to the following common solutions:
| Masalah | Kemungkinan Punca | Penyelesaian |
|---|---|---|
| Peranti tidak dihidupkan. | Bateri lemah atau habis. | Cas peranti menggunakan kabel USB. |
| Pengukuran yang tidak tepat. | Dirty laser lens; incorrect reference point; unstable surface. | Clean the laser lens; verify the front/rear reference setting; ensure a stable measurement surface. |
| Laser beam is not visible. | Bright ambient light; device malfunction. | Use in lower light conditions; contact customer support if problem persists. |
| Paparan kosong atau beku. | Software error; low battery. | Try restarting the device. Ensure battery is charged. |
If the problem persists after attempting these solutions, please contact AquilaPro customer support.
8. Spesifikasi
| Ciri | Perincian |
|---|---|
| Nombor Model | KL02060 |
| Julat Pengukuran | 197 kaki (60 m) |
| Ketepatan | ±0.078 inch (±2 mm) |
| Unit Pengukuran | Meters (m), Inches (in), Feet (ft) |
| Kelas Laser | Kelas II, <1mW |
| Jenis Bateri | Rechargeable Lithium-ion (included) |
| Port Pengecasan | USB |
| Dimensi Produk | 2.79 x 1.52 x 8.64 cm (approx. 28L x 15W x 86H mm) |
| Berat Barang | 50 g |
| bahan | aluminium |
| Tahap Ketahanan Air | Waterproof (IP54 International Protection Rating) |
| Komponen yang Disertakan | Lanyard |
9. Waranti dan Sokongan
AquilaPro products are designed for reliability and performance. For warranty information or technical support, please refer to the contact details provided with your purchase or visit the official AquilaPro webtapak.