
1. Pengenalan
This manual provides detailed instructions for the AITRIP ESP32-S3-DevKitC-1-N16R8 development board. This board integrates Wi-Fi and Bluetooth Low Energy (BLE) functions, making it suitable for a wide range of Internet of Things (IoT) applications. It features dual USB Type-C ports for programming and power, and an RGB LED for status indication.
2. Produk Lebihview dan Ciri
The ESP32-S3-DevKitC-1-N16R8 is a powerful microcontroller unit (MCU) module designed for ease of use and versatility in IoT projects. Key features include:
- Ketersambungan Bersepadu: Features Wi-Fi and BLE 5.0 for robust wireless communication.
- Dua Port USB Jenis-C: Facilitates easy programming and power supply, supporting both USB and UART modes.
- AI IoT Capabilities: Designed to support artificial intelligence and IoT applications.
- W2812B RGB Lighting: Includes an integrated RGB LED for visual feedback and status indication.
- Pilihan Kuasa Fleksibel: Can be powered via USB-to-UART Port, ESP32-S3 USB Port, or directly through 5V and 3V3 pins.

Figure 2.1: Three AITRIP ESP32-S3-DevKitC-1-N16R8 development boards with included pin headers.

Rajah 2.2: Depan dan belakang views of a single ESP32-S3-DevKitC-1-N16R8 development board, highlighting component placement.

Figure 2.3: Detailed close-up images showing the ESP32-S3 module, reset and boot buttons, and dual USB Type-C ports.
3. Komponen Termasuk
Each package of the AITRIP ESP32-S3-DevKitC-1-N16R8 includes:
- ESP32-S3-DevKitC-1-N16R8 Development Board(s)
- Pin Headers (for optional soldering)
4. Pinout Diagram and Block Diagram
Understanding the pin assignments and internal structure is crucial for effective use of the development board.
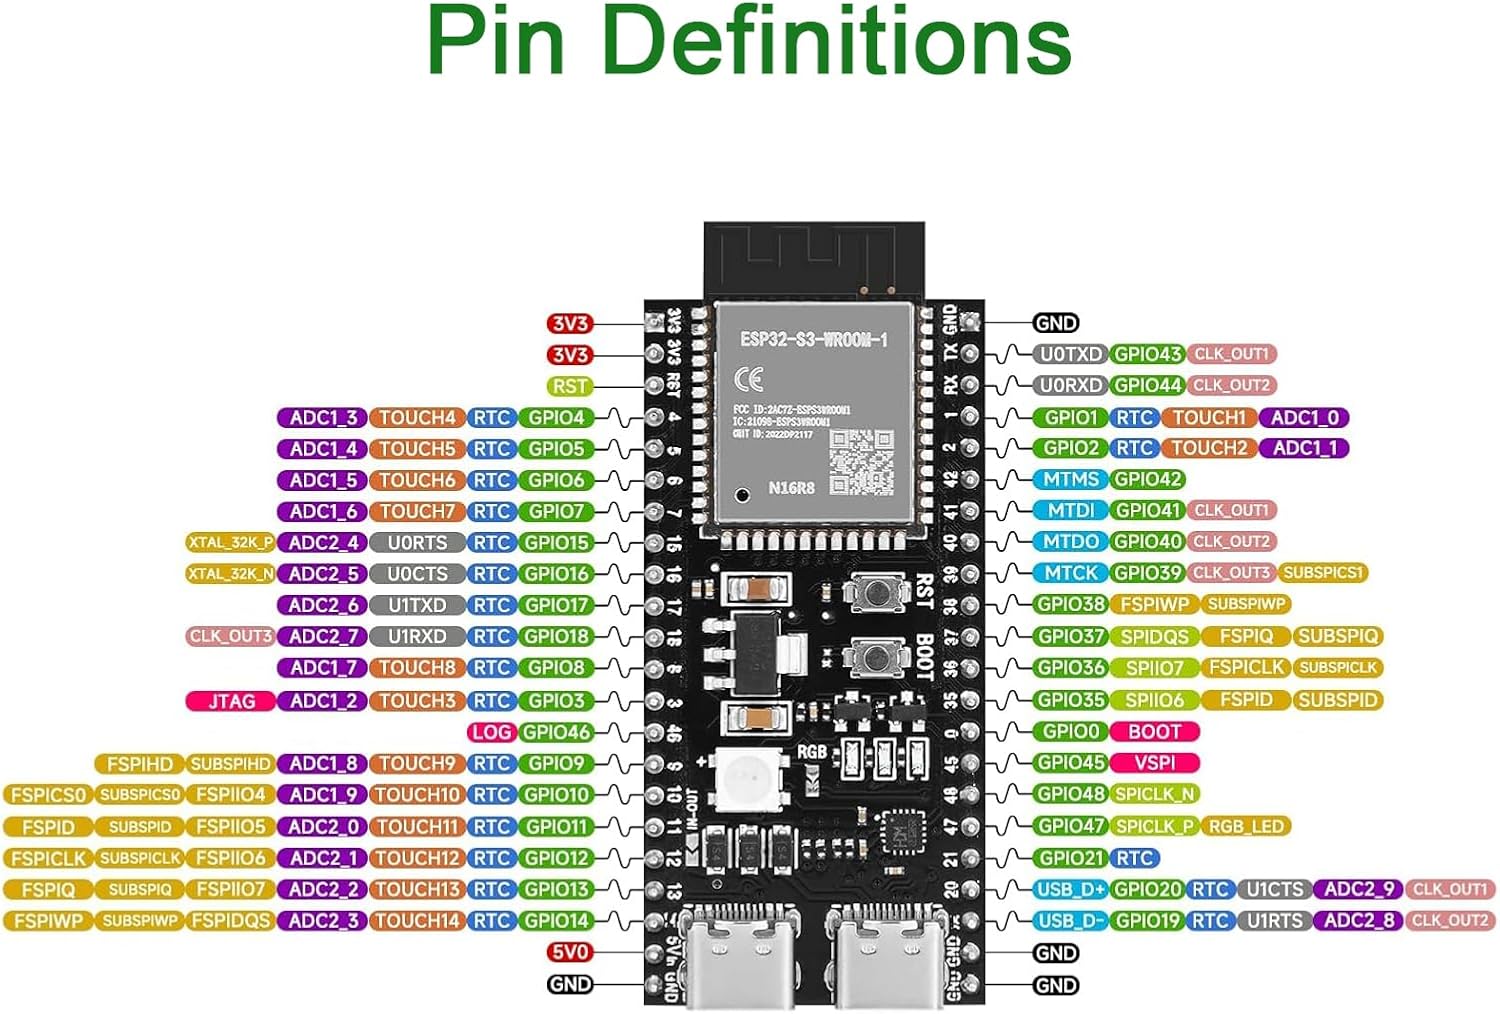
Figure 4.1: Detailed pin definitions for the ESP32-S3-DevKitC-1-N16R8, showing GPIOs, power pins, and special functions.

Figure 4.2: Block diagram illustrating the power supply and programming paths, along with key features of the ESP32-S3 module including 8MB Flash and 8MB PSRAM.
5. Persediaan dan Bekalan Kuasa
To begin using your ESP32-S3-DevKitC-1-N16R8 board:
- Sambungkan Kuasa: The board can be powered via either of the dual USB Type-C ports. Connect a USB cable from your computer or a 5V power adapter to one of the USB Type-C ports.
- Pemasangan Pemandu: Ensure you have the necessary USB-to-UART bridge drivers installed on your computer. For CH340 drivers, refer to the official CH340 driver GitHub site.
- Initial Power Check: Upon successful connection, the power indicator LED on the board should illuminate.
- 5V Pin Activation: Note that the 5V output on the 5Vin pin may be disabled by default. To enable it, you might need to bridge tiny pads near pins 11 and 12, as indicated in some user feedback. Consult the detailed pinout diagram for precise locations.
6. Getting Started with Programming
The ESP32-S3-DevKitC-1-N16R8 supports various programming environments, including MicroPython and Arduino IDE.
6.1. MicroPython
The boards are often pre-flashed with MicroPython firmware. If you need to re-flash or update the firmware:
- Keperluan: Python, esptool (find on Espressif official site), CH340 Driver.
- Berkelip: guna
esptool.pycommands for erasing and flashing firmware. Example:esptool.py --port PORT_NAME erase_flashdanesptool.py --port PORT_NAME --baud 1000000 write_flash -z 0x0 FIRMWARE.bin. Remember to replacePORT_NAME(e.g., COM4 on Windows, /dev/ttyUSB0 on Linux) andFIRMWARE.binwith your specific firmware file. - Perisian tegar: Find S3 Firmware (MicroPython) on GitHub.
6.2. Arduino IDE
To program the board using Arduino IDE:
- Keperluan: Python, Arduino IDE, CH340 Driver.
- Install Hardware Package: Find the ESP32 Arduino package on Espressif's official site and install it in your Arduino IDE.
- Configure Board: Use the latest ESP32 Arduino package and select the appropriate S3 series board in the Arduino IDE's board manager.
Video 6.1: Selesaiview of the ESP32-S3 development board, showcasing ciri-ciri dan potensi aplikasinya.
Video 6.2: A closer look at the ESP32 S3 Development Board N16R8, detailing its components and pin layout.
7. Mengendalikan Lembaga
Once programmed, the ESP32-S3 board operates based on the uploaded firmware. Its integrated Wi-Fi and BLE capabilities allow it to connect to networks and other devices for data exchange and control. The RGB LED can be programmed to indicate various states or provide visual feedback for your applications.
8. Penyelenggaraan
To ensure the longevity and optimal performance of your development board:
- Tangani dengan Berhati-hati: Avoid static discharge by handling the board on an anti-static mat or by grounding yourself.
- Storan: Store the board in a dry, cool environment, away from direct sunlight and extreme temperatures.
- Pembersihan: Gunakan berus lembut dan kering atau udara termampat untuk menghilangkan habuk. Elakkan menggunakan cecair atau bahan kimia yang keras.
- Bekalan Kuasa: Always use a stable 5V power supply. Over-voltage boleh merosakkan papan.
9. Penyelesaian masalah
- Papan Tidak Menghidupkan Kuasa: Ensure the USB cable is securely connected and the power source is active. Check if the power indicator LED is on.
- Ralat Pengaturcaraan: Verify that the correct drivers (e.g., CH340) are installed and the correct COM port is selected in your IDE. Ensure the board is in bootloader mode if required (usually by holding the BOOT button while pressing and releasing RST, kemudian lepaskanasing BOOT).
- Isu Sambungan Wi-Fi: Check your Wi-Fi credentials in your code. Ensure the board is within range of your Wi-Fi access point. Some users have reported issues with Wi-Fi stability; ensure your power supply is adequate and consider updating firmware.
- 5V Output Not Working: As mentioned in Section 5, the 5V output on the 5Vin pin might require bridging specific pads on the board. Refer to the pinout diagram for details.
- UART Port Non-Operational: If one USB-C port (UART) is not functioning, try the other USB-C port (ESP32-S3 USB Port) or ensure the correct drivers are installed and recognized by your operating system.
10. Spesifikasi
| Ciri | Perincian |
|---|---|
| Model Modul | ESP32-S3-DevKitC-1-N16R8 |
| Pemproses | ESP32-S3 (Dual-core Xtensa LX7) |
| Ketersambungan | Wi-Fi (IEEE 802.11b/g/n), Bluetooth (BLE 5.0) |
| Memori Kilat | 16MB (Quad SPI) |
| PSRAM | 8MB (Octal SPI) |
| Vol Operasitage | 3.3V |
| Pin I/O Digital | 31 |
| Kelajuan Jam | 240MHz |
| Port USB | Dual USB Type-C (USB-to-UART, ESP32-S3 USB/OTG) |
| Sokongan Sistem Pengendalian | FreeRTOS, MicroPython, Arduino IDE |
| Dimensi | 63mm x 28mm (lebih kurang 2.48 x 1.10 inci) |
| Berat Barang | 1.13 auns (lebih kurang 32g) |

Figure 10.1: Physical dimensions of the ESP32-S3-DevKitC-1-N16R8 development board.
11. Waranti dan Sokongan
For warranty information and technical support, please refer to the official AITRIP product page or contact AITRIP customer service directly. Keep your purchase receipt for warranty claims.