1. Pengenalan
This manual provides comprehensive instructions for the Talkpod A36Plus Ham Handheld Two Way Radio. It covers essential information regarding setup, operation, maintenance, and troubleshooting to ensure optimal performance and user experience. Please read this manual thoroughly before operating your device.
2. Produk Lebihview
The Talkpod A36Plus is a versatile ham handheld two-way radio designed for reliable communication across various frequencies. Key features include:
- Kuasa Output 8W: Provides long-range communication capabilities.
- Bateri 3200mAh: Hayat bateri yang lebih lama untuk penggunaan yang berpanjangan.
- 999 Saluran Boleh Disesuaikan: Ampkapasiti untuk pelbagai keperluan komunikasi.
- VHF/UHF Receive: Supports a wide range of frequencies including 144-148MHz, 420-450MHz, 462/467MHz.
- Airband Receiving and Scanning: Ability to receive airband frequencies (108-136 AM AIR BAND).
- Skrin Warna 1.44 inci: Clear and intuitive display for easy navigation.
- Kaedah Pengecasan Pelbagai: USB Direct Charger Cable, Desktop Charger, Type-C charging.
- Tahan Air IP54: Memberikan perlindungan daripada percikan.
2.1. Apa yang ada di dalam Kotak
Your Talkpod A36Plus package includes the following items:
- Talkpod A36Plus 8W Radio Unit
- Antena Gain Tinggi
- Bateri Litium-Ion 3200mAh
- Pengecas Desktop
- Type-C Charger and Cable
- K-Port Cable
- Battery Back Clip
- Tali Pergelangan Tangan

Figure 2.1: Talkpod A36Plus radio unit with its complete set of accessories, including the radio, antenna, battery, chargers, and cables.
2.2. Key Features Visual Overview
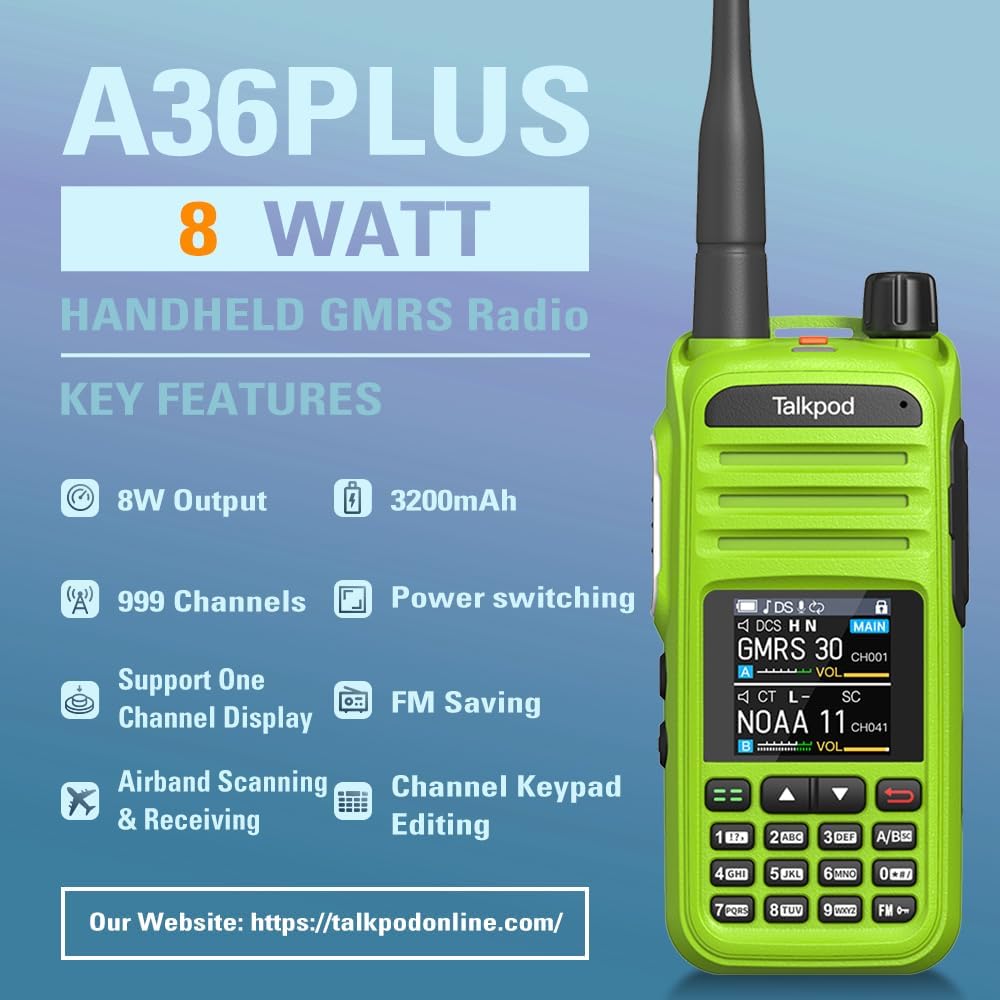
Figure 2.2: Visual representation of the A36Plus's key features, highlighting its 8W output, 3200mAh battery, 999 channels, power switching, FM saving, airband scanning, and channel keypad editing.

Figure 2.3: Illustration emphasizing the 8 Watt output and long antenna, designed to facilitate far-range communication.

Figure 2.4: Labeled diagram of the Talkpod A36Plus, pointing out key components such as the A/B switch, multi-colored display, PTT button, alarm button, power/volume knob, and K-Port.
3. Persediaan
Before using your Talkpod A36Plus, follow these steps to set up the device:
- Pemasangan Bateri:
Align the 3200mAh Lithium-Ion battery with the battery compartment on the back of the radio. Gently slide the battery into place until it clicks securely. Ensure it is firmly attached to prevent accidental detachment during use.

Figure 3.1: The 3200mAh rechargeable battery, indicating standby time of 120 hours, working time of 24 hours, and a charge time of 3 hours.
- Lampiran Antena:
Screw the high-gain antenna clockwise into the antenna connector on top of the radio until it is finger-tight. Do not overtighten.
- Mengecas Bateri:
The A36Plus supports multiple charging methods. You can use the provided USB Direct Charger Cable by plugging it into the Type-C port on the radio, or place the radio in the Desktop Charger. Connect the charger to a power source (wall adapter, PC, car, power bank). The charging indicator will show the charging status. A full charge typically takes about 3 hours.
- Attaching the Belt Clip and Wrist Strap:
Attach the battery back clip to the battery if desired. Secure the wrist strap to the designated loop on the radio for convenient carrying.
3.1. Pembukaan Kotak dan Pemasangan Awal
Video 3.1: This video demonstrates the unboxing process of the Talkpod A36Plus, showing how to unpack the radio unit and its accessories, and how to attach the battery and antenna for first-time use.
4. Arahan Operasi
This section details the operational aspects of your Talkpod A36Plus radio.
4.1. Hidupkan/Mati Kuasa dan Kawalan Kelantangan
- Hidupkan kuasa: Rotate the Power/Volume knob (located on top of the radio) clockwise until you hear a click. The display will light up.
- Matikan: Rotate the Power/Volume knob counter-clockwise until you hear a click. The display will turn off.
- Pelarasan Kelantangan: Setelah dihidupkan, terus putar tombol Kuasa/Kelantangan untuk melaraskan tahap output audio.
4.2. Initial Set and Quitting the Menu
Understanding how to navigate and exit the menu is fundamental for configuring your radio.
Video 4.1: This video guides you through the initial setup process and demonstrates how to effectively navigate and exit the menu system on your Talkpod A36Plus radio.
4.3. Using Menu Mode
The menu mode allows access to various settings and functions of the radio.
Video 4.2: Learn how to navigate and utilize the various options within the menu mode of your Talkpod A36Plus radio to customize settings and access advanced features.
4.4. Pemilihan Frekuensi
The A36Plus supports both Frequency Mode (VFO) and Channel Mode (CH) for frequency selection.
Video 4.3: This video explains how to switch between Frequency Mode (VFO) and Channel Mode (CH) and select desired frequencies or channels on your Talkpod A36Plus.
The radio supports 999 customizable channels, including 8 GMRS Repeater Channels and 11 NOAA Channels.
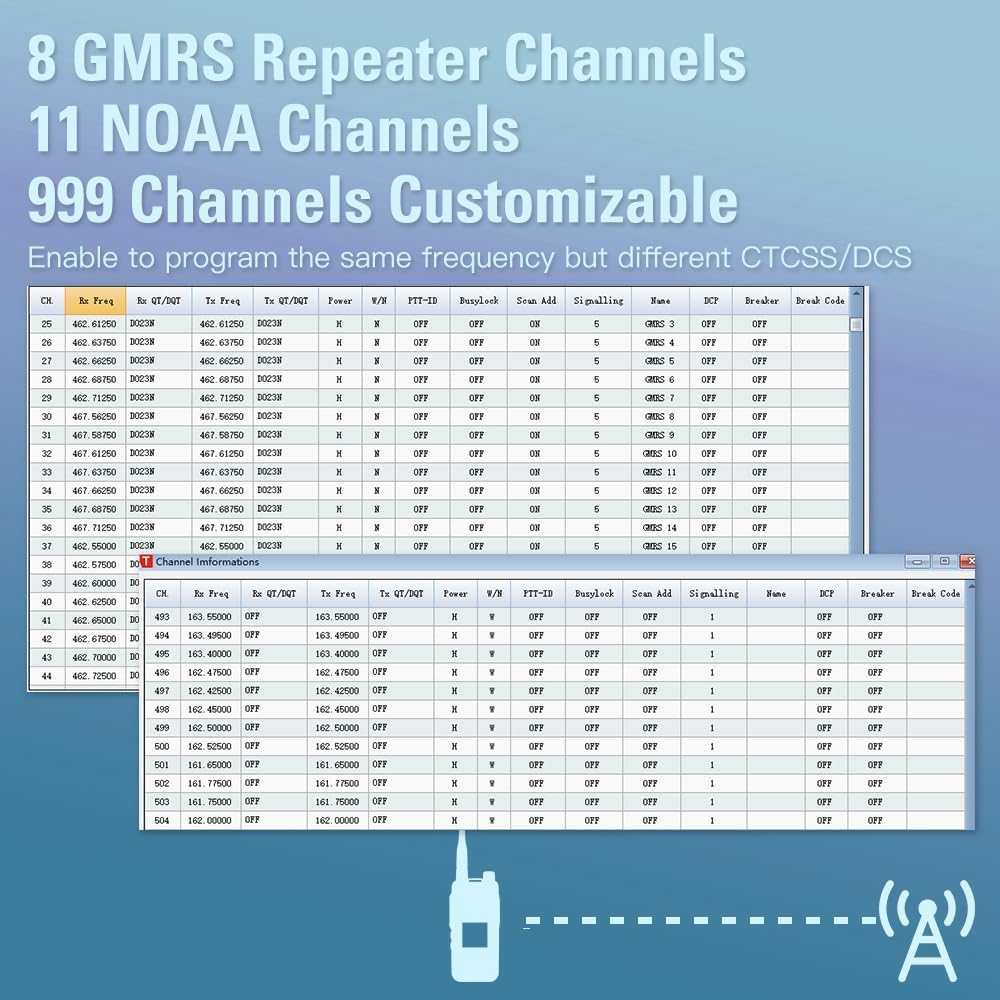
Gambar 4.1: Lebihview of the radio's channel capabilities, including 8 GMRS Repeater Channels, 11 NOAA Channels, and 999 customizable channels, with examples of channel programming tables.
4.5. Adjusting Tuning Step
The tuning step determines the increment by which the frequency changes when adjusted. This is crucial for precise frequency selection.
Video 4.4: Learn how to adjust the tuning step in VFO mode on your Talkpod A36Plus to fine-tune frequencies for optimal reception and transmission.
4.6. Setting Squelch Function
The squelch function suppresses background noise when no signal is received. Adjusting the squelch level helps to filter out weak signals or noise.
Video 4.5: This video demonstrates how to set the squelch function on your Talkpod A36Plus, explaining how different squelch levels affect signal reception and noise reduction.
5. Penyelenggaraan
Proper maintenance ensures the longevity and reliable operation of your Talkpod A36Plus.
- Pembersihan: Gunakan yang lembut, damp kain untuk membersihkan bahagian luar radio. Jangan gunakan bahan kimia yang keras atau pembersih yang kasar.
- Penjagaan Bateri: To maximize battery life, avoid fully discharging the battery frequently. Charge the battery regularly, even if the radio is not in use for extended periods.
- Storan: Simpan radio di tempat yang sejuk dan kering jauh dari cahaya matahari langsung dan suhu yang melampau.
5.1. Performing a Partial Reset
A partial reset can resolve minor operational issues without erasing all programmed data. This is useful if the radio malfunctions due to external factors like static electricity.
Video 5.1: This video demonstrates how to perform a partial reset on your Talkpod A36Plus. A partial reset restores operational settings to default values without clearing memory channel contents, scan boundary contents, call channel contents, DTMF memory contents, or home channel settings.
6. Penyelesaian masalah
If you encounter issues with your Talkpod A36Plus, refer to the following common problems and solutions:
| Masalah | Kemungkinan Punca | Penyelesaian |
|---|---|---|
| Radio tidak dihidupkan. | Bateri rendah atau kehabisan bateri. Pemasangan bateri yang salah. | Charge the battery fully. Ensure the battery is correctly installed and clicked into place. |
| No signal reception or poor audio. | Incorrect frequency/channel. Squelch level too high. Antenna not properly attached. Out of range. | Verify frequency/channel settings. Adjust squelch level (refer to Section 4.6). Ensure antenna is securely attached. Move closer to the transmitting station or repeater. |
| Intermittent transmission. | Weak signal reception. Interference. | Lower the squelch level (refer to Section 4.6). Move to an area with less interference. |
| Radio membeku atau menjadi tidak responsif. | Software glitch or static electricity. | Perform a partial reset (refer to Section 5.1). If the issue persists, a full reset may be necessary (note: a full reset will erase all programming). |
Jika masalah berterusan selepas mencuba penyelesaian ini, sila hubungi sokongan pelanggan.
7. Spesifikasi
| Ciri | Spesifikasi |
|---|---|
| Jenama | Talkpod |
| Nombor Model | A36Plus |
| Berat Barang | 1.19 paun |
| Dimensi Produk | 4.25 x 1.1 x 2.05 inci |
| Bateri | 1 bateri Lithium Ion diperlukan (termasuk) |
| warna | hijau |
| Bilangan Saluran | 999 |
| Ciri Khas | Battery Saver Mode, Weather Alert, Roger Beep, Emergency Alarm, Automatic Squelch |
| Tx Range (MHz) | 144-148MHz, 420-450MHz, 462/467MHz |
| Rx Range (MHz) | 76-108 FM Broadcast Radio, 108-136 AM AIR BAND, 136-180 FM VHF, 200-260 FM VHF, 350-400 FM UHF, 400-520 FM UHF |
| Julat Percakapan Maksimum | 10 Kilometer |
| Teknologi Penala | UHF, VHF |
| Voltage | 7.4 Volt |
| Tahap Ketahanan Air | Kalis Air (IP54) |
8. Waranti dan Sokongan
Talkpod is committed to providing high-quality products and excellent customer service.
- Perkhidmatan Pelanggan: If you encounter any problems while using your Talkpod two-way radio, our professional technical team is ready to provide assistance. Please contact us via Amazon or email for a satisfactory solution.
- Panduan Pengguna (PDF): A detailed PDF version of the Instructions for Use (IFU) is available for download: Muat turun Panduan Pengguna.