
pengenalan
This manual provides essential information for setting up, operating, and maintaining your GEEKOM Mini PC AS5. Please read these instructions carefully before using the device to ensure optimal performance and longevity. The GEEKOM Mini PC AS5 is a compact and powerful computing solution designed for various applications, from home entertainment to professional tasks.
Kandungan Pakej
Sebelum meneruskan dengan persediaan, sila sahkan bahawa semua item yang disenaraikan di bawah disertakan dalam pakej anda:
- GEEKOM Mini PC AS5
- Penyesuai Kuasa
- VESA Mount (with screws)
- SSD Mounting Screws
- Skru Pemasangan HDD
- Panduan Cepat
- Manual Pengguna (dokumen ini)
- Kabel USB-C ke USB-C

Rajah 1: Contents of the GEEKOM Mini PC AS5 package.
Panduan Persediaan
1. Menyambung Peranti
Connect your monitor, keyboard, and mouse to the GEEKOM Mini PC AS5. Refer to the port diagram below for correct connections.
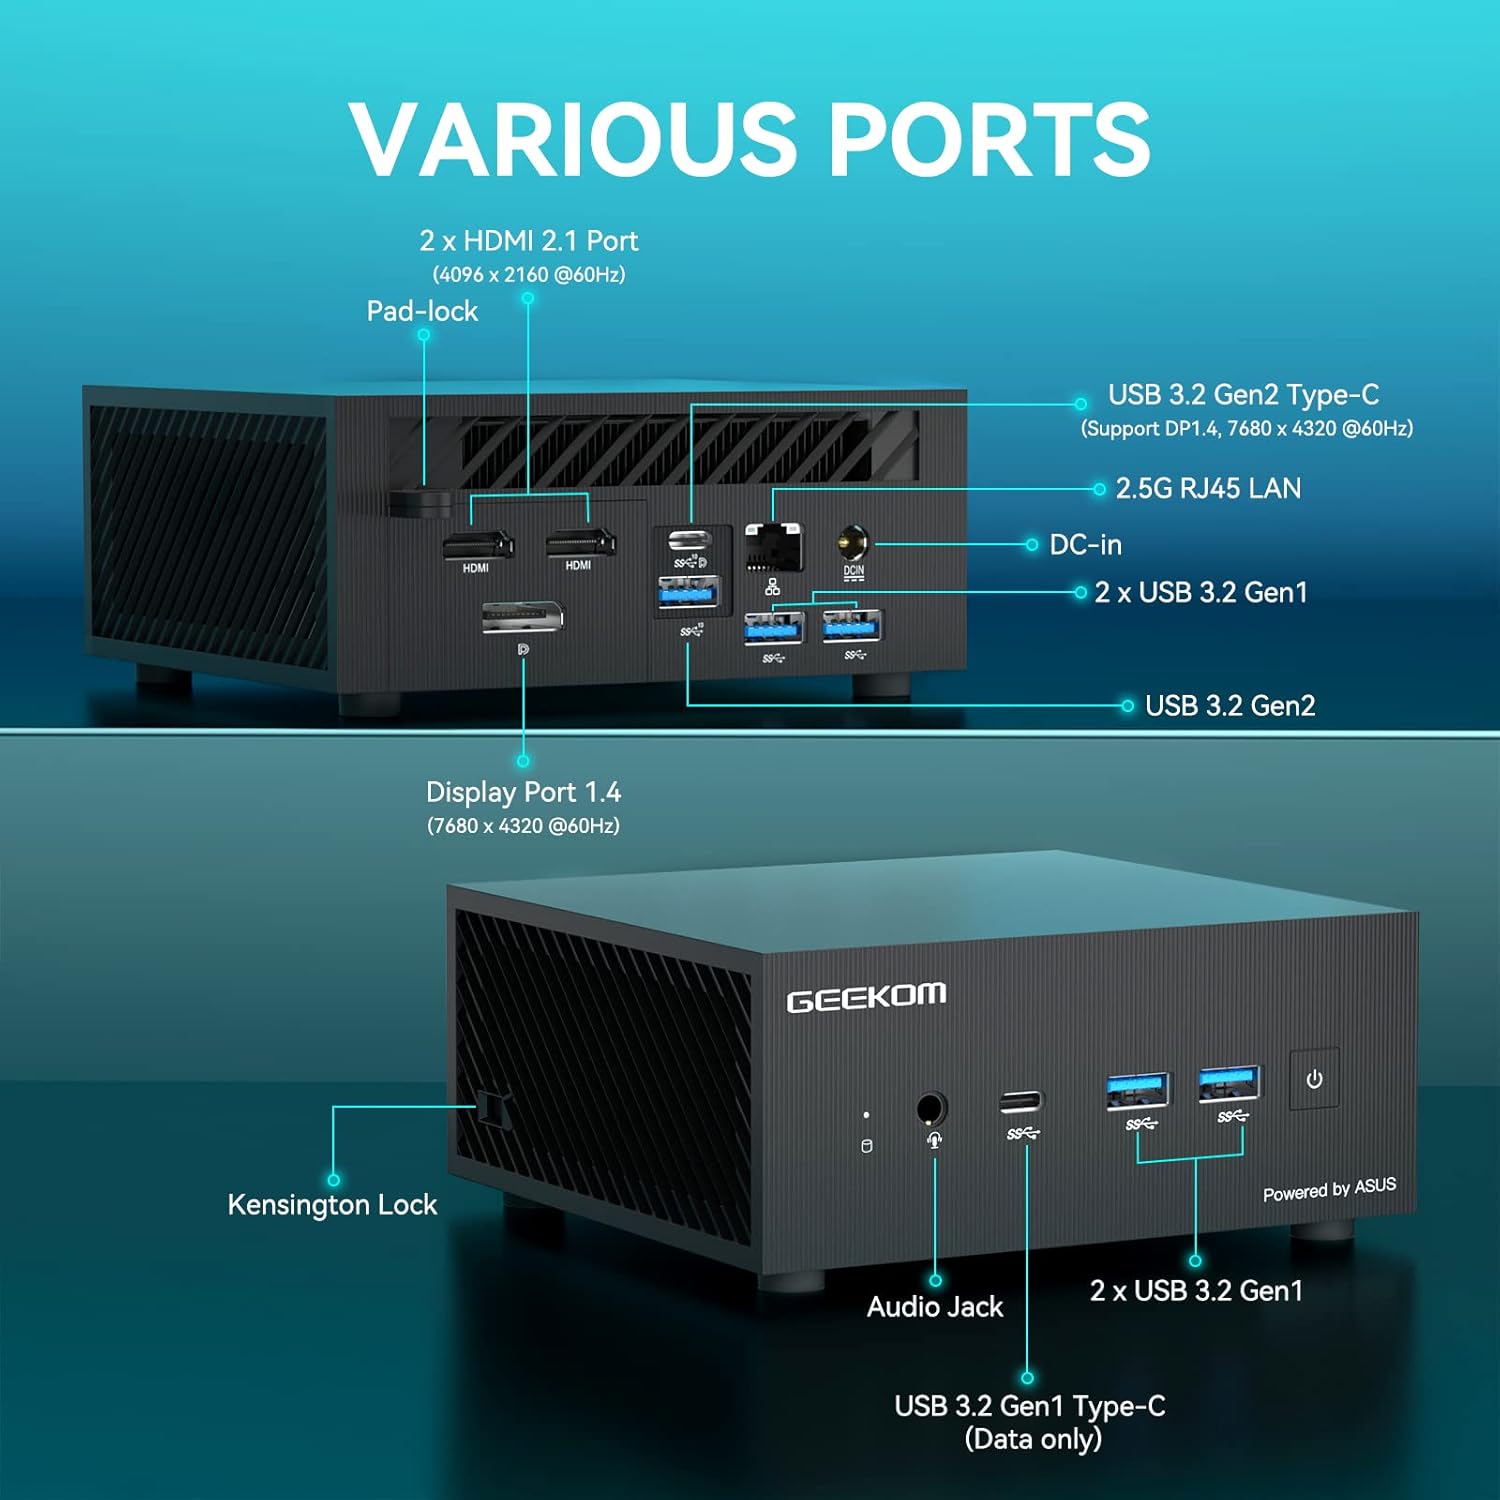
Rajah 2: Berakhirview of available ports on the GEEKOM Mini PC AS5.
- Sambungan Paparan: Use an HDMI cable to connect your monitor to one of the two HDMI 2.1 ports, or a DisplayPort cable to the Display Port 1.4. The USB 3.2 Gen2 Type-C port also supports DisplayPort 1.4 for video output.
- Peranti USB: Connect your keyboard, mouse, and other USB devices to the available USB 3.2 Gen1 and Gen2 ports.
- Sambungan Rangkaian: For a wired network connection, connect an Ethernet cable to the 2.5G RJ45 LAN port. For wireless, ensure your Wi-Fi network is available.
- Audio: Connect headphones or speakers to the Audio Jack.
2. Sambungan Kuasa
Connect the power adapter to the DC-In port on the Mini PC, then plug the power adapter into a wall outlet.
3. Kuasa Awal Hidup
Press the power button located on the front of the Mini PC. The system will boot up, and you will see the operating system loading on your connected display.
4. Persediaan Sistem Pengendalian
Follow the on-screen instructions to complete the initial setup of Windows 10 Pro, including language selection, network configuration, and user account creation.
Arahan Operasi
Operasi Asas
- Hidupkan/Mati Kuasa: Press the power button to turn the device on. To turn off, use the Windows shutdown option or press and hold the power button for 5 seconds.
- Mulakan semula: Use the restart option within the Windows operating system.
- Mod tidur: The system will enter sleep mode after a period of inactivity. Press any key or move the mouse to wake it up.
Konfigurasi Paparan
The GEEKOM Mini PC AS5 supports multiple displays, including up to four 4K displays or ultra-realistic 8K visuals.

Rajah 3: The GEEKOM Mini PC AS5 supports ultra-realistic 8K visuals.

Rajah 4: Multitasking across four 4K displays with the GEEKOM Mini PC AS5.
To configure multiple displays, right-click on the desktop, select "Display settings," and arrange your monitors as desired.
Network Connectivity (Wi-Fi 6E)
The Mini PC supports Wi-Fi 6E, offering enhanced wireless performance. To connect to a Wi-Fi network:

Rajah 5: GEEKOM Mini PC AS5 featuring Wi-Fi 6E support for faster, lower-latency wireless connectivity.
- Klik ikon Wi-Fi dalam dulang sistem.
- Pilih rangkaian yang anda inginkan daripada senarai.
- Masukkan kata laluan rangkaian jika digesa.
- Click "Connect."
Penyelenggaraan
Pembersihan
- Pastikan peranti dimatikan dan dicabut plag sebelum dibersihkan.
- Gunakan kain lembut dan kering untuk mengelap bahagian luar Mini PC.
- Untuk tanda degil, ringankan dampen kain dengan air. Elakkan bahan kimia yang keras atau pembersih yang kasar.
- Keep ventilation openings clear of dust and debris using compressed air.
Kemas Kini Perisian
Regularly update your Windows operating system and drivers to ensure optimal performance and security. You can check for updates via Windows Update settings.
Pengurusan Storan
Periodically check your storage usage and remove unnecessary files to maintain system speed. The Mini PC supports additional storage expansion (SSD/HDD) if needed.
Menyelesaikan masalah
- Tiada Kuasa:
- Pastikan penyesuai kuasa disambungkan dengan selamat ke PC Mini dan salur keluar kuasa yang berfungsi.
- Sahkan alur keluar kuasa berfungsi dengan memasang peranti lain.
- Tiada Paparan:
- Pastikan monitor dihidupkan dan sumber input yang betul telah dipilih.
- Ensure the HDMI or DisplayPort cable is securely connected to both the Mini PC and the monitor.
- Cuba kabel atau monitor yang berbeza jika boleh.
- Tiada sambungan internet:
- Untuk sambungan berwayar, semak status kabel Ethernet dan penghala.
- For Wi-Fi, ensure Wi-Fi is enabled in Windows settings and you are connected to the correct network with the correct password.
- Mulakan semula penghala dan Mini PC anda.
- Kelembapan Sistem:
- Tutup aplikasi yang tidak perlu berjalan di latar belakang.
- Semak dan pasang sebarang kemas kini Windows yang belum selesai.
- Jalankan pembersihan dan defragmentasi cakera (untuk HDD) atau TRIM (untuk SSD).
- Imbas untuk perisian hasad atau virus.
Spesifikasi
| Nama Model | AS5 |
| Pemproses | AMD Ryzen™ 9 5900HX (8 Cores, 16 Threads, Max Turbo Frequency 4.60 GHz, 16MB Cache, cTDP 35W) |
| Sistem Operasi | Windows 10 Pro |
| RAM | 32 GB DDR4 SDRAM |
| Penyimpanan | 1 TB (PCIE x 2 interface) |
| Grafik | AMD Radeon™ Vega 8 Graphics (supports 8K visuals) |
| Kesambungan Wayarles | Wi-Fi 6E |
| Pelabuhan |
|
| Dimensi | 13 x 12 x 5.8 cm |

Rajah 6: AMD Ryzen™ 9 5900HX Processor details.
Waranti & Sokongan
Maklumat Waranti
GEEKOM products typically come with a standard manufacturer's warranty. Please refer to the warranty card included in your package or visit the official GEEKOM weblaman web untuk terma dan syarat jaminan terperinci khusus untuk rantau dan tarikh pembelian anda. Simpan bukti pembelian anda untuk tuntutan jaminan.
Sokongan Pelanggan
For technical assistance, troubleshooting beyond this manual, or warranty inquiries, please contact GEEKOM customer support. You can usually find contact information on the official GEEKOM website or in the quick guide provided with your product.
GEEKOM Official Webtapak: www.geekompc.com