
1. Pengenalan
Welcome to the instruction manual for the Supermicro X13SEM-TF motherboard. This document provides essential information for the proper installation, configuration, and maintenance of your motherboard. Please read this manual thoroughly before proceeding with any installation or operation.
The Supermicro X13SEM-TF is designed to support Intel Xeon SPR-SP CPUs with up to 56 cores and 350W TDP, featuring EBGPCH and 8-channel DDR5 memory support.
2. Produk Lebihview
Below is an image of the Supermicro X13SEM-TF motherboard, highlighting its key components.
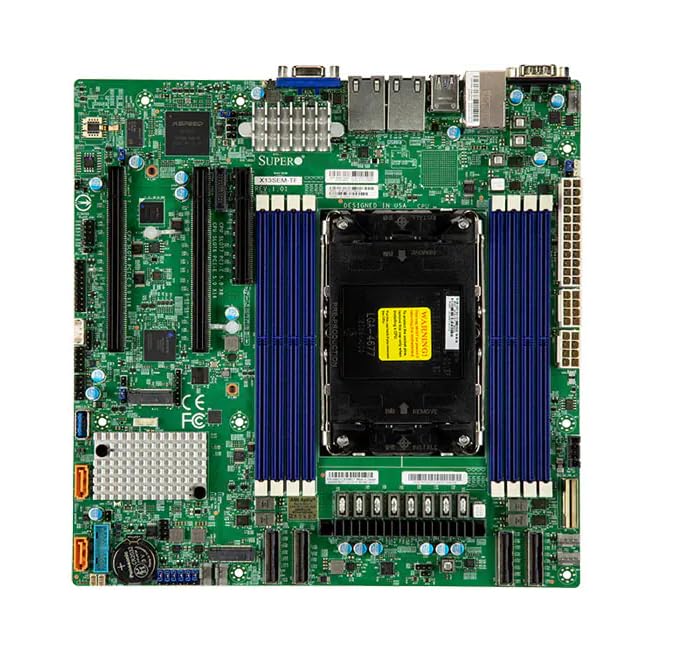
Image Description: This image displays the Supermicro X13SEM-TF motherboard. Key visible components include the large LGA 4677 CPU socket at the center, surrounded by eight DDR5 DIMM slots (blue). Various PCIe slots, SATA ports, USB headers, and power connectors are distributed across the green PCB. The rear I/O panel features USB ports, Ethernet ports, and a VGA port. Heatsinks are visible over the VRM and chipset areas.
3. Maklumat Keselamatan
Always observe standard electrostatic discharge (ESD) precautions when handling the motherboard.
- Disconnect all power sources before installation or maintenance.
- Pakai tali pergelangan tangan anti statik.
- Avoid touching components directly unless necessary.
- Ensure proper ventilation within the system chassis.
- Refer to professional assistance if unsure about any procedure.
4. Persediaan dan Pemasangan
4.1. Kandungan Pakej
Sahkan bahawa semua komponen terdapat dalam pakej:
- Supermicro X13SEM-TF Motherboard
- I/O Shield (if not integrated)
- Kabel SATA
- Manual Pengguna (dokumen ini)
- CD/USB pemacu (atau arahan muat turun)
4.2. Pemasangan Papan Induk
- Sediakan Casis: Ensure the computer chassis is ready for motherboard installation. Install standoffs in the appropriate locations.
- Pasang I/O Shield: If provided separately, install the I/O shield into the chassis opening.
- Pasang Papan Induk: Carefully place the motherboard into the chassis, aligning it with the standoffs and I/O shield. Secure it with screws.
- Pasang CPU:
- Buka tuil soket CPU.
- Align the CPU (Intel Xeon SPR-SP) with the socket, matching the triangular markers.
- Perlahan-lahan letakkan CPU ke dalam soket. Jangan paksa.
- Tutup tuil soket untuk mengunci CPU.
- Pasang Penyejuk CPU: Attach the compatible CPU cooler according to its manufacturer's instructions. Ensure proper thermal paste application.
- Pasang Memori (RAM):
- Buka klip pada slot DIMM DDR5.
- Align the memory modules with the slots, ensuring the notch matches.
- Press down firmly on both ends until the clips snap into place. Refer to the motherboard layout for optimal memory population.
- Sambungkan Kuasa:
- Connect the 24-pin ATX main power connector.
- Connect the 8-pin (or 4+4-pin) CPU power connector(s).
- Sambungkan Peranti Storan: Connect SATA data and power cables to your storage drives (HDDs/SSDs) and the motherboard's SATA ports.
- Sambungkan Pengepala Panel Hadapan: Connect the power switch, reset switch, HDD LED, power LED, and front panel USB/audio headers to their respective pins on the motherboard. Refer to the motherboard diagram for correct pin assignments.
- Pasang Kad Pengembangan: Insert any necessary PCIe expansion cards (e.g., graphics cards, network cards) into the appropriate PCIe slots and secure them.
5. Arahan Operasi
5.1. Kuasa Awal Hidup
After completing all connections, connect the power supply to an electrical outlet and power on the system.
The system should boot to the BIOS/UEFI interface or an installed operating system.
5.2. Konfigurasi BIOS/UEFI
To enter the BIOS/UEFI setup, press the designated key (usually DEL or F2) semasa permulaan.
Configure boot order, system time, and other necessary settings. Save changes before exiting.
5.3. Pemasangan Pemandu
Install all necessary drivers for the motherboard chipset, network, audio, and any other integrated components. Drivers can be found on the Supermicro website or the provided driver media.
6. Penyelenggaraan
Penyelenggaraan tetap memastikan prestasi optimum dan jangka hayat papan induk anda.
- Penyingkiran habuk: Bersihkan habuk dari papan induk dan komponen secara berkala menggunakan udara termampat. Pastikan sistem dimatikan dan dicabut.
- Kemas Kini BIOS/UEFI: Periksa Supermicro website for BIOS/UEFI updates. Update only if necessary and follow the provided instructions carefully.
- Kemas Kini Pemandu: Keep drivers updated for optimal compatibility and performance.
- Pemeriksaan Fizikal: Periksa papan induk secara berkala untuk sebarang tanda kerosakan, sambungan longgar atau kapasitor membonjol.
7. Penyelesaian masalah
7.1. Tiada Kuasa
- Periksa semua sambungan kuasa (ATX 24-pin, CPU 8-pin).
- Pastikan bekalan kuasa dihidupkan.
- Uji bekalan kuasa dengan sistem lain atau penguji bekalan kuasa.
- Verify front panel power switch connection.
7.2. Tiada Paparan
- Pastikan monitor disambungkan dan dihidupkan.
- Check if the graphics card (if dedicated) is properly seated and powered.
- Cuba pasang semula modul RAM.
- If using integrated graphics, ensure the CPU supports it and the display cable is connected to the motherboard's video output.
7.3. Ketidakstabilan Sistem / Ranap
- Semak suhu CPU dan GPU.
- Verify RAM is correctly installed and compatible.
- Jalankan alat diagnostik memori.
- Pastikan semua pemacu telah dipasang dan dikemas kini.
- Periksa kabel atau komponen yang longgar.
8. Spesifikasi
| Ciri | Perincian |
|---|---|
| Model | Supermicro X13SEM-TF (MBD-X13SEM-TF-B) |
| Sokongan CPU | Intel Xeon SPR-SP, up to 56 cores, 350W TDP |
| Soket CPU | LGA 4677 |
| Chipset | EBGPCH |
| Ingatan | 8-channel DDR5 DIMM slots |
| Dimensi (LxWxH) | 16 x 12 x 5 inci |
| Berat badan | 2.86 paun |
| Pengeluar | SuperMicro |
| Tarikh Mula-mula Tersedia | 20 Januari 2023 |
9. Waranti dan Sokongan
9.1. Maklumat Waranti
For detailed warranty information, please refer to the official Supermicro webtapak atau kad jaminan yang disertakan dengan produk anda.
9.2. Sokongan Teknikal
If you encounter issues that cannot be resolved using this manual, please contact Supermicro technical support.
Visit the official Supermicro website for support resources, driver downloads, and contact information: www.supermicro.com/support