
1. Pengenalan
This manual provides essential information for the proper installation, configuration, and operation of your Teltonika RUT951 4G LTE Router. The RUT951 is a robust industrial cellular router designed for professional applications, offering reliable internet connectivity via 4G LTE, Wi-Fi, and Ethernet. It features dual-SIM support for network redundancy and is powered by RutOS, providing advanced customization and security features.
2. Produk Lebihview
2.1 Ciri-ciri Utama
- Dual-SIM 4G LTE cellular connectivity for reliable network access.
- Integrated Wi-Fi (802.11b/g/n) for local wireless networking.
- Four Ethernet interfaces (3x LAN, 1x WAN) for wired connections.
- Powered by RutOS for advanced customization, automation, and security.
- Robust design suitable for various IoT and industrial scenarios.
2.2 Kandungan Pakej
The standard package for the Teltonika RUT951 router typically includes:
- Teltonika RUT951 Router Unit
- Penyesuai Kuasa
- 2 x Mobile Antennas (SMA)
- 2 x Wi-Fi Antennas (RP-SMA)
- Kabel Ethernet
- Panduan Mula Pantas
2.3 Susun Atur Penghala
Familiarize yourself with the router's ports, indicators, and slots.
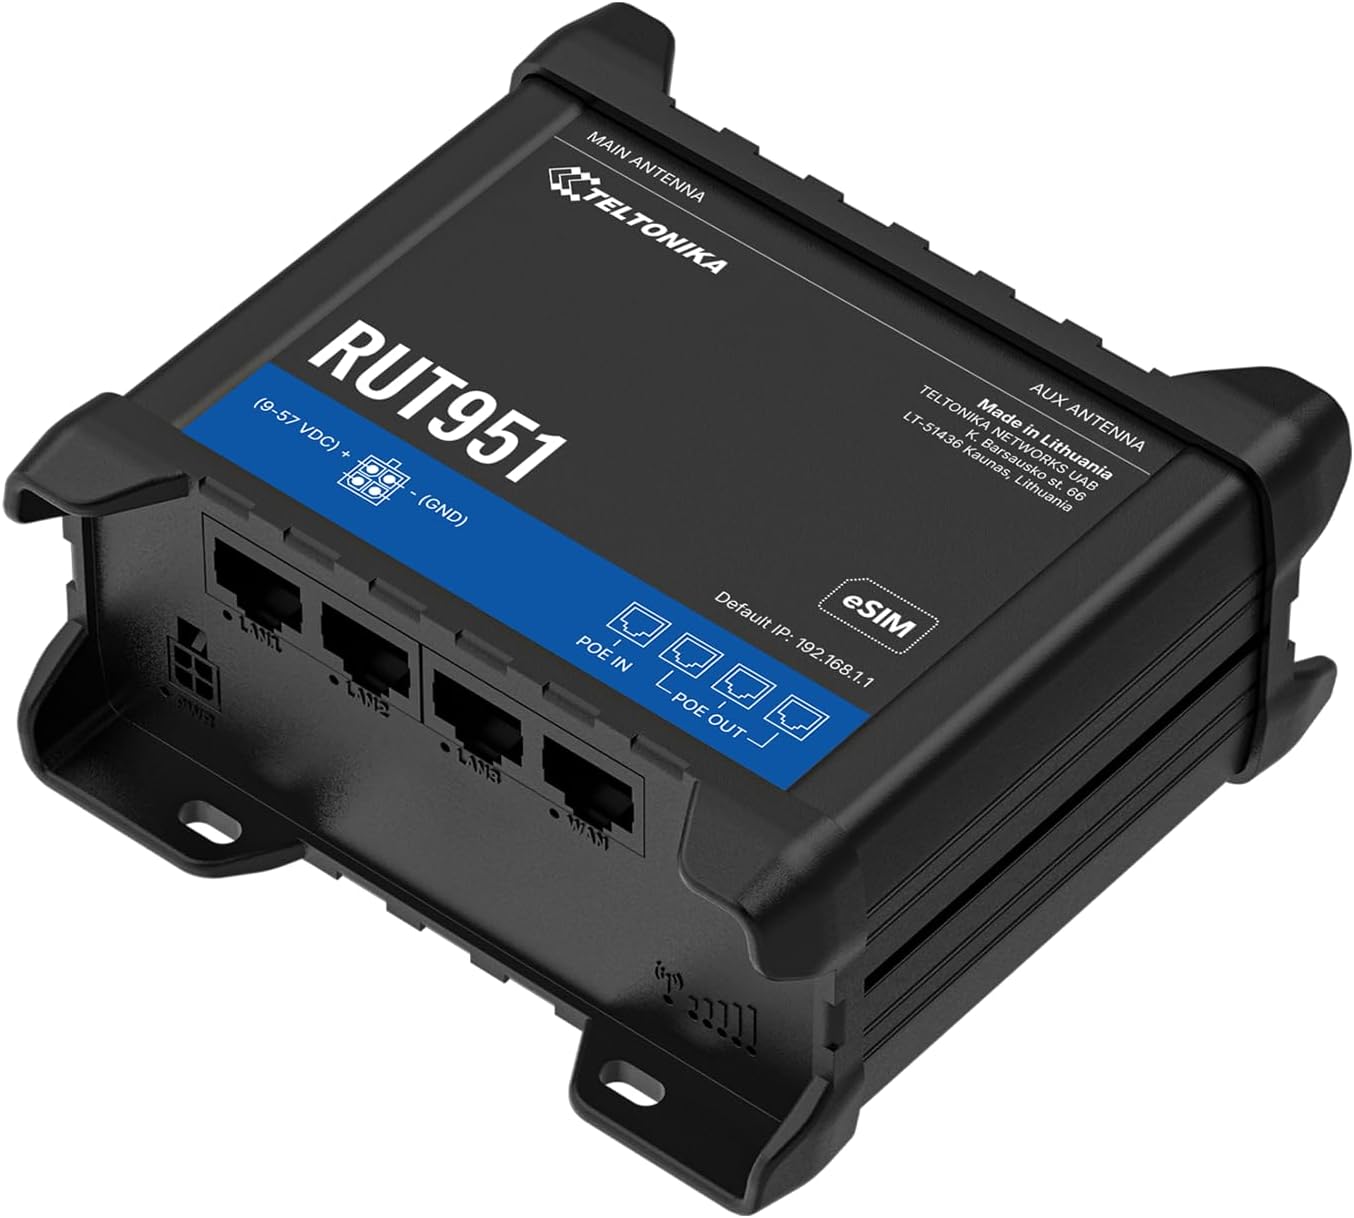
Rajah 1: Depan view of the Teltonika RUT951 router, showing the model name and general design.

Rajah 2: Detailed diagram illustrating the various ports and indicators on the Teltonika RUT951 router, including mobile and Wi-Fi antenna connectors, SIM slots, Ethernet ports, power socket, and LED indicators.
- Mobile AUX Antenna Connector (SMA female): For secondary mobile antenna.
- Mobile MAIN Antenna Connector (SMA female): For primary mobile antenna.
- SIM1 / SIM2 Slots: For inserting cellular SIM cards.
- Butang TETAP SEMULA: To restore factory settings or reboot.
- Wi-Fi Antenna Connectors (RP-SMA female): For Wi-Fi antennas.
- Soket kuasa: Untuk menyambungkan penyesuai kuasa.
- Port Ethernet LAN: For connecting local network devices.
- WAN Ethernet Port: For connecting to an external network (e.g., fiber modem).
- LED Kekuatan Isyarat Mudah Alih: Indicate cellular signal strength.
- Mobile Connection Status LED: Indicates cellular connection status.
- LED LAN: Nyatakan aktiviti pada port LAN.
- LED WAN: Indicates activity on the WAN port.
3. Arahan Persediaan
3.1 Pemasangan Kad SIM
- Locate the SIM card slots (SIM1 and SIM2) on the top panel of the router.
- Using a SIM ejector tool or a paperclip, gently press the small button next to the SIM slot to open it.
- Insert your activated Mini-SIM card(s) into the slot(s) with the gold contacts facing down and the notched corner oriented correctly.
- Push the SIM tray back into the router until it clicks into place.

Rajah 3: Atas view of the RUT951, highlighting the SIM card slots and antenna connectors.
3.2 Sambungan Antena
- Screw the two mobile antennas onto the SMA connectors labeled 'MOBILE' (MAIN and AUX) on the top panel.
- Screw the two Wi-Fi antennas onto the RP-SMA connectors labeled 'WIFI' on the top panel.
- Ensure all antennas are securely tightened for optimal signal reception.
3.3 Sambungan Kuasa
- Connect the provided power adapter to the power socket on the router.
- Palamkan hujung satu lagi penyesuai kuasa ke dalam salur keluar kuasa yang sesuai.
- The router will power on automatically. Observe the power LED indicator.

Rajah 4: Bawah view of the RUT951, showing the Ethernet ports and power input.
3.4 Sambungan Ethernet
To connect a device directly to the router:
- Connect one end of an Ethernet cable to any of the LAN ports (LAN1, LAN2, LAN3) on the router.
- Connect the other end of the Ethernet cable to your computer or network device.
- If you are using the router as a WAN gateway, connect your external modem (e.g., fiber modem) to the WAN port.
4. Arahan Operasi
4.1 Initial Access to WebUI
- Ensure your computer is connected to the router via Ethernet or Wi-Fi. The default Wi-Fi SSID and password can be found on the router's label.
- Buka a web pelayar dan masukkan alamat IP lalai: 192.168.1.1
- You will be prompted for login credentials. The default username is admin. The default password is also admin (or as specified on the router's label).
- Upon first login, you will be guided through a setup wizard to change the default password and configure basic settings.
4.2 Konfigurasi Rangkaian
After initial login, you can configure various network settings through the WebUI:
- Tetapan WAN: Configure your cellular (4G LTE) connection, including APN settings, or set up the Ethernet WAN port.
- Tetapan LAN: Manage the local network IP address range and DHCP server.
- Tetapan Wi-Fi: Change Wi-Fi SSID, password, security protocols, and channel settings.
- Dwi SIM: Configure failover or load balancing between the two SIM cards for continuous connectivity.
- VPN: Set up various VPN protocols for secure remote access.
5. Penyelenggaraan
5.1 Kemas Kini Perisian Tegar
Regularly updating the router's firmware is crucial for security, performance, and new features. Firmware updates can be performed via the WebUI under the 'System' or 'Firmware' section. Always download firmware from the official Teltonika Networks webtapak.
5.2 Tetapan Semula Kilang
Jika anda menghadapi masalah berterusan atau terlupa kelayakan log masuk anda, anda boleh melakukan tetapan semula kilang:
- With the router powered on, locate the RESET button (refer to Figure 2).
- Press and hold the RESET button for approximately 10 seconds until all LEDs flash.
- Release the button. The router will reboot with factory default settings.
6. Penyelesaian masalah
- Tiada sambungan internet:
- Check SIM card insertion and activation.
- Sahkan tetapan APN dalam WebUI.
- Ensure mobile antennas are securely connected.
- Check cellular signal strength LEDs.
- Wi-Fi Tidak Berfungsi:
- Ensure Wi-Fi is enabled in the WebUI.
- Check Wi-Fi antenna connections.
- Verify Wi-Fi SSID and password.
- Tidak Boleh Akses WebUI:
- Ensure your device is connected to the router (Ethernet or Wi-Fi).
- Verify your computer's IP settings (should be set to obtain IP automatically).
- Cuba kosongkan cache penyemak imbas anda atau gunakan penyemak imbas lain.
- Perform a factory reset if you suspect incorrect IP configuration or forgotten password.
7. Spesifikasi
| Ciri | Spesifikasi |
|---|---|
| Jenama | Teltonica |
| Nama Model | RUT951 |
| Teknologi Ketersambungan | Wi-Fi, 4G LTE, 3G, 2G |
| Standard Komunikasi Tanpa Wayar | 802.11b, 802.11g, 802.11n |
| Kelas Band Kekerapan | Dwi-Jalur |
| Bilangan Pelabuhan | 4 (3x LAN, 1x WAN) |
| Lebar Jalur Pelabuhan LAN | 100 Mbps |
| Kadar Pemindahan Data | 150 Megabits Per Second (Max Upstream) |
| Sistem Operasi | RutOS |
| Berat Barang | 287 Gram |
| Voltage | 30 Volt |
| Protokol Keselamatan | WPS (and others via RutOS) |
| Liputan | Dual SIM network redundancy |
8. Maklumat Keselamatan
- Gunakan hanya penyesuai kuasa yang disediakan bersama peranti.
- Jangan dedahkan peranti kepada air, lembapan atau suhu yang melampau.
- Elakkan meletakkan peranti berhampiran sumber haba atau di bawah cahaya matahari langsung.
- Pastikan pengudaraan yang betul untuk mengelakkan terlalu panas.
- Do not attempt to open or modify the device. This will void the warranty.
- Dispose of the device and its accessories responsibly according to local regulations.
9. Waranti dan Sokongan
The Teltonika RUT951 router comes with a standard manufacturer's warranty. For detailed warranty terms and conditions, please refer to the documentation included with your product or visit the official Teltonika Networks website. For technical support, firmware downloads, and additional resources, please visit the Teltonika Networks support portal or contact your vendor.