1. Produk Lebihview
This document provides instructions for the installation, maintenance, and general information regarding the EDILKAMIN R656200 original burn pot and gasket. This component is a crucial part of your pellet stove's combustion system, designed for efficient and safe operation.
The burn pot, also known as a crucible, is where the wood pellets are ignited and burned. The accompanying gasket ensures a proper seal, which is essential for maintaining optimal airflow and preventing smoke leakage.
2. Keserasian
The EDILKAMIN R656200 burn pot and gasket are compatible with the following EDILKAMIN pellet stove models:
- Brio
- hydroflex C
- Inpellet 49
- Inpellet 54
- pellets plus 54
- kembar
Always verify the compatibility with your specific stove model before attempting installation.
3. Maklumat Keselamatan
Please read and understand all safety warnings before proceeding with installation or maintenance. Failure to follow these instructions may result in property damage, personal injury, or death.
- Always disconnect power: Before performing any maintenance or installation on your pellet stove, ensure it is completely unplugged from the electrical outlet.
- Biarkan sejuk: Ensure the stove and all its components, especially the burn pot area, have completely cooled down before touching them. Hot surfaces can cause severe burns.
- Pakai alat pelindung: Use appropriate personal protective equipment, such as heat-resistant gloves and eye protection, during installation and cleaning.
- Professional assistance: If you are unsure about any step or uncomfortable performing the installation, consult a qualified technician.
- Original parts only: Use only genuine EDILKAMIN replacement parts to ensure proper fit, function, and safety.
4. Kandungan Pakej
Pakej harus mengandungi item berikut:
- 1 x EDILKAMIN R656200 Burn Pot (Crucible)
- 1 x Gasket (pre-installed or separate, depending on packaging)
Inspect all components for any signs of damage upon receipt. Contact your supplier immediately if any parts are missing or damaged.
5. Arahan Pemasangan
Follow these steps to replace the burn pot and gasket in your compatible EDILKAMIN pellet stove:
- Prepare the stove: Ensure the pellet stove is turned off, unplugged, and completely cool. Open the stove door to access the combustion chamber.
- Remove old components: Carefully remove any remaining pellets or ash from the old burn pot. Locate and remove the old burn pot and its gasket. Note how the old components were seated for reference.
- Bersihkan kawasan: Thoroughly clean the area where the burn pot sits, removing any ash or debris. This ensures a proper seal for the new gasket.
- Pasang gasket baru: If the gasket is separate, carefully place the new gasket into its designated groove or position in the stove or on the new burn pot. Ensure it is seated evenly and securely.
- Insert new burn pot: Carefully place the new EDILKAMIN R656200 burn pot into its position within the combustion chamber. Ensure it sits flush and is properly aligned. The grate should be facing upwards.
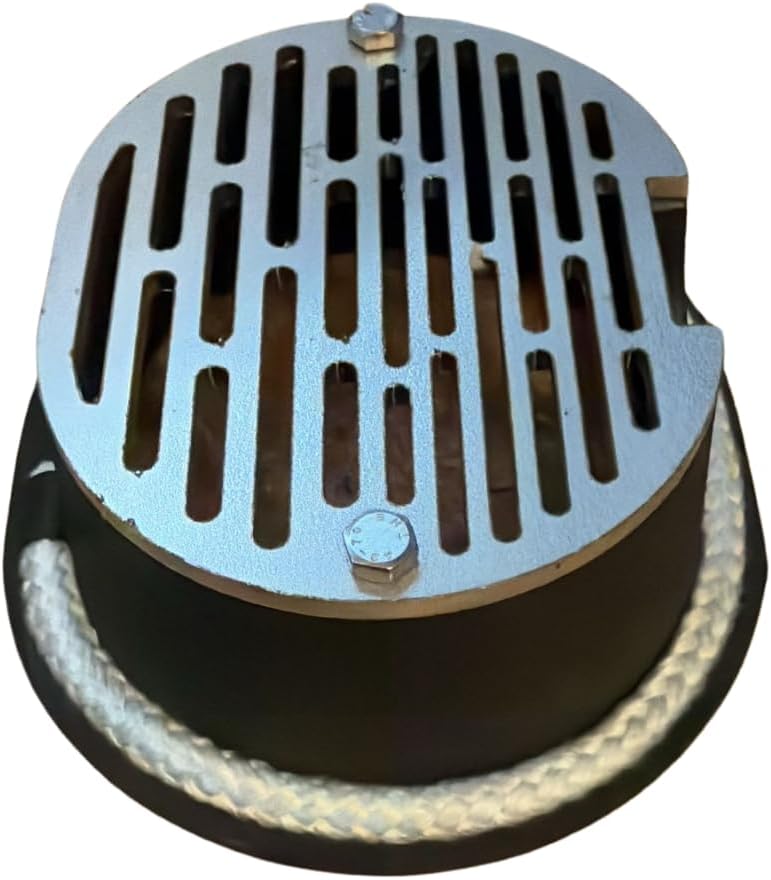
Rajah 1: Atas view of the EDILKAMIN R656200 burn pot, showing the grate and securing screws.

Rajah 2: Sisi view of the EDILKAMIN R656200 burn pot, highlighting the integrated gasket and air intake holes.

Gambar 3: Dalaman view of the EDILKAMIN R656200 burn pot, illustrating the grate structure from below.
- Secure the burn pot: If your stove model requires securing the burn pot with screws or clips, ensure these are re-installed and tightened appropriately.
- Close and test: Close the stove door. Reconnect the power and perform a test run according to your stove's operating manual to ensure proper combustion and no smoke leakage.
6. Pertimbangan Operasi
Once installed, the burn pot functions as part of your stove's combustion system. Ensure that the burn pot is clean and free of obstructions before each use to allow for proper airflow and efficient pellet burning. Refer to your specific EDILKAMIN pellet stove's main operating manual for detailed instructions on starting and operating your appliance.
7. Penyelenggaraan
Regular cleaning of the burn pot is essential for optimal performance and longevity of your pellet stove.
- Daily/Regular Cleaning: After the stove has cooled, remove the burn pot and empty any ash or unburnt pellets. Use a wire brush or scraper to clean the grate and the sides of the burn pot, ensuring all air holes are clear.
- Pemeriksaan gasket: Periodically inspect the gasket for signs of wear, cracking, or damage. A worn gasket can lead to inefficient combustion and smoke leakage. Replace the gasket if it shows any signs of degradation.
- Penyingkiran Abu: Ensure the ash pan and combustion chamber are regularly cleaned to prevent ash buildup that could impede airflow to the burn pot.
8. Penyelesaian masalah
If you experience issues after replacing the burn pot, consider the following:
- Poor Combustion/Low Flame: Check if the burn pot's air holes are clear of ash or debris. Ensure the burn pot is seated correctly and the gasket provides a tight seal.
- Smoke Leakage: This often indicates a problem with the gasket. Re-check the gasket's seating and condition. If damaged, replace it.
- Pellets Not Igniting: Ensure the igniter is clean and functioning correctly. Verify that pellets are feeding properly into the burn pot.
For more complex issues, refer to your EDILKAMIN pellet stove's main troubleshooting guide or contact a qualified service technician.
9. Spesifikasi
| Nombor Bahagian | R656200 |
| Pengeluar | EDILKAMIN |
| Jenis Produk | Burn Pot (Crucible) with Gasket |
| Keserasian | EDILKAMIN Brio, hydroflex C, Inpellet 49, Inpellet 54, pellets plus 54, Twin pellet stoves |
| Dimensi Pakej | 13.5 x 12 x 6 cm |
| Berat Pakej | 1 kilogram |
| Bateri Diperlukan | Tidak |
10. Waranti dan Sokongan
Specific warranty information for this replacement part is not provided in the product details. For warranty inquiries or technical support, please contact EDILKAMIN directly or the authorized dealer from whom you purchased the product. Always refer to your main EDILKAMIN pellet stove manual for comprehensive warranty and service information.