
Maklumat Keselamatan
Please read this instruction manual carefully before installation and use. Improper installation or use may cause damage to the product or personal injury. Keep this manual for future reference.
- Kapasiti Berat: Jangan melebihi kapasiti berat maksimum 17.6 paun (8 kg) setiap monitor.
- Saiz Monitor: This stand is designed for monitors between 13 and 32 inches.
- Keserasian VESA: Ensure your monitors have VESA mounting patterns of 75x75mm or 100x100mm.
- Ketebalan Meja: Untuk C-clamp installation, the desk thickness must be between 0.39"-3.15" (10-80mm). For grommet installation, the desk thickness must be between 0.39"-3" (10-75mm) with a hole diameter of 0.39"-2.36" (10-60mm).
- Kestabilan: Always ensure the stand is securely fastened to a stable desk surface.
- Kanak-kanak: Jauhkan bahagian kecil daripada kanak-kanak untuk mengelakkan bahaya tercekik.
Senarai Pembungkusan
Verify all components are present before beginning installation. If any parts are missing or damaged, please contact customer service.

Image showing all components included with the MOUNTUP MU3004 Dual Vertical Monitor Stand, including poles, VESA plates, desk clamp, grommet base parts, and various screws and tools.
- Kutub Atas
- Kutub Bawah
- Plat VESA (x2)
- Monitor Arms (x2)
- Meja Clamp Perhimpunan
- Grommet Base Parts
- Klip Kabel
- Kit Perkakasan (skru, pencuci, kunci Allen)
- Manual Arahan
Ciri dan Spesifikasi Produk
The MOUNTUP MU3004 Dual Vertical Monitor Stand is designed to optimize your workspace by securely holding two monitors in a stacked configuration.
- Vertical Dual Monitor Setup: Supports two monitors, one above the other, up to 32 inches each.
- Keserasian Tinggi: Fits most flat or curved screens from 13 to 32 inches.
- Kapasiti Berat: Each monitor arm supports up to 17.6 lbs (8 kg).
- Standard VESA: Sesuai dengan corak VESA 75x75mm dan 100x100mm.
- Multi-Function Adjustment: Offers tilt (±30°), swivel (±90°), and 360° rotation for optimal viewsudut-sudut.
- Pelarasan Ketinggian: Easy height adjustment along the 31.7-inch (80.5 cm) center pole.
- Pilihan Pemasangan: Menyokong kedua-dua C-clamp (drill-free) and grommet base installations.
- Pembinaan Tahan Lama: Made from heavy-duty alloy steel for stability and longevity.
- Pengurusan Kabel: Integrated cable clips help keep wires organized and reduce desktop clutter.
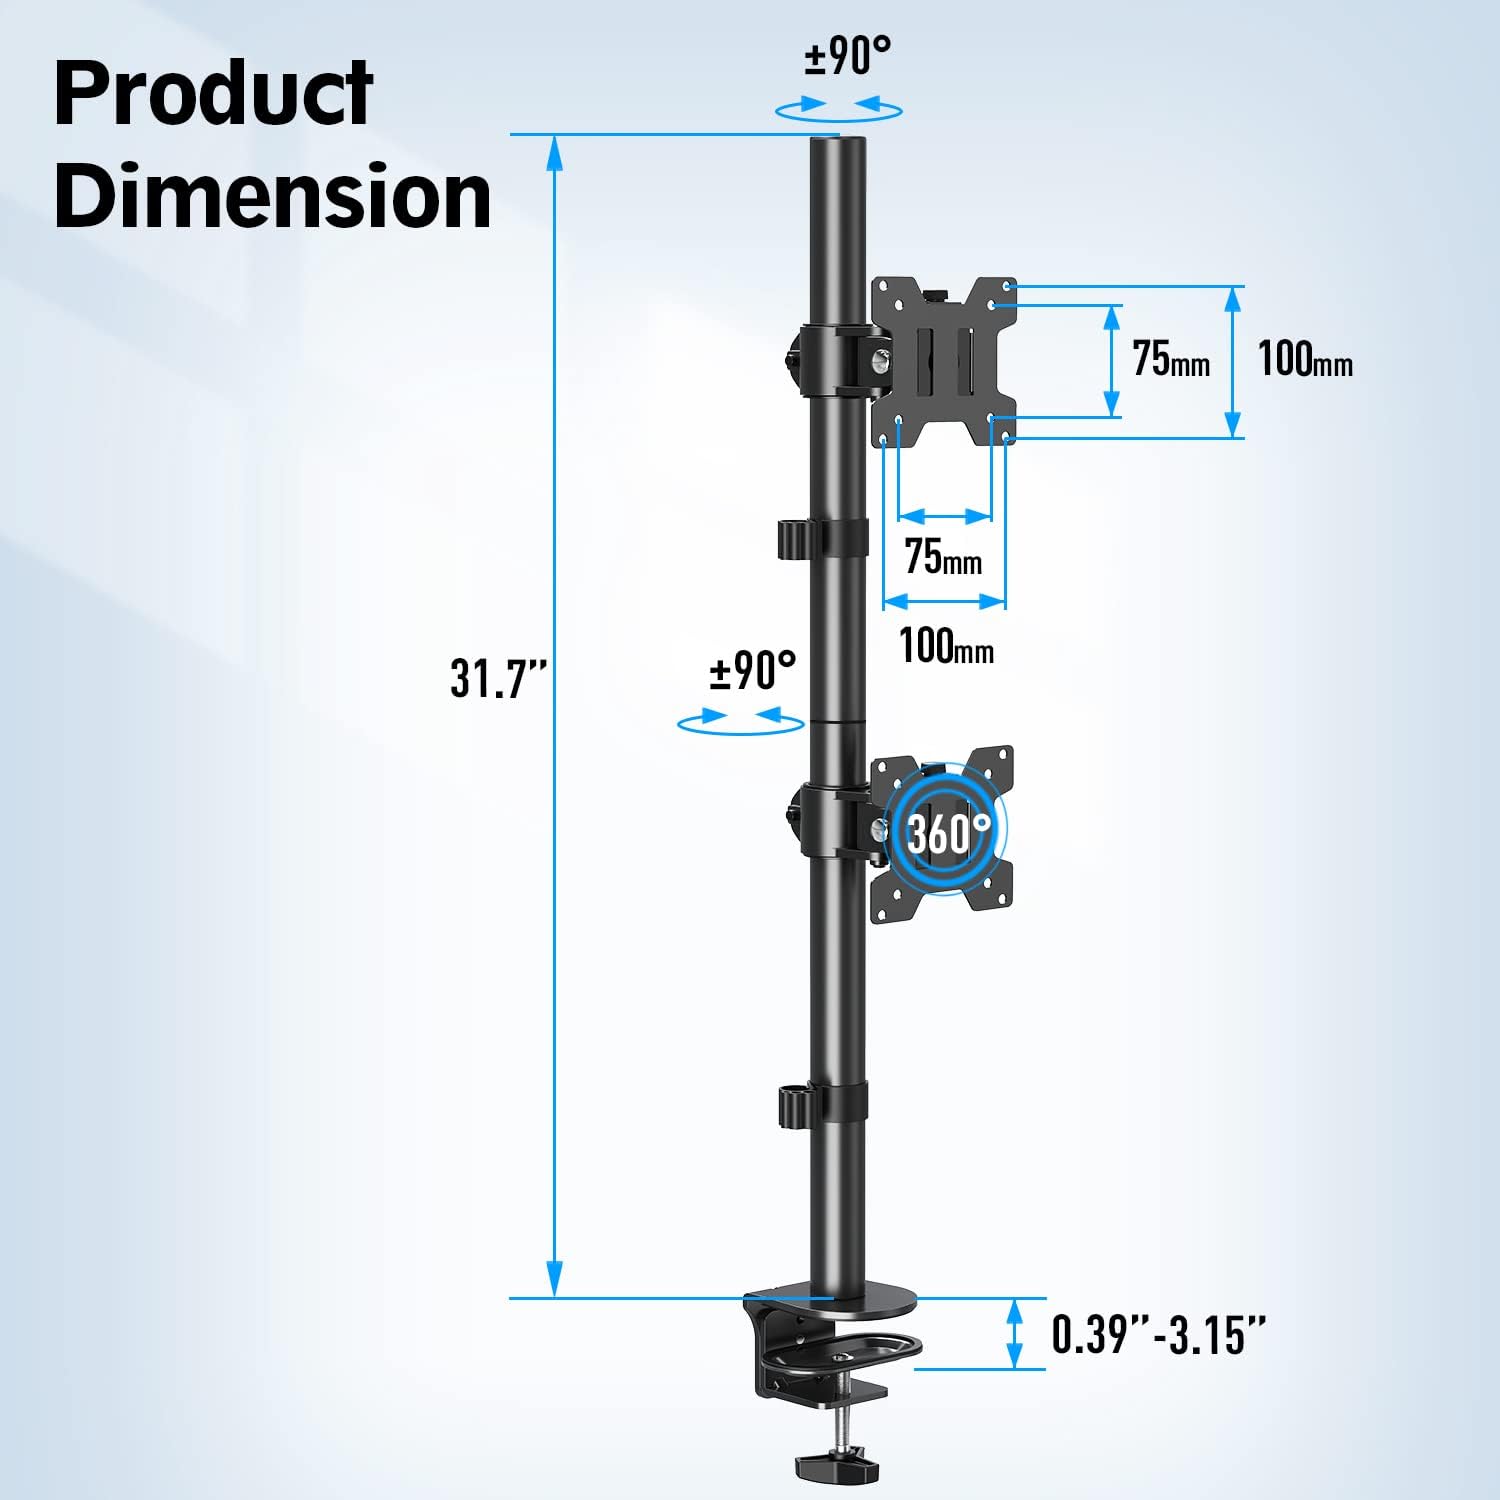
This image illustrates the key dimensions of the MOUNTUP MU3004 stand, including the 31.7-inch pole height, VESA plate sizes (75mm and 100mm), and the range of desk thickness supported by the clamp (0.39"-3.15").
Persediaan dan Pemasangan
Follow these steps to correctly install your MOUNTUP MU3004 Dual Vertical Monitor Stand.
- Pasang Tiang:
Connect the upper and lower pole sections. Secure them together using the provided screw and Allen key.
Video segment demonstrating how to install and secure the upper and lower pole sections of the monitor stand (0:04-0:11).
- Choose Installation Option:
Tentukan antara C-clamp installation (Option A) or Grommet Base installation (Option B) based on your desk type.
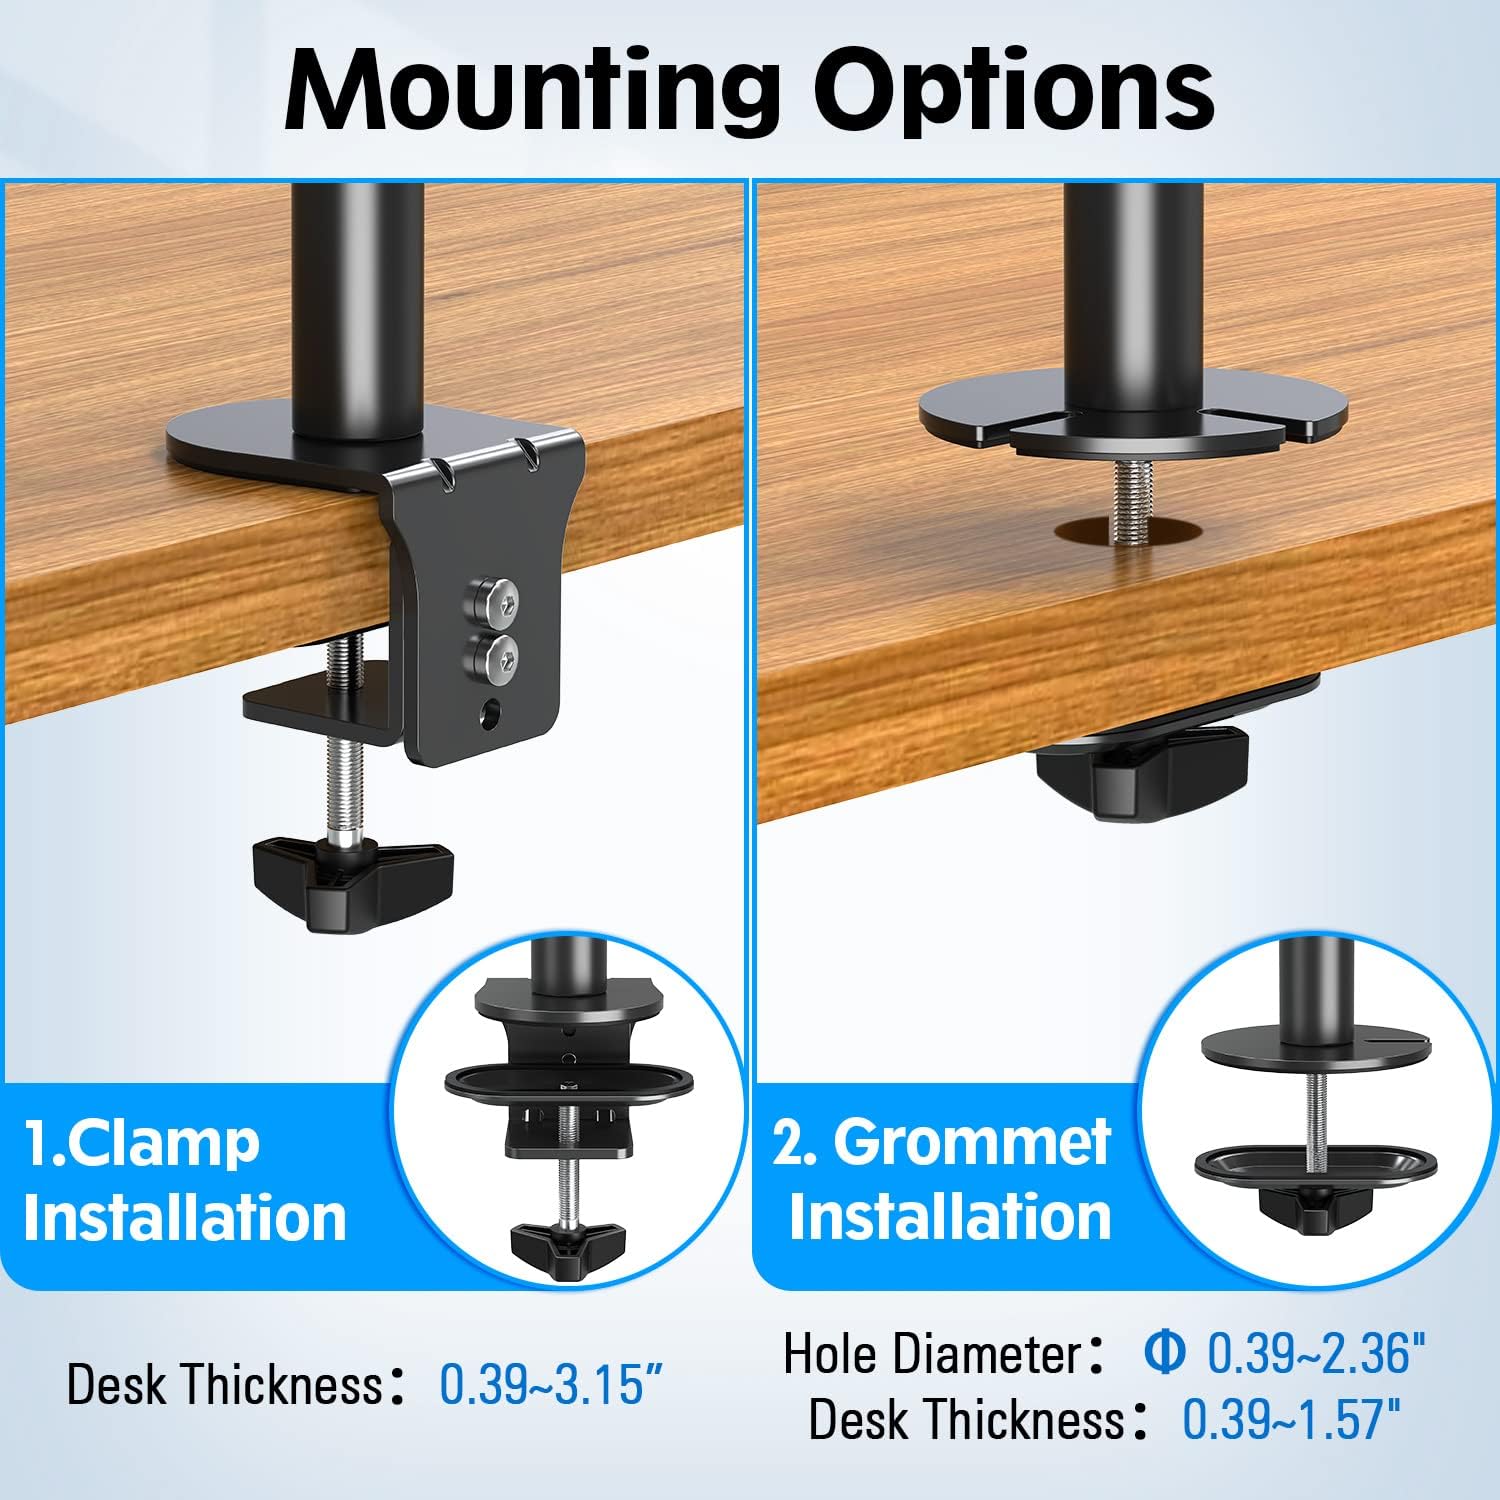
This image displays the two available installation methods: C-clamp for desk edges and grommet base for desks with existing holes.
- Install Desk Mount:
Option A (C-Clamp): Attach the L-plate to the lower pole, then attach the clamp bracket to the L-plate. Secure the entire assembly to your desk edge by tightening the knob bolt.
Video segment illustrating the C-clamp installation process, including attaching the L-plate and securing the clamp to the desk (0:13-0:36).
Option B (Grommet Base): Bongkar clamp bracket. Install the round plate to the lower pole. Insert the knob bolt through the clip plate and the desk grommet hole, then tighten to fix the stand to the desktop.
Video segment demonstrating the grommet base installation, showing how to disassemble the clamp, install the round plate, and secure the stand through a desk grommet hole (0:39-1:12).
- Pasangkan Plat VESA pada Monitor:
Attach the VESA plates to the back of your monitors using the appropriate screws from the hardware kit. Ensure they are securely fastened.
Video segment showing the process of attaching the VESA plates to the back of the monitors (1:12-1:22).
- Install Monitor Arms and Cable Clips:
Slide the monitor arms onto the main pole. Adjust their height to your desired position and tighten them with the Allen key. Install the cable clips on the pole.
Video segment demonstrating how to install and slide the middle heads (monitor arms) and cable clips to their desired positions on the pole, then tighten them (1:22-1:29).
- Hang Monitors:
Carefully hang your monitors onto the installed monitor arms. Secure them using the safety screws provided.
Video segment showing how to hang the monitors onto the mount and secure them with safety screws (1:29-1:35).
Arahan Operasi dan Pelarasan
The MOUNTUP MU3004 offers various adjustments to achieve your optimal viewpengalaman dalam.

This image illustrates the multiple viewing angles supported by the stand, including tilt (up/down 30°), 360° rotation, 31.7" height adjustment, and swivel (left/right 90°).
- Tilt Adjustment (±30°):
Loosen the tilting bolt on the monitor arm, adjust the screen to your desired up or down angle, then retighten the bolt to secure.
Video segment demonstrating the tilt adjustment feature of the monitor stand, allowing monitors to be angled up or down by 30 degrees (0:07-0:11).
- Swivel Adjustment (±90°):
Gently rotate the monitor left or right to achieve your preferred viewing direction. The VESA head allows for a ±90° swivel.
Video segment illustrating the swivel adjustment, allowing monitors to be turned left or right by 90 degrees (0:12-0:16).
- Putaran (360°):
Rotate your monitor 360° to switch between landscape and portrait orientations as needed.
Video segment demonstrating the 360° rotation feature, enabling easy switching between landscape and portrait monitor orientations (0:17-0:22).
- Pelarasan Ketinggian:
Loosen the monitor arm clamp on the main pole, slide the monitor to the desired height, and then retighten the clamp. Hold both sides of the monitor when adjusting height after installation.
Video segment showing the free height adjustment along the 31.7-inch pole, allowing users to position monitors at their preferred vertical level (0:23-0:26).
Pengurusan Kabel
Utilize the integrated cable clips to route and organize your monitor cables along the main pole. This helps maintain a clean and clutter-free workspace.
Video segment demonstrating how to use the cable management clips to organize monitor cables along the stand's pole (1:36-1:44).
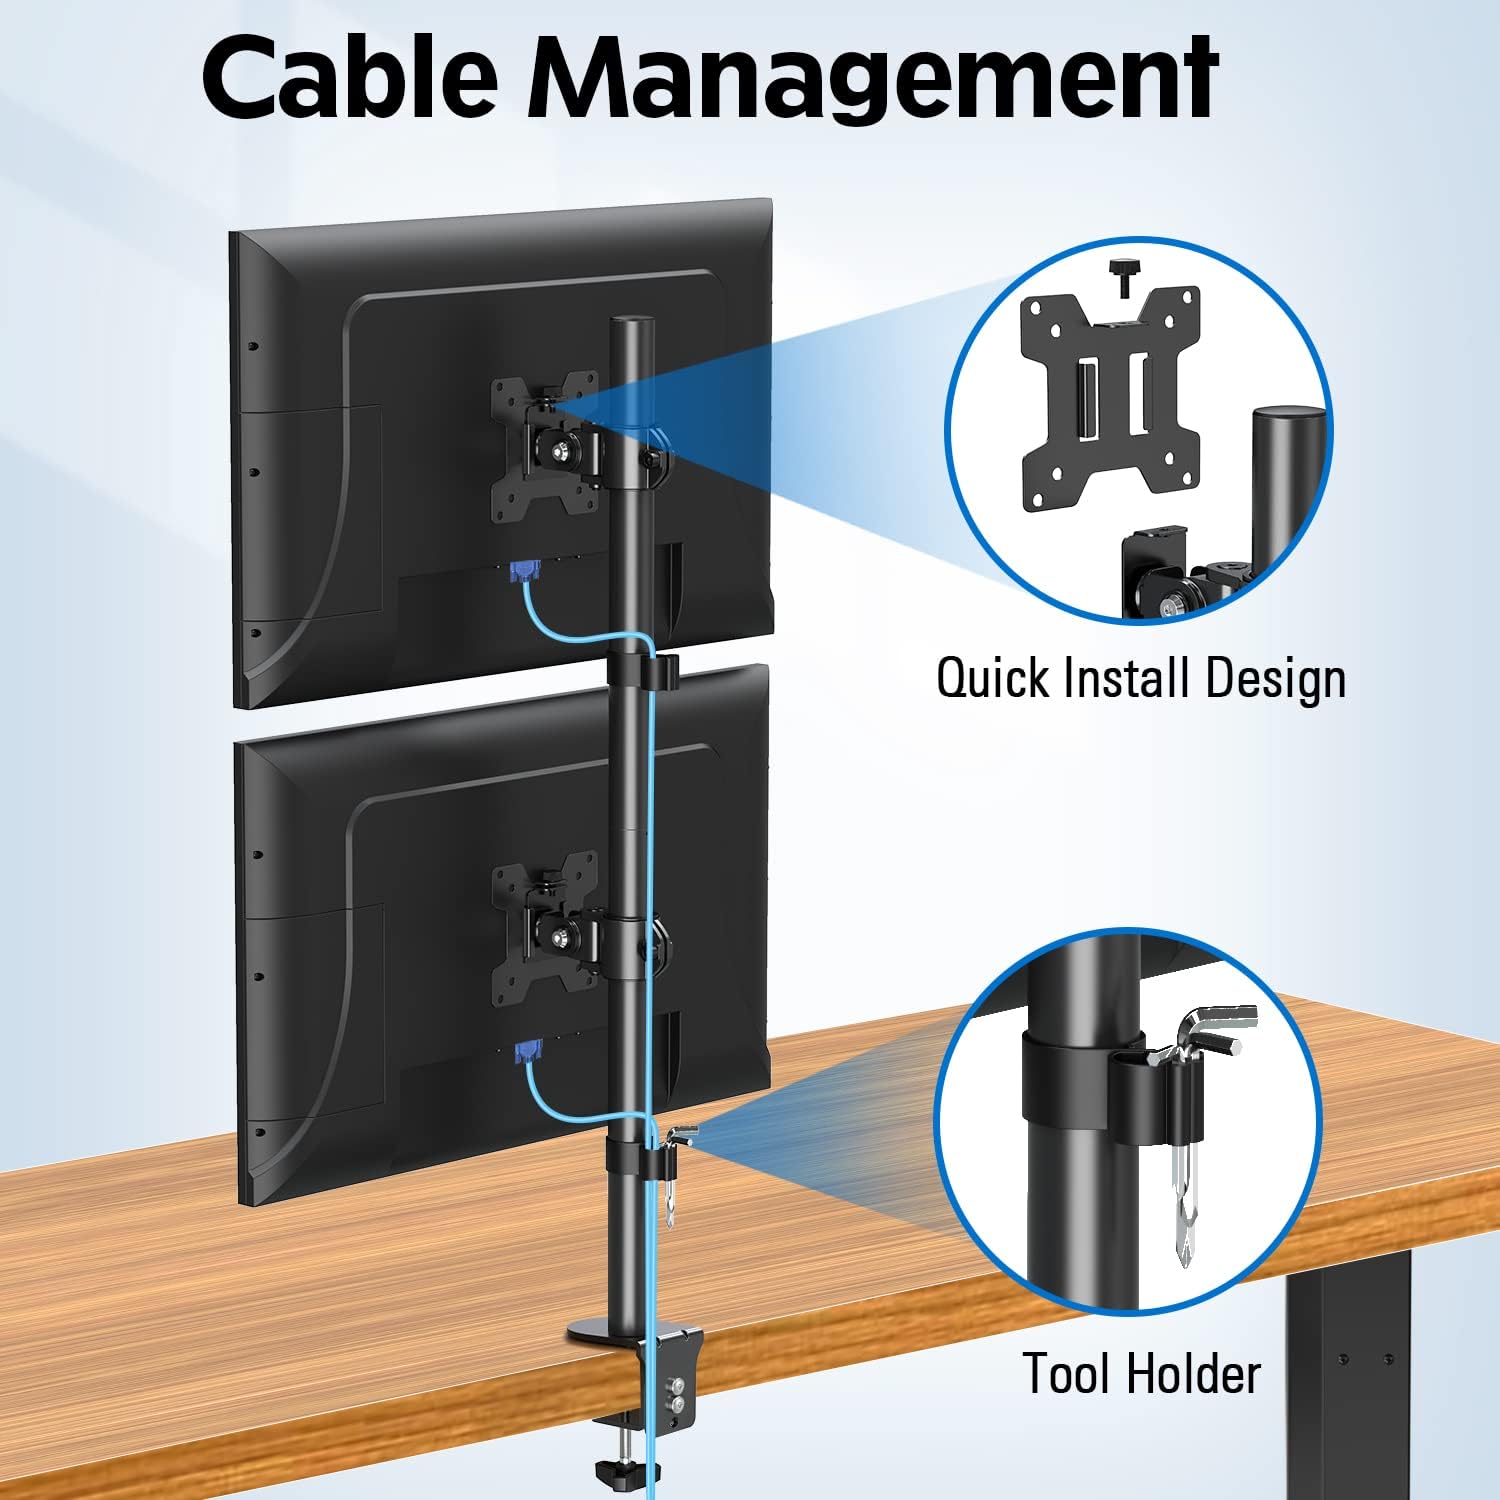
This image highlights the cable management clips on the stand, designed to keep cables tidy, and also shows the quick install design of the VESA plate.
Menyelesaikan masalah
If you encounter any issues with your MOUNTUP MU3004 monitor stand, refer to the following common solutions:
- Monitors are not stable/sagging:
Ensure all screws, especially those securing the monitor arms to the pole and the VESA plates to the monitors, are tightened. Verify that your monitors do not exceed the 17.6 lbs (8 kg) weight limit per arm.
- Pendirian goyah:
Check that the C-clamp or grommet base is securely fastened to your desk. Ensure your desk surface is stable and can support the weight of the stand and monitors.
- Kesukaran melaraskan kedudukan monitor:
Loosen the adjustment bolts slightly before attempting to tilt, swivel, or rotate the monitors. Retighten once the desired position is achieved. For height adjustment, ensure the clamp on the main pole is loosened sufficiently.
- Cables are not staying in clips:
Ensure cables are properly routed and secured within the clips. If cables are too thick or numerous, consider using additional cable ties.
If these solutions do not resolve your issue, please contact MOUNTUP customer service for further assistance.
Waranti dan Sokongan
The MOUNTUP MU3004 Dual Vertical Monitor Stand comes with a Waranti 3 tahun, ensuring confidence in its construction, strength, and durability.
For any pre-purchase questions, installation inquiries, or support needs, please do not hesitate to contact MOUNTUP customer service. Our team is ready to assist you.