
1. Pengenalan
Welcome to the user manual for your new Cheerlux C50 Projector. This guide provides essential information on setting up, operating, maintaining, and troubleshooting your device. Please read this manual thoroughly before using the projector to ensure optimal performance and safety. Keep this manual for future reference.
2. Arahan Keselamatan
Untuk mengelakkan kebakaran, renjatan elektrik atau kecederaan, sila patuhi langkah berjaga-jaga keselamatan berikut:
- Jangan halang bukaan pengudaraan. Pastikan ruang yang mencukupi di sekeliling projektor untuk aliran udara yang betul.
- Do not expose the projector to rain or moisture. Avoid placing objects filled with liquids, such as vases, on the projector.
- Jangan buka projektor casing. Rujuk semua servis kepada kakitangan perkhidmatan yang berkelayakan.
- Gunakan hanya penyesuai kuasa yang dibekalkan dengan projektor.
- Elakkan melihat terus ke dalam kanta projektor apabila lamp dihidupkan, kerana cahaya terang boleh merosakkan mata anda.
- Letakkan projektor di atas permukaan yang stabil dan rata untuk mengelakkannya daripada jatuh.
- Cabut palam projektor daripada soket kuasa semasa ribut petir atau apabila tidak digunakan untuk jangka masa yang lama.
3. Kandungan Pakej
Sila pastikan semua item ada dan dalam keadaan baik:
- Projektor Cheerlux C50
- Alat Kawalan Jauh
- Kabel Kuasa
- Kabel HDMI
- AV kabel
- Manual Pengguna
4. Produk Lebihview
Familiarize yourself with the components and ports of your Cheerlux C50 Projector.

This image displays the Cheerlux C50 Projector from a front-top angle, highlighting its lens, focus ring, and control panel buttons on the top surface. The projector features a white and grey casing.
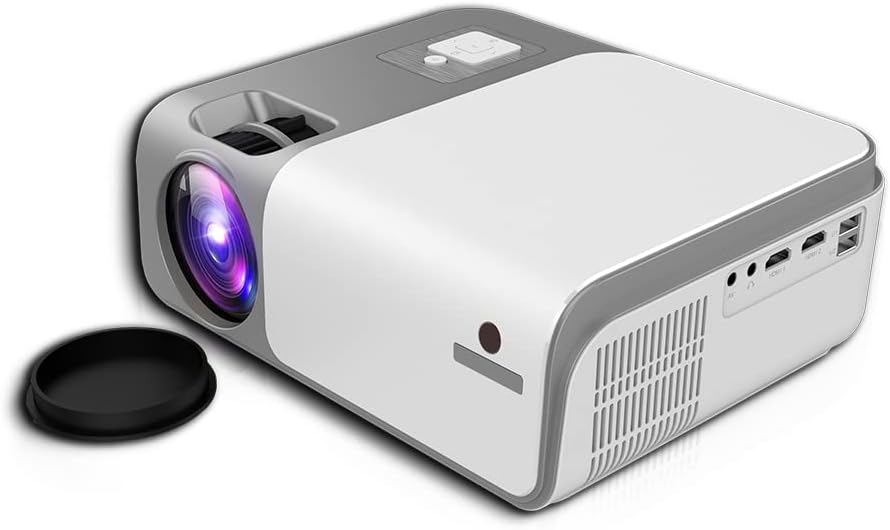
This image shows the rear and side of the Cheerlux C50 Projector, revealing various input/output ports such as HDMI, USB, and AV, along with ventilation grilles. A lens cap is visible next to the lens.
4.1. Panel hadapan
- Kanta Tayangan: Memancarkan imej.
- Cincin Fokus: Melaraskan ketajaman imej.
4.2. Panel Atas
- Butang Kawalan: Power, Menu, Source, Navigation (Up/Down/Left/Right), OK.
4.3. Panel belakang
- Input Kuasa: Menyambung ke kabel kuasa.
- Port HDMI (x2): Connect to HDMI-enabled devices (laptops, gaming consoles, Blu-ray players).
- Port USB (x2): Sambungkan pemacu USB untuk main balik media.
- Pelabuhan AV: Sambungkan ke peranti lama menggunakan kabel AV.
- Audio Keluar (3.5mm): Sambungkan pembesar suara atau fon kepala luaran.
- Penerima IR: Untuk isyarat kawalan jauh.
5. Persediaan
5.1. Sambungan Kuasa
- Sambungkan kabel kuasa ke port input kuasa projektor.
- Palamkan hujung kabel kuasa yang lain ke salur keluar dinding.
- Lampu penunjuk kuasa pada projektor akan menyala.
5.2. penempatan
Position the projector on a stable, flat surface. The ideal projection distance for the Cheerlux C50 is between 1.5 to 6 meters, depending on the desired screen size. Ensure the projector is centered with your projection screen or wall.
5.3. Pembetulan Fokus dan Keystone
- Pelarasan Fokus: Turn the focus ring on the front of the projector until the projected image appears sharp and clear.
- Keystone Correction (4P): If the projected image appears trapezoidal (wider at the top or bottom), use the 4P keystone correction function. This can typically be accessed via the projector's menu or dedicated buttons on the remote control. Adjust each of the four corners independently to achieve a perfectly rectangular image.
6. Beroperasi
6.1. Hidupkan/Mati Kuasa
- Hidupkan kuasa: Press the power button on the projector or the remote control. The projector will start up, and the lamp akan menerangi.
- Matikan: Press the power button again. Confirm shutdown if prompted. Allow the projector to cool down before unplugging it.
6.2. Sumber Input
Connect your desired device to the projector using the appropriate cable (HDMI, AV, USB). Then, press the 'Source' button on the projector or remote control to select the corresponding input source.
- HDMI: For high-definition video and audio from laptops, game consoles, etc.
- USB: Untuk bermain media files (photos, videos, music) directly from a USB flash drive.
- DARI: For standard definition video and audio from older devices like DVD players.
6.3. Kesambungan Tanpa Wayar (WiFi & Bluetooth)
The Cheerlux C50 Projector features built-in WiFi and Bluetooth for enhanced connectivity.
- Sambungan WiFi: Navigate to the 'Settings' menu, select 'Network' or 'WiFi Settings'. Choose your desired WiFi network from the list and enter the password.
- Sambungan Bluetooth: In the 'Settings' menu, select 'Bluetooth'. Turn on Bluetooth and pair with your Bluetooth-enabled speakers or headphones.
6.4. Pencerminan Skrin
The projector supports wireless screen mirroring from compatible smartphones and tablets.

This image illustrates the Cheerlux C50 Projector wirelessly connected to a smartphone. The phone's screen, displaying a movie scene, is being mirrored to the projector, indicated by a Wi-Fi signal icon between the devices.
- Ensure both your projector and mobile device are connected to the same WiFi network.
- Pada projektor, pilih pilihan 'Pencerminan Skrin' atau 'Paparan Tanpa Wayar' daripada menu utama.
- On your mobile device, activate its screen mirroring feature (e.g., 'Smart View' for Samsung, 'Screen Mirroring' for Android, 'AirPlay' for iOS).
- Select the projector's name from the list of available devices on your phone.
- The mobile device's screen content will now be projected.
6.5. Navigasi Menu
Use the navigation buttons (Up, Down, Left, Right) and 'OK' button on the projector or remote control to browse through the on-screen menu. The 'Menu' button typically opens the main settings, and the 'Return' or 'Exit' button closes menus.
7. Penyelenggaraan
7.1. Pembersihan
- Kanta: Gunakan kain lembut dan bebas lin yang direka khusus untuk kanta optik. Jangan gunakan pembersih yang kasar.
- Casing: Lap bahagian luar projektor dengan kain lembut dan kering. Untuk kotoran degil, lap sedikitampen kain dengan air.
- Lubang Pengudaraan: Periodically clean the vents with a soft brush or compressed air to prevent dust buildup, which can affect cooling.
7.2. Penyimpanan
When not in use for extended periods, store the projector in a cool, dry place, away from direct sunlight and extreme temperatures. Cover the lens with its cap to protect it from dust and scratches.
8. Penyelesaian masalah
Jika anda menghadapi masalah dengan projektor anda, rujuk kepada masalah dan penyelesaian biasa berikut:
| Masalah | Kemungkinan Punca | Penyelesaian |
|---|---|---|
| Tiada imej ditayangkan | Power cable loose, incorrect input source, device not connected. | Check power connection, select correct input source, ensure source device is on and connected. |
| Imej kabur | Focus not adjusted, projector too close/far. | Adjust the focus ring. Reposition the projector within the recommended distance. |
| Imej adalah trapezoid | Projektor tidak berserenjang dengan skrin. | Use the 4P keystone correction function in the menu. |
| Tiada bunyi | Volume too low, external speakers not connected, source device muted. | Increase projector volume, check external speaker connection, unmute source device. |
| Alat kawalan jauh tidak berfungsi | Batteries dead, obstruction, not pointing at IR receiver. | Replace batteries, remove obstructions, point remote directly at the projector's IR receiver. |
9. Spesifikasi
Technical specifications for the Cheerlux C50 Projector:
| Ciri | Spesifikasi |
|---|---|
| Nama Jenama | Generic (Cheerlux C50) |
| Teknologi Ketersambungan | Wi-Fi, Bluetooth |
| Resolusi Asli | 1920 x 1080 |
| Kecerahan | 4000 Lumen |
| Faktor Bentuk | Mudah alih |
| Jenis Pemasangan | Pemasangan Atas Meja |
| Jenis Pengawal | Alat Kawalan Jauh |
| Jarak Lemparan Maksimum | 6 Meter |
| Wattage | 3 watt |
| Ciri Khas | Built In Wi Fi, Portable, Wireless, 4P Keystone Correction |
10. Waranti dan Sokongan
The Cheerlux C50 Projector comes with a standard manufacturer's warranty. Please refer to the warranty card included in your package for specific terms and conditions, including warranty period and coverage details. For technical support, service, or further inquiries, please contact your retailer or the manufacturer's customer service department.
Simpan resit pembelian anda sebagai bukti pembelian untuk tuntutan waranti.