
1. Pengenalan
Thank you for choosing the Xigmatek Lux M Micro-ATX Mini Tower PC Case. This manual provides detailed instructions for the installation, operation, and maintenance of your new PC chassis. Please read this manual carefully before beginning the assembly process to ensure proper installation and to maximize the performance and longevity of your system.
The Lux M case is designed to offer a robust and aesthetically pleasing housing for your computer components, featuring a tempered glass side panel, a metallic front panel with a unique cut-out pattern, and pre-installed fixed RGB fans for optimal cooling and visual appeal. It supports Micro-ATX and Mini-ITX motherboards and is compatible with various cooling solutions, including water cooling.
2. Maklumat Keselamatan
Sila patuhi langkah berjaga-jaga keselamatan berikut semasa pemasangan dan pengendalian:
- Sentiasa putuskan sambungan bekalan kuasa dari alur keluar dinding sebelum memasang atau menanggalkan sebarang komponen untuk mengelakkan kejutan elektrik.
- Handle all components with care. Avoid touching circuit boards directly; hold them by their edges.
- Wear an anti-static wrist strap when handling sensitive electronic components to prevent electrostatic discharge (ESD) damage.
- Keep the case and components away from liquids, excessive heat, and direct sunlight.
- Ensure proper ventilation around the PC case to prevent overheating.
- Keep small parts and screws out of reach of children.
3. Kandungan Pakej
Sahkan bahawa semua barang ada di dalam bungkusan anda. Jika terdapat barang yang hilang atau rosak, sila hubungi peruncit anda.
- Xigmatek Lux M Micro-ATX Mini Tower PC Case
- Accessory box (containing screws, standoffs, cable ties, etc.)
- Manual Pengguna (dokumen ini)
4. Produk Lebihview
Familiarize yourself with the various parts of your Xigmatek Lux M PC case.
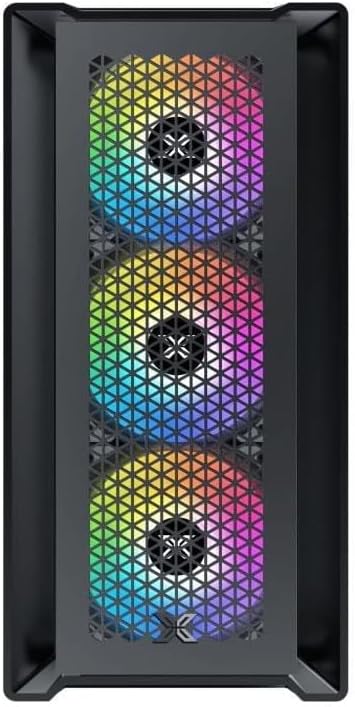
Rajah 4.1: Depan View. This image displays the front of the Xigmatek Lux M case, highlighting the metallic mesh panel with a triangular design and the three pre-installed 120mm fixed RGB fans.

Figure 4.2: Angled Top-Front View. This perspective shows the tempered glass side panel, offering a clear view of the interior, and the top panel with its I/O ports (USB, audio) and power button.
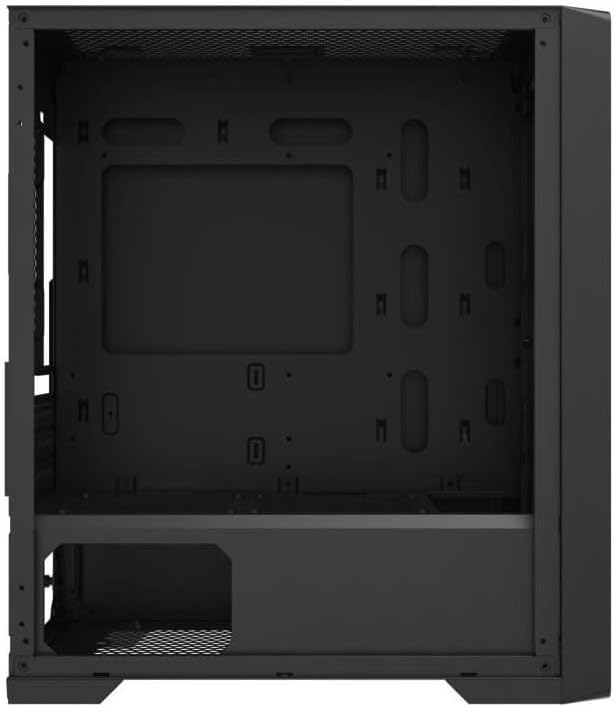
Figure 4.3: Interior Layout. The internal structure of the case, featuring the motherboard mounting tray, cutouts for cable management, and the power supply shroud at the bottom.
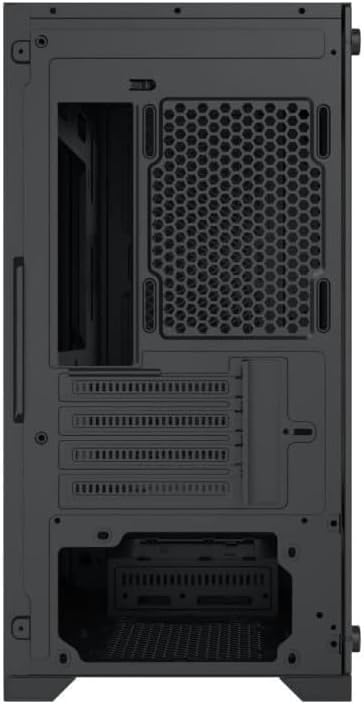
Rajah 4.4: Belakang View. This image illustrates the rear of the case, including the expansion slots for graphics cards and other add-in cards, the rear fan mounting area, and the power supply mounting bracket.
5. Persediaan dan Pemasangan
Follow these steps to install your computer components into the Xigmatek Lux M case.
5.1. Menyediakan Kes
- Letakkan bekas di atas permukaan yang rata dan stabil.
- Remove the tempered glass side panel by unscrewing the thumb screws and carefully lifting it off. Set it aside on a soft, non-abrasive surface.
- Remove the opposite steel side panel by unscrewing the thumb screws and sliding it backward.
5.2. Pemasangan Papan Induk
The Lux M supports Micro-ATX and Mini-ITX motherboards.
- Install the I/O shield (if not pre-installed on your motherboard) into the rear opening of the case.
- Align the motherboard with the pre-installed standoffs. Ensure all screw holes on the motherboard match the standoffs.
- Secure the motherboard using the provided motherboard screws. Do not overtighten.
5.3. Pemasangan Unit Bekalan Kuasa (PSU).
The PSU mounts at the rear bottom of the case.
- Slide the PSU into its designated compartment from the rear of the case.
- Align the PSU's screw holes with the holes on the case's rear panel.
- Secure the PSU with the provided screws.
5.4. Storage Drive Installation (2.5"/3.5" Drives)
The case supports 2x 2.5"/3.5" storage drives.
- Locate the drive cage beneath the PSU shroud or dedicated 2.5" mounting points behind the motherboard tray.
- For 3.5" HDDs, slide the drive into a drive tray (if applicable) and secure it with screws.
- For 2.5" SSDs, secure them directly to the mounting points using the provided screws.
5.5. Pemasangan Kad Grafik (VGA) dan Kad Pengembangan
Sarung ini menyokong kad grafik sehingga 320mm panjang.
- Tanggalkan penutup slot pengembangan yang diperlukan dari bahagian belakang bekas.
- Insert your graphics card or other expansion card into the appropriate PCIe slot on your motherboard.
- Secure the card to the case using the expansion slot screws.
5.6. Cooling System Installation (Optional)
The Lux M comes with 4x 120mm X24F fixed RGB fans. It supports additional cooling options.
- Penyejuk CPU: Max height of 160mm. Install your CPU cooler according to its manufacturer's instructions.
- Sokongan Radiator: The case supports radiators of 360mm, 240mm, or 120mm. Refer to your radiator's manual for installation. Common mounting locations include the front and top panels.
5.7. Pengurusan Kabel
Gunakan potongan penghalaan kabel dan titik ikat di belakang dulang papan induk untuk menyusun kabel. Ini meningkatkan aliran udara dan estetika.
5.8. Perhimpunan Akhir
- Once all components are installed and cables are managed, reattach the steel side panel and secure it with thumb screws.
- Carefully reattach the tempered glass side panel and secure it with thumb screws.
6. Arahan Operasi
After completing the installation, connect your peripherals (monitor, keyboard, mouse) and power cable to the PC. Press the power button located on the top panel of the case to start your system.
The pre-installed X24F RGB fans feature fixed RGB lighting, which will illuminate automatically upon system power-on. No additional software or controller is required for their basic operation.
Ensure that the case's ventilation is not obstructed to maintain optimal airflow and cooling performance.
7. Penyelenggaraan
Regular maintenance helps ensure the longevity and optimal performance of your PC components.
- Pembersihan Habuk: Periodically clean dust filters (if present) and the interior of the case using compressed air or a soft brush. Dust accumulation can hinder airflow and lead to overheating.
- Pembersihan Luaran: Lap permukaan luar dengan lembut, damp cloth. Avoid harsh chemicals that may damage the finish or tempered glass.
- Kaca Terbaja: Clean the tempered glass panel with a glass cleaner and a microfiber cloth to avoid scratches and streaks.
8. Penyelesaian masalah
If you encounter issues during or after installation, consider the following common troubleshooting steps:
- Tiada Kuasa:
- Pastikan kabel kuasa disambungkan dengan selamat ke kedua-dua PSU dan alur keluar dinding.
- Check that the PSU switch is in the 'ON' position.
- Verify that the front panel power switch cable is correctly connected to the motherboard's front panel header.
- Fans Not Spinning / RGB Not Lighting:
- Ensure all fan power cables are securely connected to the motherboard or a fan controller.
- For RGB, confirm that any necessary RGB headers are connected to the motherboard (though the included fans are fixed RGB and should light up with power).
- Tiada Output Paparan:
- Verify that your monitor cable is connected to the graphics card (if installed) and not the motherboard's integrated graphics port.
- Letakkan semula kad grafik dalam slot PCIenya.
- Terlalu panas:
- Ensure all case fans are spinning and oriented correctly for optimal airflow (intake/exhaust).
- Bersihkan sebarang penapis habuk dan komponen dalaman.
- Verify that the CPU cooler is properly seated and making good contact with the CPU.
For more complex issues, consult your component manuals or seek assistance from Xigmatek support or a qualified technician.
9. Spesifikasi
| Ciri | Spesifikasi |
|---|---|
| Jenama | Xigmatek |
| Nama Model | Lux M |
| Nombor Model | EN48540 |
| Jenis Kes | Menara Mini |
| Keserasian Papan Induk | Micro-ATX, Mini-ITX |
| bahan | Tempered Glass (side panel), Metal (front panel) |
| warna | Hitam |
| Peminat prapasang | 4 x 120mm X24F Fixed RGB Fans |
| Sokongan Radiator | 360mm, 240mm, 120mm |
| Ketinggian Penyejuk CPU Maks | 160mm |
| Max VGA Length | 320mm |
| Panjang PSU Maks | 165mm |
| Ruang Simpanan | 2x 2.5"/3.5" |
| Ciri Khas | RGB Lighting, Triangular Mesh Front Design |
10. Waranti dan Sokongan
Xigmatek products are manufactured to the highest quality standards. For warranty information and technical support, please refer to the warranty card included with your product or visit the official Xigmatek webtapak. Sila simpan bukti pembelian anda untuk tuntutan waranti.
For further assistance, you may contact Xigmatek customer support through their official channels.