
1. Pengenalan
The Sunshine DT-17N Digital Multimeter is a versatile and reliable tool designed for accurate electrical measurements. It is particularly suitable for phone repair technicians and general electronics work, capable of measuring various electrical parameters including voltage, current, resistance, capacitance, and temperature. Its compact design and user-friendly features make it an essential tool for diagnosing and repairing electronic devices.

Figure 1: The Sunshine DT-17N Digital Multimeter, demonstrating its compact size for portability.
2. Maklumat Keselamatan
To ensure safe operation and prevent damage to the meter, please read and follow all safety instructions carefully. This multimeter features double insulation protection for enhanced user safety.
- Always ensure the test leads are in good condition and properly connected before taking measurements.
- Jangan gunakan voltage or current that exceeds the maximum rated values for each range.
- Never use the multimeter if it appears damaged or if the test leads are frayed.
- Berhati-hati semasa bekerja dengan voltagadalah melebihi 30V AC RMS, puncak 42V atau 60V DC, kerana ini menimbulkan bahaya kejutan.
- Sentiasa putuskan sambungan kuasa ke litar dan nyahcas vol tinggitage kapasitor sebelum mengukur rintangan, kesinambungan, atau diod.
- Replace the battery promptly when the low battery indicator appears to ensure accurate readings.
3. Produk Lebihview
3.1. Multimeter Components

Rajah 2: Depan view of the DT-17N Multimeter, highlighting its main display and controls.
3.2. Ciri Paparan
The DT-17N features a large LCD display with a backlight, ensuring clear readability in various lighting conditions.

Figure 3: The multimeter's LCD display with its backlight feature, improving visibility in low-light environments.
- Paparan LCD Besar: Provides clear numerical readings.
- Lampu latar: Improves visibility in dark or low-light conditions. Activated by pressing and holding the HOLD button.
- Unit Pengukuran: Displays the appropriate unit (e.g., V, A, Ω, °C/°F).
- Status Bateri: Menunjukkan paras bateri semasa.
- Automatic Polarity Display: Shows positive or negative polarity automatically.
3.3. Controls and Input Ports
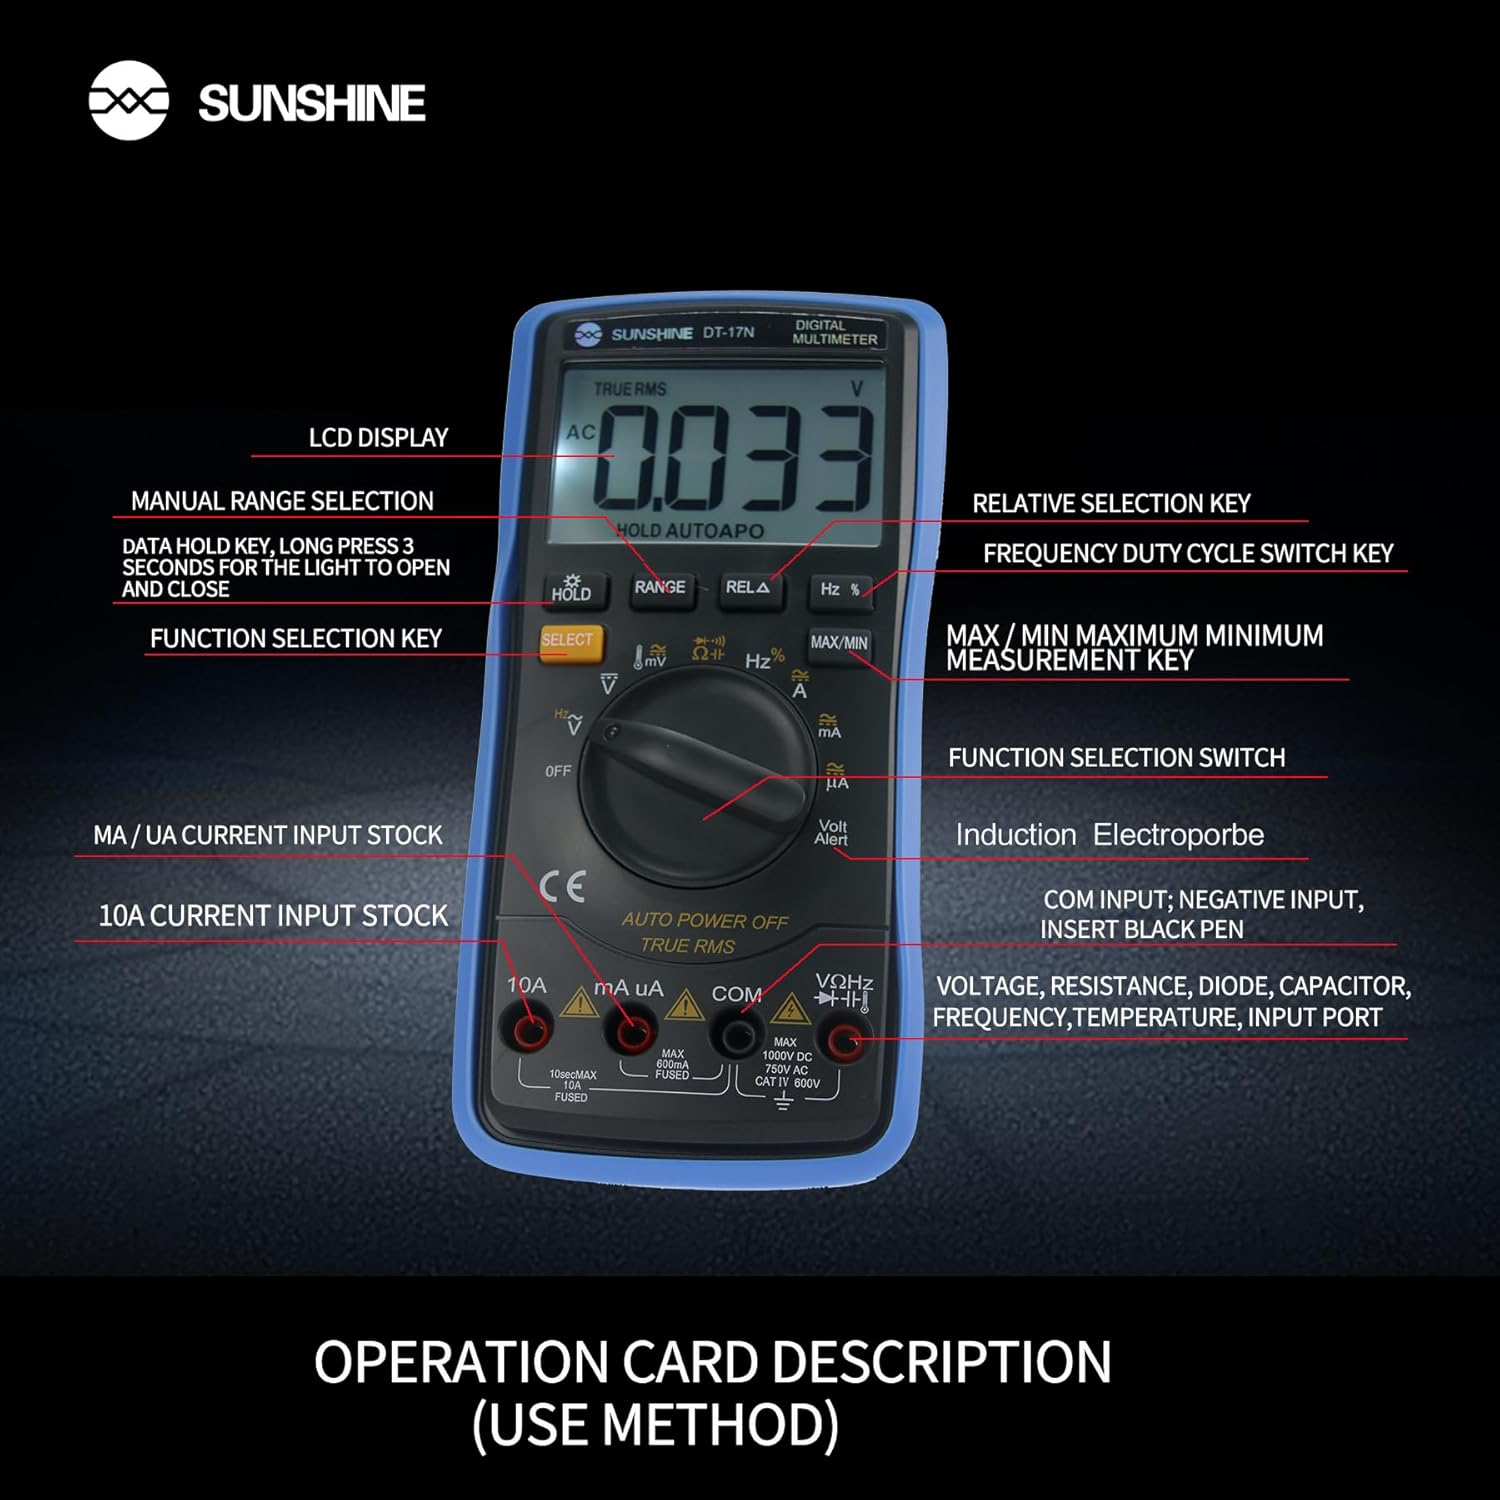
Rajah 4: Terperinci view of the multimeter's controls and input ports with their respective functions.
- Suis Fungsi Putar: Used to select the desired measurement function (e.g., Voltage, Arus, Rintangan, Suhu).
- Butang PILIH: Toggles between different measurement modes within a single rotary switch position (e.g., AC/DC voltage, Diod/Kesinambungan).
- Butang TAHAN: Freezes the current reading on the display. Press and hold to activate/deactivate the backlight.
- Butang RANGE: Allows manual selection of measurement ranges, overriding the automatic ranging feature.
- RELA Button (Relative Selection Key): Mengukur perbezaan antara nilai rujukan yang disimpan dan bacaan semasa.
- Hz % Button (Frequency Duty Cycle Switch Key): Toggles between frequency and duty cycle measurements.
- Butang MAX/MIN: Memaparkan nilai diukur maksimum atau minimum semasa sesi pengukuran.
- VΩHz Input Port: Connect the red test lead for voltage, resistance, frequency, capacitance, diode, and temperature measurements.
- COM Input Port: Connect the black test lead (common ground) for all measurements.
- mA/uA Input Port: Connect the red test lead for measuring small currents (milliamperes and microamperes).
- 10A Input Port: Connect the red test lead for measuring large currents (up to 10 Amperes).
- Volt Alert (NCV): Vol. Bukan Kenalantage detection feature.
4. Persediaan
4.1. Pemasangan Bateri
The DT-17N is battery-powered. To install or replace the battery:
- Pastikan multimeter dimatikan.
- Cari penutup petak bateri di bahagian belakang unit.
- Tanggalkan skru penahan dan tanggalkan penutup.
- Insert the new battery, observing correct polarity (+ and -).
- Gantikan penutup petak bateri dan kencangkannya dengan skru.
4.2. Menghubungkan Petunjuk Ujian
Always connect the black test lead to the COM input jack. Connect the red test lead to the appropriate input jack based on the measurement you intend to perform:
- Untuk Voltage, Resistance, Capacitance, Frequency, Diode, and Temperature measurements: Connect the red test lead to the VΩHz jek.
- For Current measurements (mA/uA): Connect the red test lead to the mA/uA jek.
- For High Current measurements (10A): Connect the red test lead to the 10A jek.
5. Arahan Operasi
The Sunshine DT-17N features automatic identification for most ranges, simplifying operation. Use the rotary switch to select the primary function and the SELECT button to toggle sub-functions.
5.1. Mengukur Voltantage (AC/DC)
- Putar suis putar ke V kedudukan.
- Sekiranya perlu, tekan PILIH button to toggle between AC (~) and DC (—) voltage.
- Sambungkan plumbum ujian hitam ke COM bicu dan ujian merah membawa kepada VΩHz jek.
- Sambungkan prob ujian secara selari dengan litar atau komponen yang ingin anda ukur.
- Baca voltagnilai e pada paparan.

Figure 5: The multimeter showing a DC millivolt measurement on its display.
5.2. Measuring Current (AC/DC)
Awas: Never connect the multimeter in parallel when measuring current, as this can damage the meter and the circuit. Always connect in series.
- Putar suis putar ke mA/uA or 10A kedudukan, bergantung kepada arus yang dijangkakan.
- Sekiranya perlu, tekan PILIH button to toggle between AC (~) and DC (—) current.
- Sambungkan plumbum ujian hitam ke COM jack. Connect the red test lead to the mA/uA or 10A jack accordingly.
- Open the circuit and connect the test probes in series with the load.
- Baca nilai semasa pada paparan.
5.3. Mengukur Rintangan
- Putar suis putar ke Ω kedudukan.
- Sambungkan plumbum ujian hitam ke COM bicu dan ujian merah membawa kepada VΩHz jek.
- Pastikan litar dinyahdayakan dan semua kapasitor dinyahcas.
- Connect the test probes across the component to measure its resistance.
- Baca nilai rintangan pada paparan.
5.4. Measuring Capacitance
- Putar suis putar ke Kapasitansi symbol (often shared with diode/continuity).
- Tekan ke PILIH button until the capacitance mode is active.
- Sambungkan plumbum ujian hitam ke COM bicu dan ujian merah membawa kepada VΩHz jek.
- Pastikan kapasitor dinyahcas sepenuhnya sebelum menyambungkan prob ujian.
- Sambungkan kuar ujian merentasi kapasitor.
- Baca nilai kapasitans pada paparan.
5.5. Measuring Frequency / Duty Cycle
- Putar suis putar ke % Hz kedudukan.
- Tekan ke % Hz button to toggle between frequency (Hz) and duty cycle (%).
- Sambungkan plumbum ujian hitam ke COM bicu dan ujian merah membawa kepada VΩHz jek.
- Sambungkan kuar ujian selari dengan sumber isyarat.
- Baca nilai frekuensi atau kitaran tugas pada paparan.
5.6. Pengukuran Suhu
The DT-17N can measure temperature using a K-type thermocouple (not always included, check package contents).

Gambar 6: Cthample of temperature measurement using the DT-17N Multimeter with a thermocouple.
- Putar suis putar ke ° C / ° F kedudukan.
- Sekiranya perlu, tekan PILIH button to choose between Celsius or Fahrenheit.
- Connect the K-type thermocouple to the VΩHz dan COM bicu, memerhati kekutuban.
- Letakkan hujung termogandingan pada atau di dalam objek yang suhunya ingin anda ukur.
- Baca nilai suhu pada paparan.
5.7. Diode Test and Continuity
- Putar suis putar ke Diod/Kesinambungan simbol.
- Tekan ke PILIH butang untuk bertukar antara Ujian Diod dan Ujian Kesinambungan.
- Sambungkan plumbum ujian hitam ke COM bicu dan ujian merah membawa kepada VΩHz jek.
- For Diode Test: Connect the probes across the diode. The display will show the forward voltage drop. Balikkan probe untuk memeriksa litar terbuka.
- For Continuity Test: Connect the probes across the circuit or component. A beep indicates continuity (low resistance).
5.8. Bukan Kenalan Voltage (NCV) Pengesanan
The NCV function allows detection of AC voltage tanpa sentuhan langsung dengan konduktor.
- Putar suis putar ke NCV position (often indicated by a Volt Alert symbol).
- Move the top part of the multimeter near the conductor.
- Meter akan berbunyi bip dan/atau menyalakan lampu penunjuk jika vol ACtage dikesan.
5.9. Pegangan Data dan Lampu Latar
- Pegangan Data: Tekan ke TAHAN button briefly to freeze the current reading on the display. Press again to release.
- Lampu latar: Tekan dan tahan butang TAHAN button for approximately 3 seconds to turn the display backlight ON or OFF.
5.10. MAX/MIN Measurement
This function records the maximum and minimum values measured during a session.
- Pilih fungsi ukuran yang dikehendaki (cth, Voltagdan).
- Tekan ke MAX/MIN button. The display will show 'MAX' and the maximum value recorded.
- Tekan MAX/MIN again to cycle to 'MIN' and view the minimum value.
- Tekan dan tahan MAX/MIN untuk keluar dari mod ini.
6. Penyelenggaraan
Penyelenggaraan yang betul memastikan jangka hayat dan ketepatan multimeter anda.
6.1. Pembersihan
Lap kes dengan iklanamp kain dan detergen lembut. Jangan gunakan bahan pelelas atau pelarut. Pastikan meter kering sepenuhnya sebelum digunakan.
6.2. Penggantian Bateri
Refer to Section 4.1 for battery replacement instructions. Always use the specified battery type.
6.3. Holster Care
The multimeter is protected by a thick rubber shockproof holster, designed for durability and a non-slip grip. Keep the holster clean and free from debris.

Figure 7: The durable rubber holster provides protection and a comfortable grip for the multimeter.
7. Penyelesaian masalah
If you encounter issues with your DT-17N multimeter, refer to the table below for common problems and solutions.
| Masalah | Kemungkinan Punca | Penyelesaian |
|---|---|---|
| Tiada paparan atau paparan malap | Low or dead battery; Poor battery contact | Replace battery; Check battery contacts |
| Bacaan yang salah | Wrong function selected; Improper test lead connection; Damaged test leads; Out of range | Select correct function; Ensure leads are in correct jacks; Replace leads; Select higher range or check specifications |
| Tiada bip kesinambungan | Circuit resistance too high; Continuity mode not selected | Ensure resistance is below threshold; Press SELECT to enter continuity mode |
| Fuse blown (for current measurements) | Overcurrent applied | Replace fuse with specified type and rating; Ensure correct current measurement procedure |
8. Spesifikasi
Technical specifications for the Sunshine DT-17N Digital Multimeter.
| Ciri | Spesifikasi |
|---|---|
| Model | DT-17N |
| Jenis Pengukuran | Multimeter |
| Paparan | 5999 (5 5/6) counts, Automatic Polarity Display, Backlit LCD |
| SampKadar ling | Lebih kurang 3 kali sesaat |
| Sumber Kuasa | Dikuasakan Bateri |
| Vol. Operasi Minimumtage | 3 Volt (DC) |
| Julat Pengukuran Suhu | 0°C hingga 1000°C (32°F hingga 1832°F) |
| Induction Electroprobe Function | Yes (NCV) |
| Penukaran A / D Integral Berganda | ya |
| Dimensi Item | 5.51 x 2.76 x 1.18 inci |
| Berat Barang | 0.55 Kilogram |
| warna | Biru |
9. Waranti dan Sokongan
9.1. Maklumat Waranti
This product comes with a warranty of 3 bulan dari tarikh pembelian. Please retain your proof of purchase for warranty claims. The warranty covers manufacturing defects under normal use.
9.2. Sokongan Pelanggan
For technical assistance or inquiries regarding your Sunshine DT-17N Digital Multimeter, please contact your retailer or the manufacturer's customer service department. Refer to your purchase documentation for specific contact details.