1. Pengenalan
This manual provides detailed instructions for the proper setup, operation, and maintenance of the HHIP 4401-1006 Universal Single Indicator Concentricity Checker. This precision instrument is designed to accurately measure the runout of both internal and external parts, ensuring high precision in various industrial applications.
Key features include a diameter capacity of 0.157-0.980 inches (4-25 mm) and a length capacity of 4 inches. It offers an accuracy of 0.00012 inches / 0.003 mm. The checker features two solid steel position wheels, a precision drive wheel for consistent part feeding, and ultra-high precision ball bearings for friction-free movement. A heavy-duty base with a fine-adjustable sliding test indicator holder is included, compatible with dovetail slot indicators. Adjustable mechanical arm stops facilitate one-handed operation. Master setting pins (4mm & 10mm diameter) are also provided.
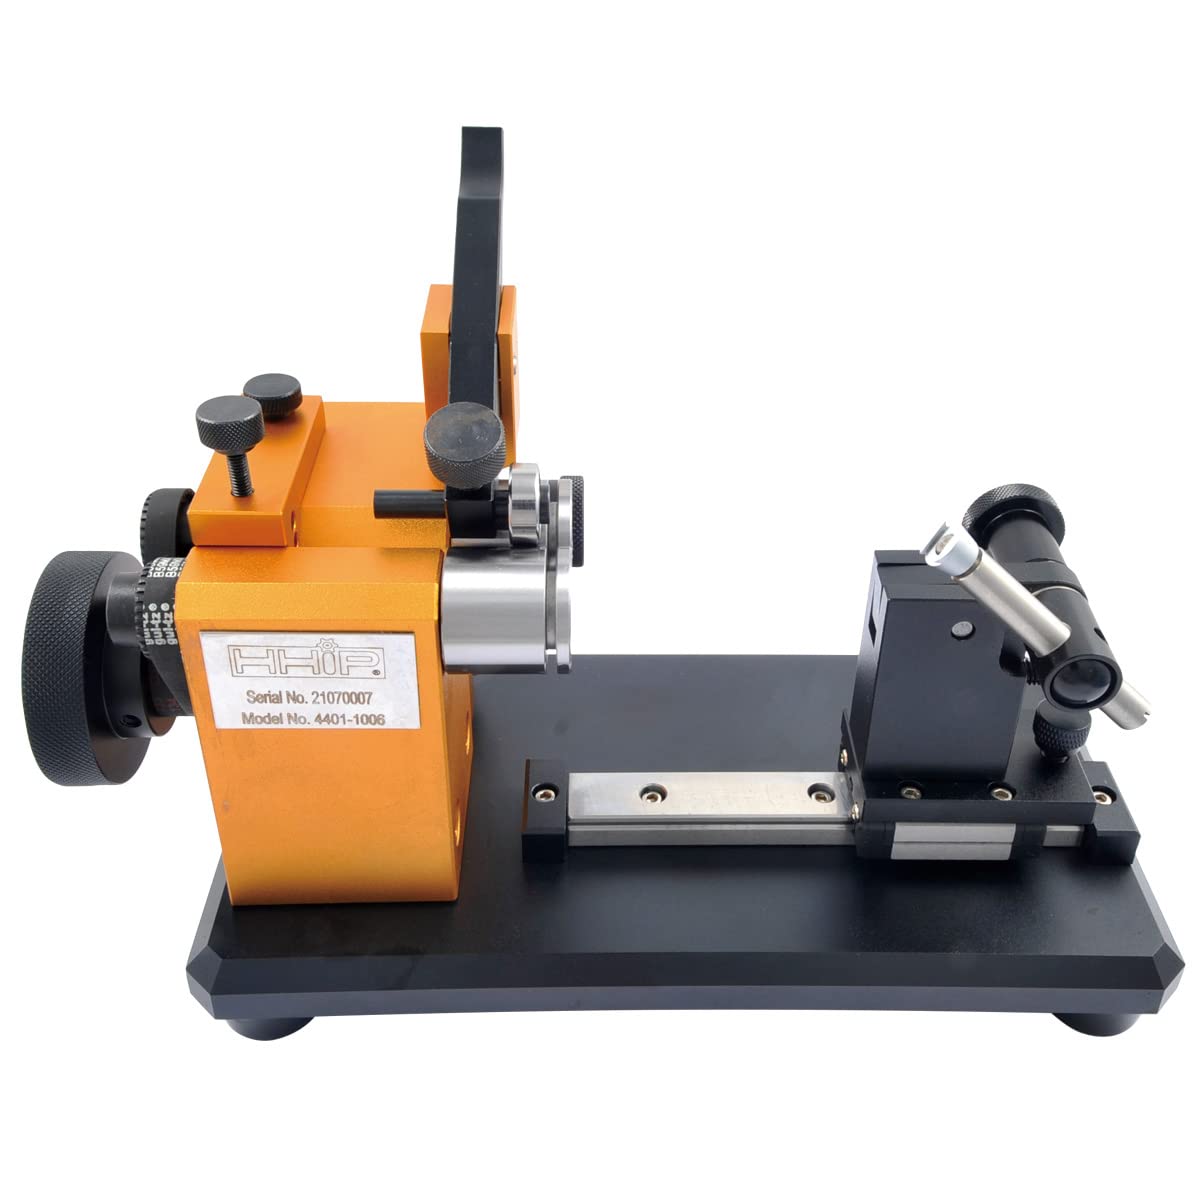
Figure 1: HHIP 4401-1006 Universal Single Indicator Concentricity Checker with a dial indicator.
2. Persediaan
Before operating the concentricity checker, ensure it is placed on a stable, level surface. Unpack all components carefully and inspect for any damage.
2.1 Pengenalan Komponen
- Unit Pangkalan Utama: Provides stability and mounting points for other components.
- Part Holding Mechanism: Consists of two position wheels and a precision drive wheel.
- Test Indicator Holder: Adjustable holder for mounting a dial test indicator (indicator not included).
- Master Setting Pins: 4mm and 10mm diameter pins for calibration.
- Directional Drive Hand Wheel: Used to rotate the part being measured.

Rajah 2: Sisi view illustrating the main components of the checker.
2.2 Mounting the Test Indicator
- Loosen the locking screw on the test indicator holder.
- Insert your dial test indicator (with a dovetail slot) into the holder.
- Adjust the indicator's position so its contact point can reach the part to be measured.
- Tighten the locking screw to secure the indicator firmly in place.
3. Arahan Operasi
This section details the procedure for measuring runout using the HHIP 4401-1006 Concentricity Checker.
3.1 Measuring External Runout
- Ensure the test indicator is properly mounted and zeroed if necessary.
- Place the cylindrical part to be measured onto the two position wheels. The precision drive wheel should engage the part.
- Adjust the test indicator holder so the indicator's contact point touches the outer diameter of the part. Apply slight preload to the indicator.
- Use the directional drive hand wheel to slowly rotate the part 360 degrees.
- Observe the maximum and minimum readings on the dial test indicator. The difference between these two readings is the total indicated runout (TIR) for the external surface.
- For repeatable readings, ensure consistent pressure is applied when pushing parts into the stop.
3.2 Measuring Internal Runout
- For internal runout, a suitable internal diameter measuring probe or attachment for your dial indicator may be required (not included).
- Position the part on the wheels as described for external runout.
- Adjust the test indicator holder so the internal probe contacts the inner diameter of the part.
- Slowly rotate the part using the directional drive hand wheel.
- Record the maximum and minimum readings to determine the internal runout.

Rajah 3: Terperinci view of the concentricity checker with operational notes.
4. Penyelenggaraan
Proper maintenance ensures the longevity and accuracy of your HHIP Concentricity Checker.
4.1 Pembersihan
- After each use, wipe down the unit with a clean, soft cloth to remove any dust, debris, or oil residue.
- For stubborn grime, use a mild, non-abrasive cleaning solution. Avoid harsh chemicals that could damage the finish or precision components.
- Ensure all moving parts, especially the precision drive wheel and ball bearings, are kept clean and free of obstructions.
4.2 Penyimpanan
- When not in use, store the concentricity checker in its protective case to prevent damage from impacts, dust, and environmental factors.
- Store in a dry, temperature-controlled environment to prevent corrosion and material degradation.

Figure 4: Concentricity checker stored in its protective case.
5. Penyelesaian masalah
This section addresses common issues you might encounter during the use of the concentricity checker.
- Issue: Inconsistent or inaccurate readings.
Penyelesaian:- Ensure the part is clean and free of burrs or debris.
- Verify the test indicator is securely mounted and functioning correctly.
- Check that the part is properly seated on the position wheels and engaged by the drive wheel.
- Confirm the checker is on a stable, vibration-free surface.
- Use the master setting pins to verify the indicator's accuracy and the checker's setup.
- Issue: Part not rotating smoothly.
Penyelesaian:- Inspect the precision drive wheel and position wheels for any obstructions or damage.
- Clean the wheels and ball bearings thoroughly.
- Ensure the part's diameter is within the specified capacity (0.157-0.980").
- Issue: Test indicator not holding position.
Penyelesaian:- Tighten the locking screw on the test indicator holder.
- Ensure the indicator's dovetail slot is clean and free of debris, allowing for a secure grip.
6. Spesifikasi
The following table outlines the technical specifications for the HHIP 4401-1006 Universal Single Indicator Concentricity Checker.
| Ciri | Spesifikasi |
|---|---|
| Nombor Model | 4401-1006 |
| Diameter Capacity | 0.157 - 0.980 inci (4 - 25 mm) |
| Length Capacity | 4 inci |
| Ketepatan | 0.00012 inci / 0.003 mm |
| Dimensi (L x W x H) | 216 x 114 x 130 mm (8.5 x 4.5 x 5.1 inci) |
| Berat Barang | 5 kg (11 lbs) |
| bahan | Blend (components include solid steel, aluminum) |
| Komponen yang Disertakan | Concentricity Checker, 4mm & 10mm Master Setting Pins |
| Pengeluar | ABS Import Tools Inc. |

Figure 5: Dimensional drawing of the HHIP 4401-1006 model.
7. Waranti dan Sokongan
For information regarding product warranty, technical support, or replacement parts, please refer to the official documentation provided with your purchase or contact the manufacturer, ABS Import Tools Inc., directly. Their contact details can typically be found on the product packaging or their official webtapak.