pengenalan
This manual provides comprehensive instructions for the safe and efficient operation, maintenance, and troubleshooting of your SINGER 4423 Heavy Duty Sewing Machine and its compatible Extension Table. Please read this manual thoroughly before using the machine to ensure optimal performance and longevity.
Arahan Keselamatan
- Sentiasa tanggalkan plag mesin daripada soket elektrik semasa menanggalkan penutup, melincirkan atau semasa membuat sebarang pelarasan servis pengguna lain yang dinyatakan dalam manual arahan ini.
- Jauhkan jari dari semua bahagian yang bergerak. Penjagaan khas diperlukan di sekitar jarum mesin jahit.
- Gunakan plat jarum yang betul. Plat yang salah boleh menyebabkan jarum patah.
- Jangan tarik atau tolak fabrik semasa menjahit. Ini boleh memesongkan jarum, menyebabkan ia patah.
- Always use the foot controller to operate the machine.
- Never operate the machine with any air openings blocked. Keep ventilation openings of the sewing machine and foot controller free from lint, dust, and loose cloth.
- Perkakas ini tidak dimaksudkan untuk digunakan oleh orang (termasuk kanak-kanak) yang kurang keupayaan fizikal, deria atau mental, atau kurang pengalaman dan pengetahuan, melainkan mereka telah diberi pengawasan atau arahan mengenai penggunaan perkakas oleh orang yang bertanggungjawab untuk keselamatan mereka.
Kandungan Pakej
Your SINGER 4423 Heavy Duty Sewing Machine package typically includes the following items:
- SINGER 4423 Mesin Jahit Tugas Berat
- Pengawal Kaki
- Standard Presser Foot (All-Purpose Foot)
- Kaki Zip
- Kaki Lubang Butang
- Kaki Jahit Butang
- Seam Ripper/Lint Brush
- Pek Jarum
- Bobbins
- Pemegang Kili
- Pin Kili Bantu
- Felt Pin Kili
- Pemutar skru
- Soft-Sided Dust Cover
- SINGER Heavy Duty Sewing Machine Extension Table
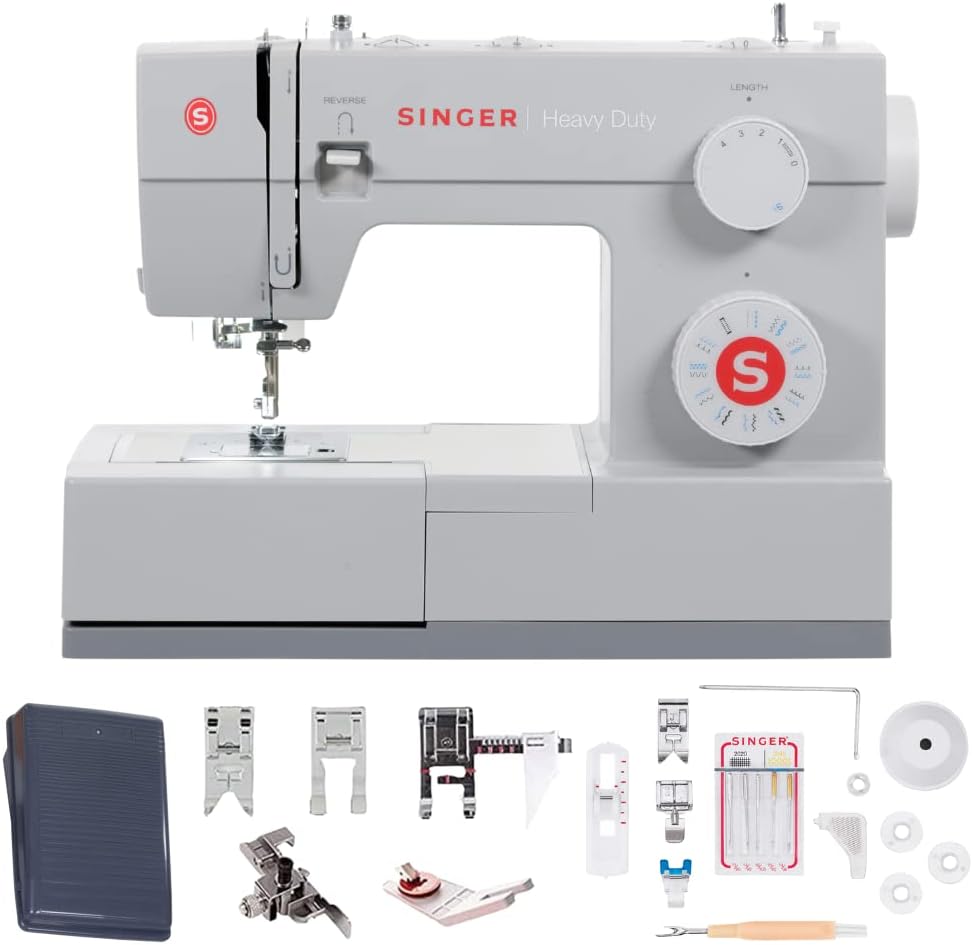
Image: SINGER 4423 Heavy Duty Sewing Machine with various presser feet, needles, bobbins, and a foot pedal.

Image: Close-up of SINGER sewing machine accessories, including different presser feet and a pack of universal needles. For more information on needles, visit https://uqr.to/hjvc.
Persediaan
1. Membongkar dan Meletakkan
Carefully remove the machine from its packaging. Place the machine on a stable, flat surface. Ensure there is adequate space around the machine for comfortable operation.
2. Sambungan Kuasa
Connect the foot controller plug into the machine's power socket. Then, plug the power cord into a suitable electrical outlet.

Imej: Belakang view of the SINGER 4423 sewing machine showing the power input and foot pedal connection point.
3. Memasang Meja Sambungan
To attach the extension table, slide it onto the free arm of the sewing machine until it clicks securely into place. The table provides an expanded work surface, useful for larger projects.

Image: The SINGER extension table, designed to provide a larger work area for sewing projects.

Imej: Atas view of the SINGER extension table, featuring integrated measurement markings in inches and centimeters.
4. Mengulirkan Mesin
Proper threading is crucial for good stitch quality. Follow these steps carefully:
- Penggulungan Bobbin: Place a spool of thread on the spool pin. Guide the thread through the bobbin winding tension disc and then around the bobbin several times. Place the bobbin onto the bobbin winder spindle and push it to the right. Press the foot controller to wind the bobbin. Stop when the bobbin is full and push the spindle to the left to disengage.
- Memasukkan Bobbin: Buka plat penutup gelendong. Masukkan gelendong yang dililit ke dalam bekas gelendong, pastikan benang terurai ke arah yang betul (biasanya lawan arah jam). Arahkan benang melalui spring tegangan dan keluar dari bukaan bekas gelendong. Tutup penutup gelendong.
- Benang Atas: Raise the needle to its highest position using the handwheel. Place a spool of thread on the spool pin. Guide the thread through the upper thread guide, down into the tension discs, up and through the take-up lever, and then down to the needle. Thread the needle from front to back.
- Membangkitkan Benang Bobbin: Hold the upper thread lightly. Turn the handwheel towards you to lower and then raise the needle. The upper thread will catch the bobbin thread, bringing a loop up through the needle plate hole. Pull both threads under the presser foot and towards the back of the machine.
Mengendalikan Mesin
1. Pemilihan Jahitan
The SINGER 4423 offers 97 stitch applications. Use the stitch selector dial on the front of the machine to choose your desired stitch pattern. Refer to the stitch chart on the machine for available options.

Imej: Jarak dekat view of the SINGER 4423 sewing machine's stitch selector dial, showing various stitch patterns.
2. Stitch Length and Width Adjustment
Adjust the stitch length using the upper dial and stitch width using the lower dial, as indicated on the machine. Experiment with different settings on a scrap piece of fabric to achieve the desired result for your project.
3. Using the Foot Pedal
The foot pedal controls the sewing speed. Press gently for slower speeds and apply more pressure for faster sewing. Release the pedal to stop.
4. Reverse Sewing
To reinforce stitches at the beginning and end of a seam, press and hold the reverse lever (usually located on the front of the machine) while sewing. Release the lever to resume forward stitching.
5. Needle and Presser Foot Replacement
Always use the correct needle type and size for your fabric. To replace the needle, loosen the needle clamp screw, remove the old needle, insert the new needle with the flat side facing the back, and tighten the screw. To change presser feet, raise the needle and presser foot lifter, then press the release button on the back of the presser foot holder. Attach the new foot by aligning it and lowering the presser foot lifter until it snaps into place.
Penyelenggaraan
1. Pembersihan
Regular cleaning helps maintain your machine's performance.
- Pembuangan Lint: Unplug the machine. Remove the needle, presser foot, and needle plate. Use the provided lint brush to remove lint and dust from the bobbin area and feed dogs.
- Pembersihan Permukaan: Lap bahagian luar mesin dengan kain lembut dan kering. Jangan gunakan bahan kimia yang keras atau pembersih yang kasar.
2. Oiling
Your SINGER 4423 Heavy Duty Sewing Machine is designed to require minimal oiling. Refer to the full instruction manual for specific oiling points if necessary, or consult a qualified service technician. Over-oiling can attract lint and cause issues.
3. Penyimpanan
When not in use, cover the machine with the provided dust cover to protect it from dust and debris. Store in a dry, stable environment.
Menyelesaikan masalah
Bahagian ini menangani isu biasa yang mungkin anda hadapi. Untuk masalah yang lebih kompleks, rujuk juruteknik perkhidmatan yang bertauliah.
| Masalah | Kemungkinan Punca | Penyelesaian |
|---|---|---|
| Jahitan Terlangkau | Jarum salah, jarum bengkok, pemasangan benang tidak betul, saiz jarum untuk fabrik yang salah. | Gantikan jarum, mesin sulam semula benang, gunakan jarum yang betul untuk jenis fabrik. |
| Pecah Benang | Improper threading, tension too tight, damaged needle, poor quality thread. | Masukkan semula benang ke dalam mesin, laraskan ketegangan, gantikan jarum, gunakan benang yang berkualiti baik. |
| Kedutan Fabrik | Ketegangan terlalu ketat, panjang jahitan salah, kaki penekan salah. | Adjust tension, increase stitch length, use appropriate presser foot. |
| Mesin Tidak Bermula | Tidak dipasang, suis kuasa dimatikan, pengawal kaki tidak disambungkan. | Periksa sambungan kuasa, pastikan suis dihidupkan. |
Spesifikasi
- Nombor Model: 4423
- Jenama: PENYANYI
- Berat Barang: 14.5 paun
- Bahan: Logam, Keluli Tahan Karat
- Sumber Kuasa: Elektrik Bertali
- Stitch Applications: 97
- warna: Kelabu
Waranti dan Sokongan
For warranty information and customer support, please refer to the warranty card included with your product or visit the official SINGER webtapak. Simpan resit pembelian anda sebagai bukti pembelian.