
1. Pengenalan
This manual provides detailed instructions for the installation, operation, and troubleshooting of the VEDINDUST HDMI Splitter Extender 1x2. This device allows you to split one HDMI signal into two identical signals and extend them up to 50 meters (165 feet) over a single Cat5e/6/7 Ethernet cable, supporting 1080p resolution. It features EDID preset management and Power Over Cable (POC) technology, requiring power only at the Transmitter (TX) unit.
2. Kandungan Pakej
Sila pastikan semua barang ada dan dalam keadaan baik semasa membuka bungkusan.
- 1x HDMI Extender Splitter (Transmitter Unit - TX)
- 2x HDMI Extender Receivers (RX Units)
- 1x 12V Power Adapter (for TX unit)
- 1x Pair of Fixed Hangers
- 1x Manual Pengguna

Image: Contents of the VEDINDUST HDMI Splitter Extender package, showing the main transmitter unit, two receiver units, power adapter, mounting brackets, and user manual.
3. Ciri-ciri Utama
- HDMI Splitter Extender: Splits one HDMI signal to two outputs and extends up to 50m (165ft) over Cat5e/6/7 cable.
- EDID Preset Management: Supports various EDID presets to optimize compatibility between source and display.
- Kabel Kuasa Atas (POC): Only the Transmitter (TX) unit requires a 12V power supply; Receiver (RX) units are powered via the Ethernet cable.
- No Compression Transmission: Supports resolutions up to 1920x1200@60Hz and 1080p@60Hz.
- Sokongan Format Audio: PCM / DTS / DSD.
- Persamaan Automatik: Built-in automatic equalization algorithm for stable transmission over varying cable lengths.
- Recommended Cable Lengths: Cat6/7 - 50m, Cat5e - 40m, Cat5 - 30m.
4. Spesifikasi
| Ciri | Perincian |
|---|---|
| Nombor Model | EX-HDMI |
| Jenama | VEDINDUST |
| Jenis Penyambung | HDMI, RJ45 |
| Jenis Kabel | Ethernet (Cat5e/6/7) |
| Bilangan Pelabuhan | 1 HDMI In, 2 HDMI Out (local loop), 2 RJ45 Out |
| Resolusi Maks | 1080p@60Hz, 1920x1200@60Hz |
| Jarak Penghantaran | Up to 50m (165ft) with Cat6/7, 40m with Cat5e, 30m with Cat5 |
| Bekalan Kuasa | 12V DC (for TX unit), POC (for RX units) |
| Peranti Serasi | PC, DVD Player, PlayStation, Television |
| Dimensi (Pakej) | 20.4 x 16.1 x 6.2 cm |
| Berat (Pakej) | 580 gram |
| UPC | 798610311257 |
5. Product Diagrams

Imej: Selesaiview of the VEDINDUST HDMI Splitter Extender system, showing the main transmitter unit and two compact receiver units.

Imej: Terperinci view of the Transmitter (TX) unit's front panel, indicating the ON/OFF switch, Power indicator, and HDMI input indicator.

Imej: Terperinci view of the Transmitter (TX) unit's rear panel, showing RJ45 outputs (CAT3, CAT4), HDMI loop-out ports (HDMI1, HDMI2), EDID DIP switch, HDMI input, and 12V DC power input.
6. Arahan Persediaan
- Connect HDMI Source to TX: Connect your HDMI source device (e.g., PC, DVD player, game console) to the HDMI DALAM port on the Transmitter (TX) unit using a high-quality HDMI cable.
- Connect Local Displays (Optional): If you wish to use local displays, connect them to the HDMI 1 dan HDMI 2 loop-out ports on the TX unit.
- Connect TX to RX Units: Sambungkan CAT3 dan CAT4 RJ45 outputs on the TX unit to the respective RJ45 inputs on the two Receiver (RX) units using Cat5e/6/7 Ethernet cables. Ensure the cable lengths are within the recommended limits (50m for Cat6/7, 40m for Cat5e, 30m for Cat5).
- Connect Remote Displays to RX Units: Connect your remote HDMI display devices (e.g., TVs, projectors) to the HDMI KELUAR ports on each RX unit using high-quality HDMI cables.
- Power On TX Unit: Connect the provided 12V power adapter to the DC12V input on the TX unit. The RX units will receive power via the Ethernet cables (POC).
- Select EDID Mode: Laraskan Suis DIP EDID on the TX unit according to your display and audio requirements. Refer to the EDID Mode section for detailed settings.
- Sahkan Sambungan: Ensure all cables are securely connected. Power on all connected devices.
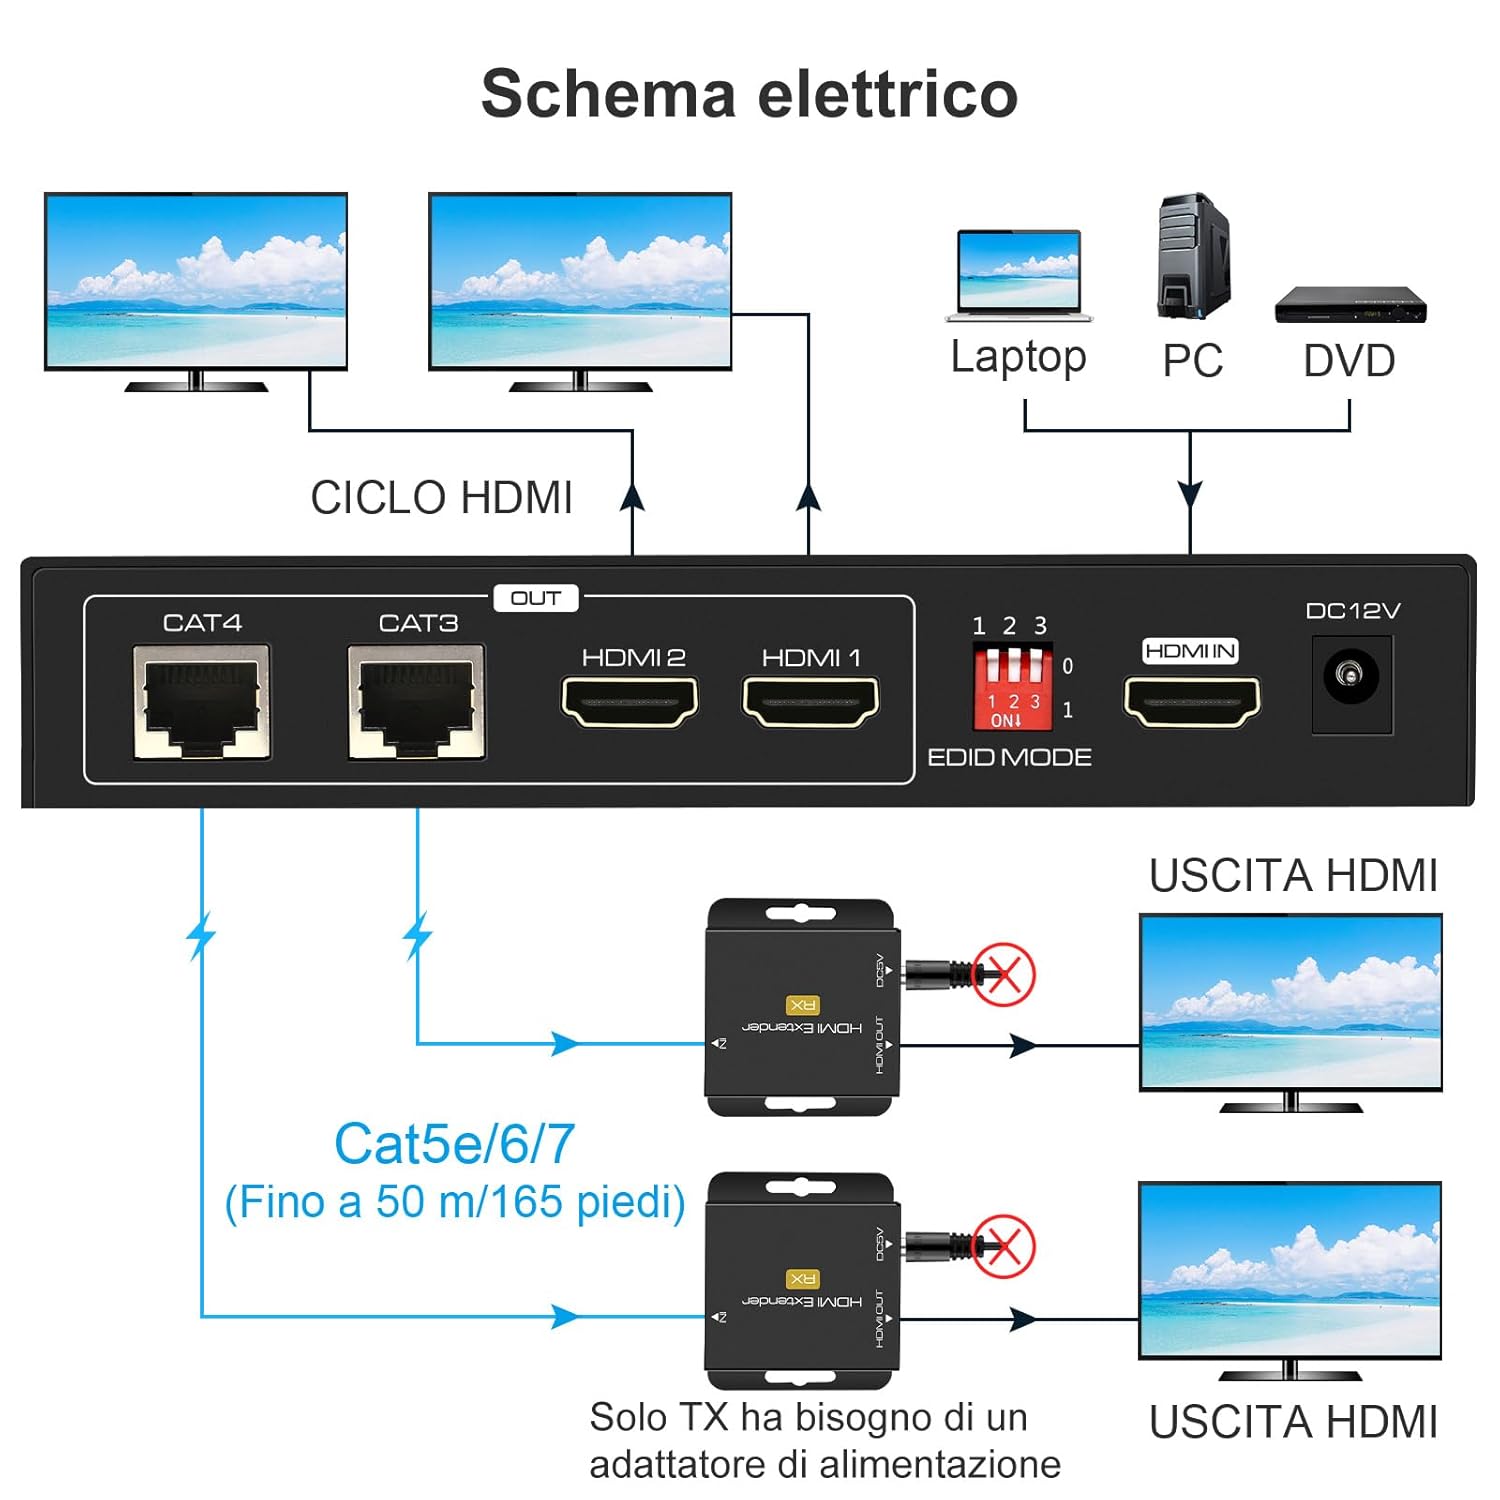
Image: A schematic diagram illustrating the connection process, showing an HDMI source connected to the TX unit, which then connects to two local displays and two remote RX units via Cat5e/6/7 cables, leading to two remote displays.

Imej: Bekasample setup showing the VEDINDUST HDMI Splitter Extender used in a conference room environment, connecting a laptop to multiple displays via the extender system.
7. Arahan Operasi
7.1 Hidupkan/Mati Kuasa
- Ensure the 12V power adapter is connected to the TX unit.
- Gunakan HIDUP/MATI switch on the front panel of the TX unit to power the system on or off.
- The Power indicator LED on the TX unit will illuminate when powered on.
7.2 EDID Mode Selection
The EDID (Extended Display Identification Data) DIP switch allows you to select the optimal video and audio format for your connected displays. This helps ensure compatibility and the best possible output quality.
Image: Close-up of the EDID DIP switch on the Transmitter unit, showing the three switches labeled 1, 2, 3 and their ON/OFF positions.
Refer to the table below for common EDID settings:
| DIP Switch Setting (1-2-3) | Mod EDID |
|---|---|
| 000 | 1080p 2CH Audio |
| 001 | 1080p 5.1CH Audio |
| 010 | 1080p 7.1CH Audio |
| 011 | 1080p 3D 2CH Audio |
| 100 | 1080p 3D 5.1CH Audio |
| 101 | 1080p 3D 7.1CH Audio |
| 110 | 1920x1200 2CH Audio |
| 111 | Copy HDMI OUT 1 EDID |
Note: "0" typically means the switch is in the OFF/down position, and "1" means the ON/up position. If you experience display issues, try different EDID settings or use the "Copy HDMI OUT 1 EDID" mode if a local display is connected to HDMI OUT 1.
8. Penyelenggaraan
- Simpan peranti di tempat yang sejuk dan kering, jauh daripada cahaya matahari langsung dan sumber haba.
- Elakkan daripada mendedahkan peranti kepada kelembapan atau suhu yang melampau.
- Bersihkan peranti dengan kain lembut dan kering. Jangan gunakan pembersih cecair atau aerosol.
- Pastikan pengudaraan yang betul di sekeliling unit untuk mengelakkan terlalu panas.
9. Penyelesaian masalah
- Tiada Gambar/Isyarat:
- Pastikan semua kabel HDMI dan Ethernet disambungkan dengan selamat.
- Verify the TX unit is powered on and the power indicator is lit.
- Check the length and quality of your Ethernet cables. Ensure they meet the recommended specifications (Cat5e/6/7).
- Try adjusting the EDID DIP switch settings on the TX unit to match your display's capabilities.
- Test with a different HDMI source or display to rule out device incompatibility.
- Isyarat Berkelip-kelip atau Sekejap-sekejap:
- This can often be resolved by adjusting the EDID settings.
- Ensure Ethernet cables are not running near strong electromagnetic interference sources.
- Periksa kabel yang rosak.
- Tiada Audio:
- Verify the EDID setting supports the desired audio format (e.g., 2CH, 5.1CH, 7.1CH).
- Semak tetapan audio pada peranti sumber anda dan paparan.
- POC Not Working (RX unit not powering on):
- Ensure the TX unit is powered by a 12V adapter. The RX units draw power from the TX unit via the Ethernet cable.
- Check the Ethernet cable for damage or improper termination.
10. Waranti dan Sokongan
For warranty information or technical support, please refer to the contact details provided with your purchase or visit the VEDINDUST official webtapak. Simpan resit pembelian anda untuk tuntutan waranti.