
sbn
User Manual for E58 Eachine JY019 Foldable RC Quadcopter
Model: sbn
1. Pengenalan
Terima kasih kerana membeliasing the E58 Eachine JY019 Foldable RC Quadcopter. This manual provides essential information for the safe operation, setup, and maintenance of your drone. Please read it thoroughly before first use to ensure proper functionality and to avoid damage.
1.1 Kandungan Pakej
Selepas membuka pakej, sila sahkan bahawa semua komponen berikut disertakan:
- 1 x RC Quadcopter (2MP Camera)
- 1 x Pemancar (Pengawal Jauh)
- 1 x 3.7V 500mAh Lipo Battery (for drone)
- 1 x Kabel Pengecas USB
- 4 x Protection Covers (Propeller Guards)
- 4 x Spare Blades (Propellers)
- 1 x Pemutar skru
- 1 x Manual Pengguna (dokumen ini)

Rajah 1.1: Berakhirview of the E58 Eachine JY019 drone and its included accessories. The image displays the folded drone, remote controller, propellers, propeller guards, USB charging cable, screwdriver, and the drone battery.

Rajah 1.2: The retail packaging for the JY019 Pocket Drone, showing the drone in both folded and unfolded states, along with the remote controller. This image confirms the product model and its compact design.
2. Garis Panduan Keselamatan
To prevent injury or damage, please observe the following safety precautions:
- Always operate the drone in open areas, away from people, animals, buildings, and obstacles.
- Jangan terbang dalam keadaan angin kencang atau keadaan cuaca buruk.
- Keep a safe distance from the rotating propellers. Do not touch them during operation.
- Pastikan bateri dron dicas sepenuhnya sebelum setiap penerbangan.
- Jangan cas bateri secara berlebihan.
- Awasi kanak-kanak semasa mereka mengendalikan dron.
- Jangan cuba mengubah suai atau membuka dron atau komponennya.
- Turn off the drone and remote controller when not in use.
- Buang bateri secara bertanggungjawab mengikut peraturan tempatan.
3. Produk Lebihview
3.1 Drone Features
- Reka Bentuk Lipat: Padat dan mudah alih untuk pengangkutan yang mudah.
- HD 2.0MP Camera: 120° Wide-Angle lens for high-resolution images and videos (720P).
- Mod Tahan Ketinggian: Maintains a consistent altitude for stable flight and video recording.
- Penerbangan Trajektori: Allows drawing a flight path on your mobile device for the drone to follow.
- One Key Take Off/Landing: Simplifies flight initiation and termination.
- Balik 360°: Performs aerial stunts with a single button.
- 6-Axis Gyro: Provides stable and easy control.

Rajah 3.1: Illustration of the drone's 120° wide-angle 720P HD camera, highlighting its field of view and image capture capabilities. A simulated phone screen shows the live video feed from the drone.

Rajah 3.2: Dimensions of the E58 Eachine JY019 drone. The image shows the drone both folded (12.5cm x 7.5cm x 5cm) and unfolded (27cm x 19.5cm x 5cm), demonstrating its compact and portable design.
3.2 Susun Atur Alat Kawalan Jauh
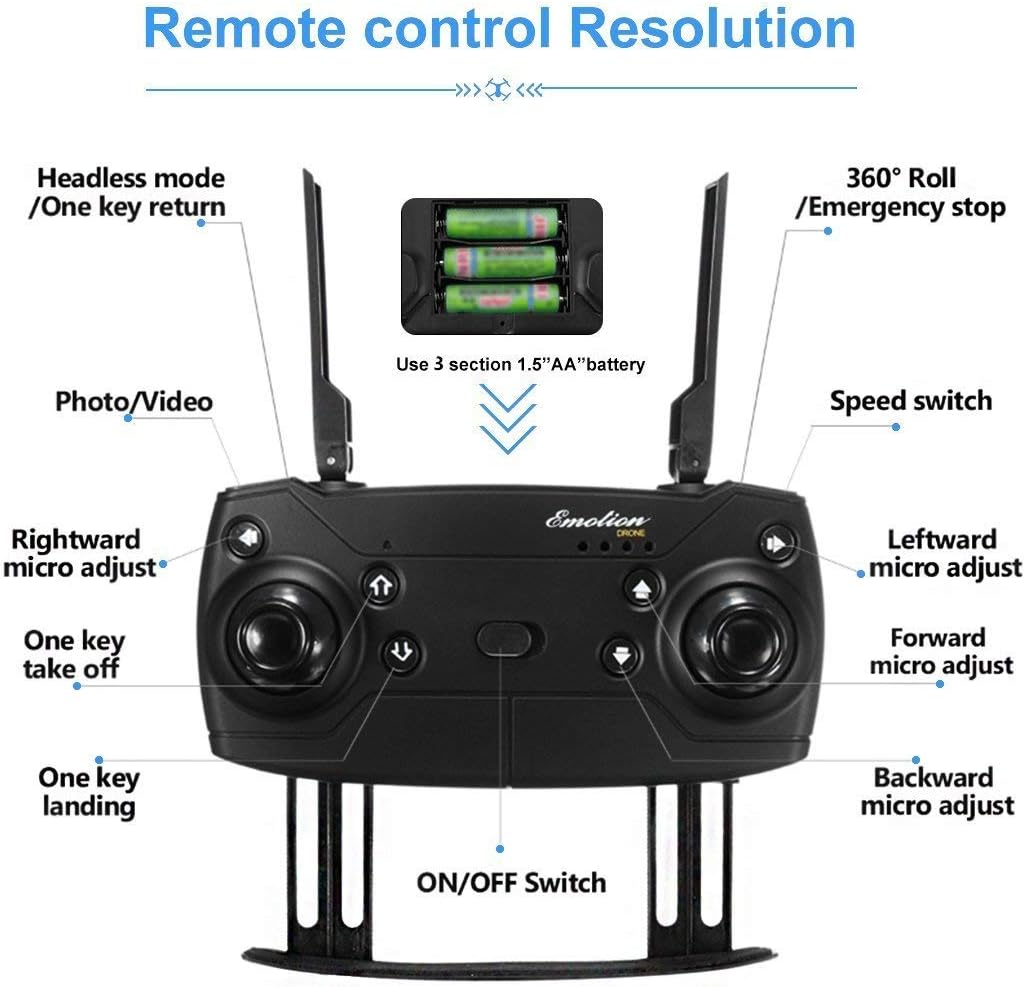
Rajah 3.3: Detailed layout of the remote controller for the E58 Eachine JY019 drone. Key functions such as Headless mode/One key return, 360° Roll/Emergency stop, Photo/Video button, Speed switch, One key take off/landing, and various micro-adjustments (rightward, leftward, forward, backward) are clearly labeled. The battery compartment for 3 x 1.5V AA batteries is also indicated.
Familiarize yourself with the remote controller's buttons and joysticks:
- Kayu Joy Kiri: Mengawal ketinggian (atas/bawah) dan putaran (kiri/kanan).
- Joystick Kanan: Controls forward/backward and left/right flight.
- Butang Pendaratan/Pelepasan Satu Kunci: Memulakan berlepas atau mendarat automatik.
- Butang Foto/Video: Menangkap foto atau memulakan/menghentikan rakaman video.
- Suis Kelajuan: Adjusts flight speed (e.g., low, medium, high).
- Headless Mode/One Key Return: Activates headless mode or returns the drone to the take-off point.
- 360° Roll/Emergency Stop: Performs a 360-degree flip or initiates an emergency stop.
- Butang Potong: Fine-tune the drone's stability (forward/backward, left/right, rotation).
- Suis kuasa: Menghidupkan/mematikan pengawal.
4. Persediaan
4.1 Mengecas Bateri Dron
- Connect the 3.7V 500mAh Lipo Battery to the USB Charging Cable.
- Plug the USB Charging Cable into a USB power source (e.g., computer USB port, USB wall adapter).
- The charging indicator light will show the charging status. Charging time is approximately 60-70 minutes.
- Setelah dicas sepenuhnya, cabut bateri daripada pengecas.
4.2 Memasang Bateri Dron
- Pastikan dron dimatikan.
- Cari petak bateri pada dron.
- Carefully insert the charged 3.7V 500mAh Lipo Battery into the compartment.
- Selamatkan penutup bateri.

Rajah 4.1: jarak dekat view of the drone's battery compartment, showing the slot where the Lipo battery is inserted. The image illustrates the mechanism for securing the battery.
4.3 Memasang Bateri Pemancar
- Buka penutup bateri di bahagian belakang alat kawalan jauh.
- Masukkan 3 bateri AA x 1.5V, pastikan kekutuban (+/-) yang betul.
- Tutup penutup bateri dengan selamat.
4.4 Penyediaan Dron
- Carefully pull out all four arms of the drone until they are fully extended and locked into place.
- Letakkan drone di permukaan rata dan rata.
- (Optional) Attach the propeller protection covers for added safety, especially for beginners.

Rajah 4.2: Quick start guide showing the initial steps for preparing the drone for flight. This includes unfolding the drone arms and placing it on a flat surface, as well as turning on the remote controller.
5. Arahan Operasi
5.1 Pairing the Drone and Controller
- Hidupkan dron dengan menekan butang kuasa. Lampu penunjuk dron akan berkelip.
- Turn on the remote controller using its power switch.
- Push the left throttle joystick fully up and then pull it fully down. The drone's lights will stop flashing and become solid, indicating successful pairing.
- For more stable flight, it is recommended to calibrate the gyroscope after pairing. Push both joysticks 45 degrees towards the outside bottom corners simultaneously until the lights flash and then become solid again.
5.2 One Key Take Off / Landing

Rajah 5.1: Visual guide demonstrating the One Key Take Off and One Key Landing functions. The drone is shown ascending from a launch pad for take-off and descending for landing, simplifying flight control.
- One Key Take Off: After pairing and calibration, press the "One Key Take Off" button. The drone will automatically ascend and hover at a certain altitude.
- Satu Pendaratan Utama: During flight, press the "One Key Landing" button. The drone will slowly descend and land gently on the ground.
5.3 Kawalan Asas Penerbangan
- Naik/Turun: Push the left joystick up to ascend, pull down to descend.
- Belok Kiri/Kanan: Push the left joystick left to turn left, push right to turn right.
- Maju/Mundur: Tolak kayu bedik kanan ke atas untuk terbang ke hadapan, tarik ke bawah untuk terbang ke belakang.
- Terbang ke Kiri/Kanan (Ke tepi): Tolak kayu bedik kanan ke kiri untuk terbang ke kiri, tolak kanan untuk terbang ke kanan.
5.4 Ciri Istimewa
- Mod Tahan Ketinggian: The drone automatically maintains its current altitude, allowing for stable hovering and easier control, especially for photography and videography. This function is achieved by analyzing air pressure data.
- Balik 360°: To perform a 360-degree flip, press the "360° Roll" button and then push the right joystick in the desired flip direction (forward, backward, left, or right). Ensure sufficient altitude before attempting.
- Penerbangan Trajektori: (Requires mobile app connection) Open the dedicated mobile app and select the trajectory flight mode. Draw a desired flight path on your phone screen, and the drone will automatically follow the recorded route.
- Mod Tanpa Kepala: When activated, the drone's orientation becomes irrelevant to the controller's direction. The drone will move relative to the pilot's perspective, making it easier for beginners to control.
- Satu Pulangan Utama: In headless mode, pressing the "One Key Return" button will cause the drone to fly back towards the take-off point.

Rajah 5.2: Explanation of the 360° Flip and Altitude Hold features. The image illustrates the drone performing a flip and maintaining a stable height, emphasizing the benefits of the atmospheric pressure sensor for stable hovering.
5.5 Camera Operation (2MP HD)
The drone is equipped with a 2MP HD camera capable of 720P video recording. To utilize the camera features:
- Sambungan Apl Mudah Alih: Download and install the recommended mobile application (refer to the product packaging or quick start guide for app name/QR code). Connect your smartphone to the drone's Wi-Fi network.
- FPV Langsung: Once connected, the live view from the drone's camera will be displayed directly on your phone screen (FPV Range: About 30m).
- Mengambil gambar: Press the "Photo/Video" button on the remote controller once to take a photo. Photos will be saved to your phone's album via the app.
- Merakam Video: Press and hold the "Photo/Video" button to start video recording. Press and hold again to stop recording. Videos will be saved to your phone's album via the app.
6. Penyelenggaraan
- Pembersihan: Use a soft, dry cloth to clean the drone and remote controller. Do not use harsh chemicals or solvents.
- Pemeriksaan baling-baling: Regularly check propellers for damage (bends, cracks). Replace any damaged propellers using the provided spare blades and screwdriver.
- Penjagaan Bateri: Store batteries in a cool, dry place. Do not store fully charged or completely depleted batteries for extended periods. Charge them to about 50% for long-term storage.
- Storan: When not in use, fold the drone arms and store it in a safe, dry place away from direct sunlight and extreme temperatures.
7. Penyelesaian masalah
| Masalah | Kemungkinan Punca | Penyelesaian |
|---|---|---|
| Drone tidak bertindak balas kepada pengawal. | Not paired; low battery (drone/controller); interference. | Re-pair drone and controller. Charge/replace batteries. Fly in an open area away from other Wi-Fi signals. |
| Drone hanyut semasa penerbangan. | Not calibrated; uneven surface at take-off; wind. | Perform gyroscope calibration on a flat surface. Use trim buttons to adjust. Avoid flying in windy conditions. |
| Kipas-kipas tidak berputar. | Obstruction; motor damage; battery not connected. | Check for tangled hair/debris. Ensure battery is properly connected. Contact support if motors are damaged. |
| Kualiti imej/video kamera yang teruk. | Low light; camera lens dirty; unstable flight. | Ensure good lighting. Clean camera lens. Fly in Altitude Hold mode for stability. |
| Masa penerbangan yang singkat. | Bateri tidak dicas sepenuhnya; bateri lama; terbang agresif. | Ensure battery is fully charged. Consider replacing old batteries. Fly more gently. |
8. Spesifikasi
| Ciri | Perincian |
|---|---|
| Jenis Item | Quadcopter RC |
| Model | sbn (JY019) |
| Flying Time | 7-9 minit |
| Jarak R / C | 80-100 meter |
| Julat FPV | Lebih kurang 30 meter |
| Masa Mengecas | 60-70 minit |
| Bateri Quadcopter | Lipo 3.7V 500mAh (Termasuk) |
| Bateri Pemancar | 3 x 1.5V AA battery (NOT Included) |
| Kekerapan | 2.4G |
| Saluran | 4ch |
| Gyro | 6 paksi |
| Motor | 0720 Motor Tanpa Biji |
| Berat Berlepas | Kira-kira 120g |
| warna | Hitam |
| Kamera | 2MP (720P HD) |
| Quadcopter Size (unfolded) | 27cm x 19.5cm x 5cm |
| Quadcopter Size (folded) | 12.5cm x 7.5cm x 5cm |
| Quadcopter Weight (with battery) | 96g |
| Quadcopter Weight (without battery) | 77.5g |
9. Waranti dan Sokongan
Specific warranty information for this product is not provided in this manual. Please refer to the product packaging, the seller's website, or contact the retailer where you purchased the drone for details regarding warranty coverage and customer support.
For technical assistance or further inquiries, please contact the product's manufacturer or the authorized distributor.
Ask a question about this manual
Ask about setup, troubleshooting, compatibility, parts, safety, or missing instructions. Manuals+ will review the question and use this page’s manual context to help answer it.