
Kadimendium V01A
Manual Pengguna Multimeter Digital ANENG V01A
Model: V01A | Brand: Kadimendium
1. Pengenalan
This user manual provides detailed instructions for the safe and effective operation of the ANENG V01A Auto Range True RMS Digital Multimeter. This ultra-portable multi-tester is designed for measuring AC/DC current, voltage, resistance, and for continuity testing. Its intelligent measurement capabilities allow for automatic identification and display of measurement data, making it user-friendly for various electrical tasks.
2. Maklumat Keselamatan
Please read all safety warnings and operating instructions carefully before using this multimeter. Failure to follow these instructions may result in electric shock, fire, or serious injury.
- Sentiasa pastikan multimeter berada dalam mod ukuran yang betul sebelum menyambungkan petunjuk ujian ke litar.
- Jangan melebihi nilai input maksimum yang ditentukan untuk setiap julat ukuran.
- Berhati-hati apabila bekerja dengan voltagadalah melebihi 30V AC RMS, puncak 42V atau 60V DC. Ini voltagia menimbulkan bahaya kejutan.
- Inspect test leads for damage before each use. Do not use if insulation is damaged or if the metal is exposed.
- Do not operate the multimeter if it appears damaged or is not operating properly.
- Gantikan bateri dengan segera apabila penunjuk bateri lemah muncul untuk memastikan bacaan yang tepat.
- Pastikan tangan dan jari berada di belakang penghadang prob semasa ujian.
- This device is designed for indoor use and should not be exposed to rain or moisture.

Image: A warning sign with multilingual text emphasizing the importance of reading product instructions carefully before use.
3. Kandungan Pakej
Sahkan bahawa semua item yang disenaraikan di bawah disertakan dalam pakej anda. Jika ada item yang hilang atau rosak, sila hubungi sokongan pelanggan.
- 1 x ANENG V01A Digital Multimeter (Battery not included)
- 2 x Ujian Probe (Merah dan Hitam)
- 1 x Manual Pengguna

Image: The ANENG V01A Digital Multimeter, its test probes, and the user manual, displayed alongside its product packaging.
4. Produk Lebihview
Familiarize yourself with the components of your ANENG V01A Digital Multimeter.

Imej: Bahagian hadapan yang jelas view of the ANENG V01A Digital Multimeter, showcasing its display, buttons, and input jacks, accompanied by its red and black test leads.

Imej: Bahagian hadapan langsung view of the ANENG V01A Digital Multimeter, highlighting its display and control panel.

Image: The ANENG V01A Digital Multimeter shown with its integrated kickstand extended, allowing for angled viewing on a flat surface.
Komponen Utama:
- Paparan LCD: Menunjukkan bacaan ukuran, unit dan penunjuk fungsi.
- Butang Fungsi:
- NCV Button: Mengaktifkan Vol. Bukan Kenalantagpengesanan e.
- H/* Butang: Data Hold function (short press) and Backlight/Flashlight activation (long press).
- Butang Kuasa: Turns the multimeter On/Off.
- Bicu Input:
- COM Jack (Black): Common terminal for all measurements. Connect the black test lead here.
- VΩmA Jack (Red): Input untuk Voltage, Resistance, and milliampere Current measurements. Connect the red test lead here.
- 10A Fused Jack (Red): Input for high current (up to 10A) measurements. Connect the red test lead here for 10A measurements.
- Prob Ujian: Red and black leads for connecting to circuits.
5. Persediaan
5.1 Pemasangan Bateri
The ANENG V01A Multimeter requires 2 x AAA batteries (not included) for operation.
- Ensure the multimeter is powered off.
- Cari penutup petak bateri di belakang multimeter.
- Gunakan pemutar skru untuk membuka petak bateri.
- Masukkan dua bateri AAA, perhatikan polariti (+ dan -) yang betul seperti yang ditunjukkan di dalam petak.
- Gantikan penutup petak bateri dan kencangkannya dengan skru.
5.2 Menghubungkan Petunjuk Ujian
Always connect the black test lead to the COM jack. Connect the red test lead to the appropriate input jack based on the measurement you intend to perform.
- Untuk Voltage, Resistance, Continuity, and milliampere Current (mA) measurements: Connect the red test lead to the VΩmA jek.
- For high current (up to 10A) measurements: Connect the red test lead to the 10A Fused jek.

Image: The ANENG V01A Digital Multimeter with its red and black test leads properly connected to the input jacks, ready for use.
6. Arahan Operasi
6.1 Power On/Off and Auto Range
Tekan ke kuasa button to turn the multimeter on. The V01A features an auto-range function, meaning it automatically recognizes and displays the measurement data without requiring manual range selection. To turn off the multimeter, press the kuasa button again. The device also has an Auto Power Off feature to conserve battery life.

Image: The ANENG V01A Digital Multimeter with its display showing a reading, emphasizing its auto-ranging capability for convenient measurement.
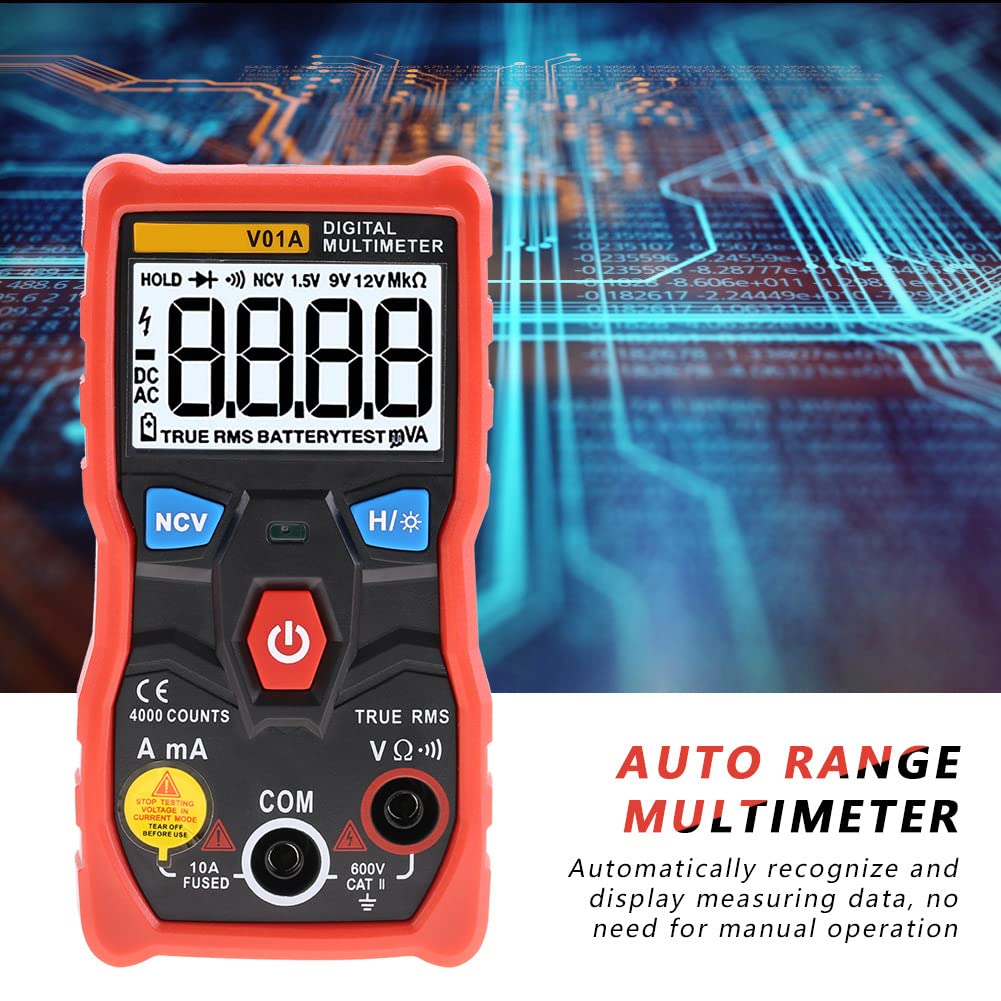
Imej: Dari dekat view of the ANENG V01A Digital Multimeter's display, highlighting the "AUTO RANGE MULTIMETER" text and indicating its automatic measurement recognition.
6.2 Fungsi Pengukuran
6.2.1 DC Jldtage Pengukuran
Connect the red test lead to the VΩmA jack and the black test lead to the COM jack. Connect the probes across the DC voltagsumber e. Multimeter akan mengesan dan memaparkan volum DC secara automatiktage.

Image: A user's hands holding the multimeter probes to measure components on a circuit board, demonstrating a typical voltage or resistance measurement scenario.
6.2.2 AC Jldtage Pengukuran
Connect the red test lead to the VΩmA jack and the black test lead to the COM jack. Connect the probes across the AC voltagsumber e. Multimeter akan mengesan dan memaparkan volum AC secara automatiktage (True RMS).
6.2.3 DC/AC Current Measurement (mA/A)
Awas: To measure current, the multimeter must be connected in series with the circuit. Never connect the multimeter in parallel with a voltage source when in current mode, as this can damage the device or blow the fuse.
- Untuk miliampere (mA) current: Connect the red test lead to the VΩmA jack and the black test lead to the COM jack.
- Untuk ampere (A) current (up to 10A): Connect the red test lead to the 10A Fused jack and the black test lead to the COM jack.
Break the circuit and connect the multimeter in series. The multimeter will automatically detect and display the current.
6.2.4 Pengukuran Rintangan
Connect the red test lead to the VΩmA jack and the black test lead to the COM jack. Ensure the circuit or component is de-energized before measuring resistance. Connect the probes across the component. The multimeter will automatically detect and display the resistance in Ohms (Ω), kilo-Ohms (kΩ), or Mega-Ohms (MΩ).
6.2.5 Ujian Kesinambungan
Connect the red test lead to the VΩmA jack and the black test lead to the COM jack. Ensure the circuit is de-energized. Touch the probes to the two points you want to test for continuity. If there is continuity (low resistance), the multimeter will emit an audible beep.
6.2.6 Bukan Kenalan Voltage (NCV) Pengesanan
Tekan ke NCV button. Hold the top part of the multimeter near an AC voltage source (e.g., a live wire or outlet). The multimeter will indicate the presence of AC voltage through an audible beep and/or visual indicator on the display, without direct contact.
6.2.7 Battery Test (1.5V, 9V, 12V)
Multimeter boleh menguji volum bateri biasatages. Connect the red test lead to the VΩmA jack and the black test lead to the COM jack. Connect the probes to the positive and negative terminals of the battery. The multimeter will display the battery voltage.

Image: A user's hands holding the multimeter probes to test the voltage of a 9V battery, demonstrating the battery test function.
6.3 Fungsi Khas
- Pegangan Data (H): Tekan pendek H/* butang untuk membekukan bacaan semasa pada paparan. Tekan sekali lagi untuk melepaskan.
- Backlight/Flashlight (*): Tekan lama H/* button to turn on the display backlight and the integrated flashlight. Long press again to turn them off. This is useful for working in dimly lit environments.
- Auto Matikan: The multimeter will automatically power off after a period of inactivity to save battery life.
- Petunjuk Bateri Rendah: A battery icon will appear on the display when the battery voltage is low, indicating that the batteries need to be replaced.
7. Penyelenggaraan
7.1 Pembersihan
Lap kes dengan iklanamp cloth and mild detergent. Do not use abrasives or solvents. Keep the input jacks free of dust and debris.
7.2 Penggantian Bateri
When the low battery indicator appears on the display, replace the batteries as described in Section 5.1. Always use 2 x AAA batteries.
7.3 Penyimpanan
If the multimeter is not used for a long period, remove the batteries to prevent leakage and damage to the device. Store the multimeter in a cool, dry place, away from direct sunlight and extreme temperatures.
8. Penyelesaian masalah
If you encounter issues with your multimeter, refer to the table below for common problems and solutions.
| Masalah | Kemungkinan Punca | Penyelesaian |
|---|---|---|
| Multimeter tidak dihidupkan. | Bateri mati atau tidak dipasang dengan betul. | Periksa kekutuban bateri atau gantikan bateri. |
| Tiada bacaan atau "OL" dipaparkan. | Open circuit, out of range, or incorrect function/lead connection. | Check circuit continuity, ensure measurement is within range, verify test lead connections for the selected function. |
| Bacaan yang tidak tepat. | Low battery, environmental interference, or damaged test leads. | Replace batteries, move away from strong electromagnetic fields, inspect and replace damaged test leads. |
| Ujian kesinambungan tidak berbunyi bip. | Litar terbuka atau rintangan tinggi. | Ensure good contact with the circuit; the circuit may not be continuous. |
9. Spesifikasi
| Parameter | Nilai |
|---|---|
| Jenama | ANENG (Kadimendium) |
| Model | V01A |
| Paparan | 4000 kiraan |
| DC Voltage Julat | 4.000V, 40.00V, 400.0V, 600V |
| Vol. ACtage Julat | 4.000V, 40.00V, 400.0V, 600V (True RMS) |
| Julat Semasa AC | 999.9mA, 9.999A |
| Julat Semasa DC | 999.9mA, 9.999A |
| Julat Rintangan | 4.000kΩ, 40.00kΩ, 400.0kΩ, 4.000MΩ, 40.00MΩ |
| Tindak Balas Kekerapan AC | 40Hz-1kHz |
| Ujian Kesinambungan | ya |
| NCV (Voltage) | ya |
| Julat Auto | ya |
| RMS sebenar | ya |
| Pegangan Data | ya |
| Lampu latar | ya |
| Lampu suluh | ya |
| Auto Matikan | ya |
| Petunjuk Bateri Rendah | ya |
| bahan | ABS, PVC |
| Sample kadar | 3SPS |
| Persekitaran Operasi | 0~40℃, <75%RH |
| Persekitaran Storan | -20~60℃, <80%RH |
| Bekalan Kuasa | 2 x AAA Batteries (NOT included) |
| Dimensi | 12 x 6 x 2.8 cm / 4.7 x 2.4 x 1.1 inci |
| Berat (Anggaran) | 199g / 7.0oz |
10. Waranti dan Sokongan
This product comes with a standard manufacturer's warranty. For specific warranty terms and conditions, please refer to the warranty card included with your purchase or contact the seller directly. If you have any questions, require technical assistance, or need to report an issue, please contact Kadimendium customer support through your purchase platform. We are committed to providing timely assistance and ensuring your satisfaction.
Ask a question about this manual
Ask about setup, troubleshooting, compatibility, parts, safety, or missing instructions. Manuals+ will review the question and use this page’s manual context to help answer it.