pengenalan
This manual provides detailed instructions for the safe and efficient operation of your SINGER M1005 Electric Sewing Machine. The M1005 is designed for various sewing projects, offering 4 built-in stitches with 11 options, adjustable thread tension, and a reverse lever for securing seams. Please read this manual thoroughly before using the machine to ensure proper setup and function.
Arahan Keselamatan Penting
Apabila menggunakan perkakas elektrik, langkah berjaga-jaga keselamatan asas hendaklah sentiasa dipatuhi, termasuk yang berikut:
- Baca semua arahan sebelum menggunakan mesin jahit ini.
- Keep these instructions in a convenient place near your machine.
- Always unplug the machine from the electrical outlet immediately after using and before cleaning, removing covers, lubricating, or making any other user servicing adjustments mentioned in the instruction manual.
- Jangan biarkan digunakan sebagai mainan. Perhatian rapi diperlukan apabila perkakas ini digunakan oleh atau berhampiran kanak-kanak.
- Gunakan produk ini hanya untuk kegunaan yang dimaksudkan seperti yang diterangkan dalam manual ini.
- Never operate this sewing machine if it has a damaged cord or plug, if it is not working properly, or if it has been dropped or damaged.
- Jauhkan jari dari semua bahagian yang bergerak. Penjagaan khas diperlukan di sekitar jarum mesin jahit.
- Sentiasa gunakan plat jarum yang betul. Plat yang salah boleh menyebabkan jarum patah.
- Jangan tarik atau tolak fabrik semasa menjahit. Ini boleh memesongkan jarum sehingga menyebabkan ia patah.
- Matikan mesin jahit apabila membuat sebarang pelarasan pada kawasan jarum, seperti memasukkan benang ke dalam jarum, menukar jarum, memasukkan benang ke dalam gelendong atau menukar kaki penekan.
Produk Selesaiview
The SINGER M1005 is a compact and user-friendly electric sewing machine designed for ease of use and portability.
Ciri-ciri Utama:
- 4 Stitches in 11 Options: Select from various straight stitches, zigzag stitches, blind hem stitch, and multi-stitch zigzag using the Stitch Selector Dial.
- Ketegangan Benang Boleh Laras: Allows for fine-tuning stitch quality for different fabrics and threads.
- Top Drop-in Bobbin: Features a transparent bobbin cover for easy monitoring of thread supply and simple bobbin insertion.
- Free-Arm Design: Facilitates sewing of cylindrical items like trouser hems and sleeve cuffs.
- Tuas Songsang: Conveniently located for securing the beginning and end of seams with reverse stitches.
- Extra High-Presser Foot Lifter: Provides additional clearance for sewing multiple layers or thicker fabrics.
- Reka Bentuk Mudah Alih: Lightweight for easy transport and storage.
Komponen yang Disertakan:
Your SINGER M1005 sewing machine package includes the following items:
- 1 Mesin Jahit
- All-purpose Foot
- Extra Needle
- Finger Guard (pre-installed, removable)
- Bobbins: Class 15 (Transparent)
- Benang Jarum Manual
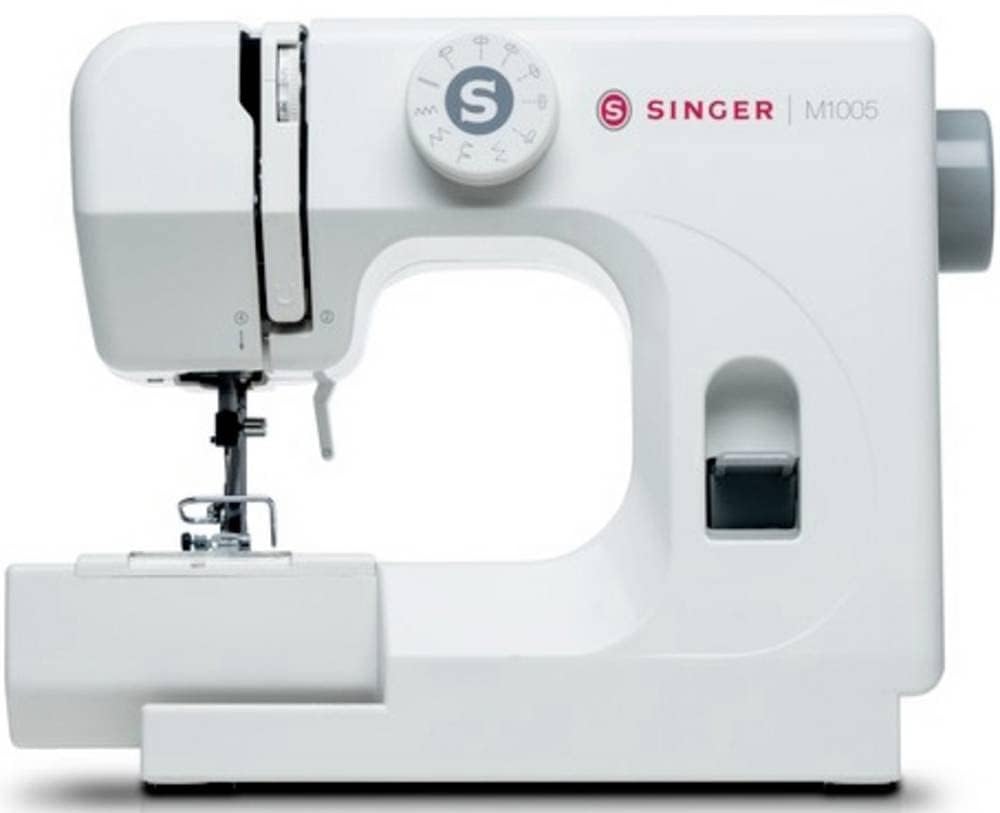
Rajah 1: The SINGER M1005 Electric Sewing Machine, showcasing its compact design and ready-to-use setup.
Persediaan
1. Sambungan Kuasa
- Letakkan mesin pada permukaan yang stabil dan rata.
- Pastikan suis kuasa berada dalam kedudukan "OFF".
- Sambungkan kord kuasa ke input kuasa mesin dan kemudian ke soket elektrik yang sesuai.
2. Menggulung Bobbin
Proper bobbin winding ensures smooth stitching.
- Letakkan gelendong benang pada pin gelendong.
- Pandu benang melalui panduan benang atas dan di sekeliling cakera tegangan penggulungan gelendong.
- Insert the thread through the small hole in the bobbin from the inside out.
- Place the bobbin onto the bobbin winder spindle.
- Tolak gelendong penggulung gelendong ke kanan.
- Turn on the machine and gently press the foot controller (if applicable) or press the start button to begin winding.
- Once the bobbin is full, push the spindle back to the left and cut the thread.
3. Inserting the Top Drop-in Bobbin
The transparent bobbin cover allows for easy monitoring.
- Pastikan jarum berada pada kedudukan tertinggi.
- Open the transparent bobbin cover plate.
- Letakkan gelendong lilit ke dalam bekas gelendong dengan benang dilonggarkan melawan arah jam.
- Guide the thread into the tension spring and then into the thread guide slot.
- Pull out approximately 10-15 cm (4-6 inches) of thread.
- Gantikan plat penutup gelendong.
4. Menjahit Benang Atas
Correct upper threading is crucial for proper stitch formation.
- Naikkan pengangkat kaki penekan.
- Letakkan gelendong benang pada pin gelendong.
- Pandu benang melalui panduan benang atas.
- Follow the numbered threading path down the right channel, up the left channel, and through the take-up lever from right to left.
- Continue guiding the thread down to the needle bar thread guide.
- Benang jarum dari depan ke belakang.
- Pull approximately 15-20 cm (6-8 inches) of thread through the needle eye.
Rajah 2: Depan view of the SINGER M1005, highlighting the stitch selector dial and general threading area.
Arahan Operasi
1. Memilih Jahitan
The SINGER M1005 offers 4 core stitch types with 11 different options.
- Pusingkan Dail Pemilih Jahitan to choose your desired stitch pattern.
- Available stitches include various straight stitches (different lengths/positions), three types of zigzag stitches (different lengths/widths), one blind hem stitch, and one multi-stitch zigzag.
- The optimum stitch width for this machine is 4 mm.
2. Adjusting Thread Tension
Adjust the needle thread tension to achieve balanced stitches.
- The tension dial is usually located on the front of the machine.
- Turn the dial to a higher number for tighter tension, and a lower number for looser tension.
- Test on a scrap piece of fabric to find the ideal setting for your fabric and thread combination.
3. Using the Reverse Lever
The reverse lever is used to secure the beginning and end of seams.
- To sew in reverse, press and hold the Tuas Terbalik located on the front of the machine.
- Release the lever to resume forward stitching.
4. Free-Arm Sewing
To utilize the free-arm feature for sewing cuffs, pant hems, or other small circular items:
- Remove the accessory storage compartment (if present) by sliding it off to the left.
- The narrow free arm is now exposed, allowing you to slide fabric around it.
5. Extra High-Presser Foot Lifter
For thicker fabrics or multiple layers, the presser foot can be raised higher than its standard position.
- Lift the presser foot lifter to its highest position.
- For extra clearance, push the lifter up further to engage the extra high position.
Penyelenggaraan
Regular maintenance ensures the longevity and optimal performance of your sewing machine. Always unplug the machine before performing any maintenance.
1. Membersihkan Mesin
- Pembuangan Lint: Gunakan berus kecil untuk menghilangkan habuk dan serabut dari kawasan gelendong dan beri makan anjing.
- Pembersihan Luaran: Lap permukaan luar dengan lembut, damp kain. Jangan gunakan bahan kimia yang keras.
2. Penggantian Jarum
Replace the needle regularly (after 8-10 hours of sewing) or if it becomes bent, dull, or broken.
- Matikan mesin dan cabut plagnya.
- Longgarkan jarum clamp skru.
- Tanggalkan jarum lama.
- Masukkan jarum baharu dengan bahagian rata menghadap bahagian belakang mesin, tolak ke atas sejauh yang boleh.
- Ketatkan jarum clamp skru dengan selamat.
Menyelesaikan masalah
Rujuk bahagian ini untuk penyelesaian kepada isu biasa yang mungkin anda hadapi.
| Masalah | Kemungkinan Punca | Penyelesaian |
|---|---|---|
| Jahitan Terlangkau | Jarum salah, jarum bengkok, cara memasukkan benang tidak betul. | Gantikan jarum dengan jenis/saiz yang betul, masukkan semula benang ke dalam mesin dengan betul. |
| Pecah Benang | Incorrect threading, tension too tight, damaged needle, poor quality thread. | Masukkan semula benang ke dalam mesin, laraskan ketegangan, gantikan jarum, gunakan benang yang berkualiti baik. |
| Kedutan Fabrik | Tension too tight, incorrect stitch length, wrong needle for fabric. | Loosen tension, adjust stitch length, use appropriate needle. |
| Jamming Mesin | Thread tangled in bobbin area, lint buildup, incorrect bobbin insertion. | Remove bobbin and clean bobbin case, re-insert bobbin correctly. |
| Jahitan Tidak Sekata | Incorrect thread tension, improper threading, worn needle. | Adjust tension, re-thread machine, replace needle. |
Spesifikasi
Technical specifications for the SINGER M1005 Electric Sewing Machine.
- Jenama: PENYANYI
- Nombor Model: M1005 (Part Number: 230246102)
- warna: putih
- Bahan: plastik
- Berat Barang: 3 Kilogram
- Sumber Kuasa: Elektrik Bertali
- Stitch Options: 4 built-in stitches with 11 options
- Max Stitch Width: 4 mm
- Jenis Bobbin: Class 15 (Transparent, Top Drop-in)
- Ciri Khas: Adjustable Thread Tension, Free-Arm Design, Reverse Lever, Extra High-Presser Foot Lifter
Waranti dan Sokongan
For warranty information, service, or technical support, please refer to the warranty card included with your product or contact SINGER customer service directly. Keep your purchase receipt as proof of purchase.
You can typically find contact information for SINGER support on their official webtapak atau dalam pembungkusan produk.