Nextbase NBDVR222XRWC
Manual Pengguna Dash Cam Nextbase 222XR
Model: NBDVR222XRWC
Jenama: Nextbase
1. Pengenalan
This manual provides detailed instructions for the installation, operation, and maintenance of your Nextbase 222XR Dash Cam. This device is designed to record high-definition video of your journeys, offering enhanced security and peace of mind on the road. Please read this manual thoroughly before using the product to ensure proper functionality and safety.
2. Maklumat Keselamatan
- Ensure the dash cam is installed in a position that does not obstruct the driver's view of the road or interfere with the operation of vehicle controls.
- Do not operate the dash cam while driving. Adjust settings or review footage only when the vehicle is safely parked.
- Elakkan daripada mendedahkan peranti kepada suhu yang melampau, cahaya matahari langsung untuk tempoh yang lama atau kelembapan yang berlebihan.
- Use only the power cable and accessories supplied with the dash cam. Using unauthorized accessories may damage the device and void the warranty.
- Keep the lens clean to ensure clear video recordings.
3. Kandungan Pakej
The Nextbase 222XR Dash Cam package includes the following items:
- Nextbase 222XR Dash Cam (Front Camera)
- Rear Wired Window Camera
- 6m cable for Rear Wired Window Camera connection
- Click&Go PRO Mount
- Power Cable (for vehicle 12V socket)
- Memory Card (as per product specifications, though some listings may vary)
Note: A Nextbase 128GB SD Card is recommended for optimal performance, but not always included in the standard package.
4. Produk Lebihview
The Nextbase 222XR is a comprehensive dash cam system designed for all-round vehicle protection.

The Nextbase 222XR system, featuring the main front dash cam and the compact rear camera.

Connect & Go: Easily connect your dash cam with the 6.5m cable, designed to be hidden for a tidy installation.

1080p 30 FPS Recording: Records in Full HD with a 140-degree viewing angle, capturing pavements and road signs clearly.
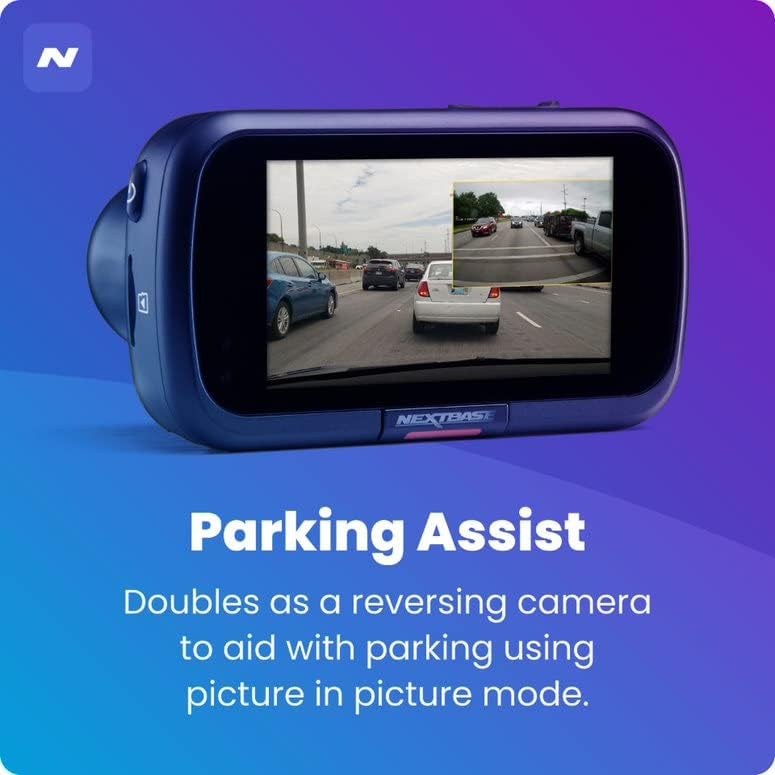
Bantuan Tempat Letak Kereta: The rear camera doubles as a reversing camera, aiding with parking using picture-in-picture mode.
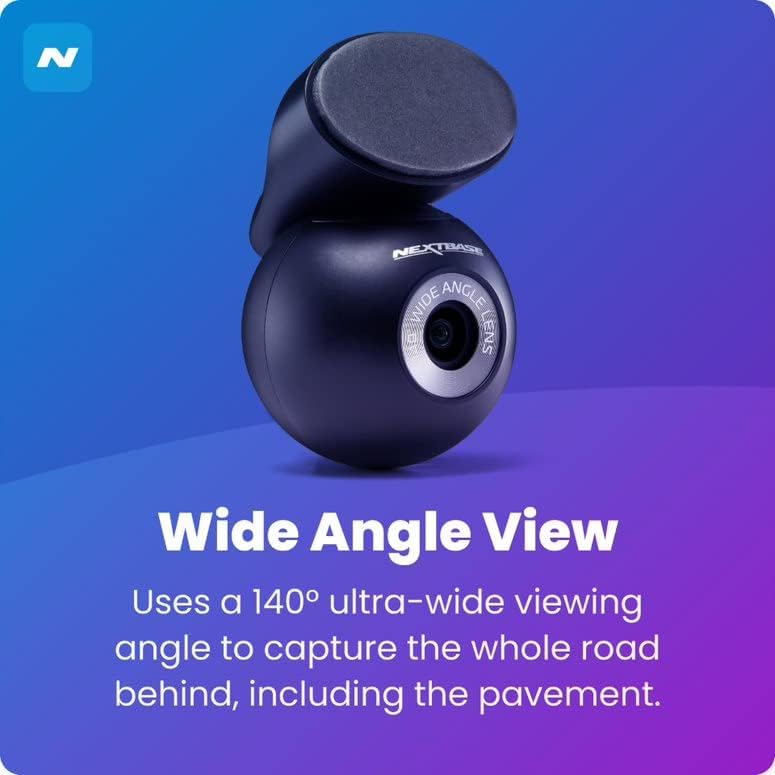
Sudut Lebar View: The rear camera uses a 140-degree ultra-wide viewing angle to capture the entire road behind, including the pavement.
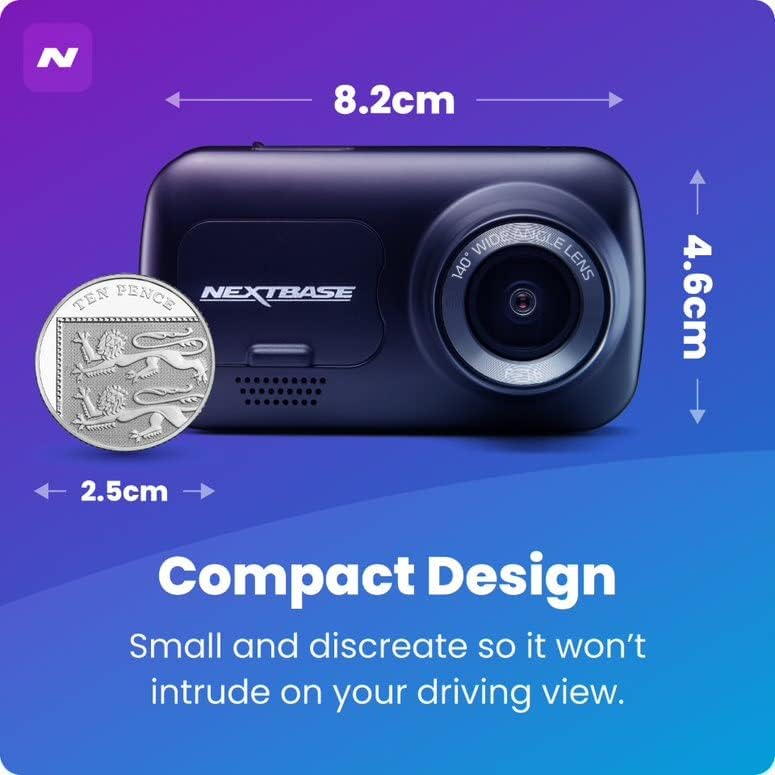
Reka bentuk padat: Small and discreet, ensuring it does not intrude on your driving view.

Mod Parkir Pintar: Records any bump or physical movement on the vehicle when left unattended. Requires Nextbase Hardwire Kit (sold separately).

Click&Go PRO: Exclusive mount clips on and charges your dash cam via magnetic connection for easy removal and reattachment.
5. Persediaan
Panduan Pemasangan
For a visual guide on installing your Nextbase Dash Cam, please refer to the official fitting video below:
Official Nextbase Fitting Video: This video demonstrates the step-by-step process for installing your Nextbase Dash Cam, including mounting and cable management.
Langkah Persediaan Awal:
- Sediakan Cermin Depan: Clean the area where the mount will be attached using the provided wet and dry wipes to ensure a strong adhesive bond.
- Attach Mount to Dash Cam: Connect the Click&Go PRO mount to the dash cam. The strong magnet will hold it securely in place.
- Position the Dash Cam: Temporarily position the dash cam on the windscreen to find an optimal location. Ensure the 'Protect' button is accessible and the driver's view is not obstructed. Note the exact position.
- Attach 3M Pad: Remove the protective film from the 3M adhesive pad on the mount. Align the keyway on the pad to the bottom left-hand side. Push the pad firmly towards the windscreen for 5-10 seconds to ensure maximum contact.
- Sambungkan Kuasa: Connect the USB power cable to the mount.
- Mount Dash Cam: Slide the dash cam onto the mount until it clicks into place. Ensure it is correctly positioned and powers on.
- Pasang Kamera Belakang: Attach the bespoke Rear Wired Window Camera to the main unit via the supplied 6m cable. Position it on the rear window for optimal rear view rakaman.
- Masukkan Kad SD: Insert a compatible Micro SD card (Class 10 or U1, up to 128GB recommended) into the dash cam's slot.
6. Arahan Operasi
Operasi asas:
- Rakaman Automatik: The dash cam will automatically power on and begin recording when connected to a power source and the vehicle ignition is turned on.
- Rakaman Gelung: The device features automatic loop recording, which continuously records video. When the memory card is full, the oldest files are overwritten to make space for new recordings.
- File Perlindungan: In the event of an impact or sudden braking, the G-sensor will automatically lock the current recording, preventing it from being overwritten. You can also manually protect a file by pressing the 'Protect' button during recording.
- Mod Letak Kereta: When enabled, the Intelligent Parking Mode will automatically start recording if any physical movement or impact is detected while your vehicle is parked and the ignition is off.
- MyNextbase Cloud & Player: Utilize the MyNextbase Cloud for free storage of your important footage and the MyNextbase Player software for easy playback and management of your recordings on a computer.
7. Penyelenggaraan
- Pembersihan: Regularly clean the dash cam's lens and screen with a soft, lint-free cloth. Do not use abrasive cleaners or solvents.
- Pengurusan Kad SD: Format your Micro SD card regularly (e.g., monthly) within the dash cam's settings to maintain optimal performance and prevent data corruption. Always use a high-quality, branded Class 10 or U1 Micro SD card.
- Kemas kini Firmware: Semak Nextbase weblaman web ini secara berkala untuk kemas kini perisian tegar. Memastikan perisian tegar kamera papan pemuka anda dikemas kini memastikan anda mempunyai ciri dan pembetulan pepijat terkini.
- Pemeriksaan Kabel: Periodically inspect all cables for any signs of wear or damage. Replace damaged cables immediately to prevent malfunction or safety hazards.
8. Penyelesaian masalah
| Masalah | Kemungkinan Punca | Penyelesaian |
|---|---|---|
| Dash cam tidak dihidupkan. | No power supply; faulty cable; loose connection. | Check power cable connection to the vehicle's 12V socket and the dash cam. Ensure the vehicle's ignition is on. Try a different power source if available. |
| Recordings are not saving or are being deleted unexpectedly. | SD card issue (not compatible, full, corrupted); loop recording settings. | Ensure you are using a compatible Class 10 or U1 Micro SD card. Format the SD card within the dash cam's settings. If issues persist, try a new Nextbase branded SD card. |
| Kualiti video kurang baik atau kabur. | Kanta kotor; filem pelindung masih pada kanta; tetapan resolusi yang salah. | Clean the lens with a soft cloth. Check if any protective film remains on the lens. Verify video resolution settings in the menu. |
| Dash cam freezes or becomes unresponsive. | Software glitch; SD card issue. | Perform a soft reset (refer to device manual for specific button combination). Format or replace the SD card. Update firmware if available. |
9. Spesifikasi
- Dimensi Produk: 1.85 x 3.27 x 2.05 inci
- Berat Barang: 14.1 auns
- Nama Model: 222XR
- Bateri: 1 Bateri Lithium Ion diperlukan
- Teknologi Ketersambungan: USB
- Ciri Khas: Compact Design, Parking Mode, Night Vision, Automatic Loop Recording, File Perlindungan
- warna: Hitam
- Resolusi Tangkapan Video: 1080p (Front), 720p (Rear)
- Jenis Pemasangan: Magnetic Mount (Click&Go PRO)
- Max SD Card Support: Up to 128GB Micro SD cards
10. Waranti dan Sokongan
Nextbase products are designed for reliability and durability. For specific warranty information, please refer to the documentation included with your product or visit the official Nextbase webtapak.
Pelan perlindungan pilihan mungkin tersedia untuk perlindungan lanjutan:
- Pelan Perlindungan 2 Tahun
- Pelan Perlindungan 3 Tahun
- Complete Protect (pelan bulanan)
For technical support, troubleshooting assistance, or to inquire about replacement parts, please contact Nextbase customer service through their official channels. Always provide your product model number (NBDVR222XRWC) when seeking support.
Ask a question about this manual
Ask about setup, troubleshooting, compatibility, parts, safety, or missing instructions. Manuals+ will review the question and use this page’s manual context to help answer it.