1. Pengenalan
This manual provides essential information for the installation, operation, and maintenance of your Apevia ATX-GX850W Galaxy 850W 80+ Gold Certified Semi-Modular Gaming Power Supply. Please read this manual thoroughly before installation and retain it for future reference.

Figure 1: Apevia ATX-GX850W Galaxy 850W Power Supply
The Apevia Galaxy 850W Power Supply is designed to deliver reliable and efficient power to your computer system. It features an 80+ Gold certification for high efficiency, a semi-modular cable design for improved cable management, and various protection mechanisms to safeguard your components.
2. Maklumat Keselamatan
- Always disconnect the power cord from the wall outlet before installing, removing, or cleaning the power supply.
- This power supply is designed for use in personal computers only. Do not use it for any other purpose.
- Jangan buka unit bekalan kuasa. vol tinggitages ada di dalam, dan membuka unit akan membatalkan jaminan.
- Pastikan pembumian yang betul untuk mengelakkan kejutan elektrik.
- Keep the power supply away from moisture, extreme temperatures, and direct sunlight.
- Pasang bekalan kuasa di kawasan yang mempunyai pengudaraan yang baik untuk mengelakkan terlalu panas.
3. Kandungan Pakej
Sahkan bahawa semua item terdapat dalam pakej:
- Apevia ATX-GX850W Galaxy 850W Power Supply Unit
- Kord Kuasa AC
- Modular Cable Set (including 20/24pin Main Power, P8(4+4P) ESP 12V, 8(6+2)pin PCI-E, SATA, Peripheral, Floppy connectors)
- Skru Pemasangan
- Manual Pengguna (dokumen ini)
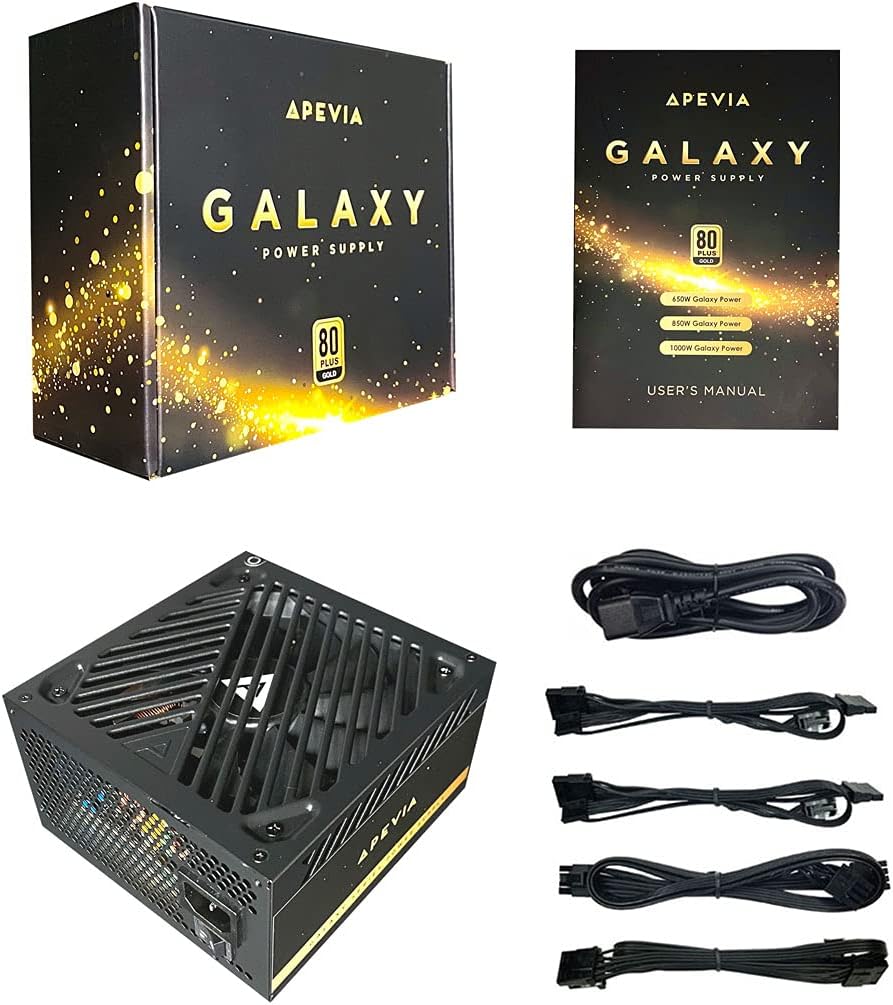
Figure 2: Power Supply Unit, Box, and Included Cables
4. Ciri-ciri Produk
- 850W 80+ Gold Certified: Ensures high power efficiency (90%+ efficiency) at 20-100% load levels, reducing heat generation and electricity consumption.
- Active PFC: Power Factor Correction of 99% for stable power delivery.
- Semi-Modular Design: Membenarkan sambungan hanya kabel yang diperlukan, meningkatkan aliran udara dan pengurusan kabel dalam bekas PC.
- Auto-Thermally Controlled 135mm Fan: Features a quiet black fan that adjusts its speed based on the power supply's temperature, ensuring optimal cooling and reduced noise.
- Heavy Duty Protections: Includes Short-Circuit Protection (SCP), Over-Voltage Protection (OVP), Over-Power Protection (OPP), and Under-Voltage Protection (UVP) to safeguard your system components.
- Double Forward Converter Design: Enhances stability and efficiency.
- Keserasian Luas: Supports ATX 12V 2.3 Version, Dual/Quad Core CPUs, SLI/Crossfire configurations, and Haswell processors.
- Large Japanese Capacitor: Provides enhanced reliability and performance.
- Single +12V Output: Delivers strong, stable power for high-performance components.
- Vol. Automatiktage Penukaran: Automatically switches between 110V and 230V depending on the power grid.
5. Panduan Pemasangan
5.1 Senarai Semak Pra-Pemasangan
- Pastikan casing komputer anda serasi dengan bekalan kuasa faktor bentuk ATX.
- Gather necessary tools: screwdriver, zip ties or cable management straps.
- Unplug your computer from the wall outlet and discharge any residual power by pressing the power button a few times.
5.2 Pemasangan Fizikal
- Buka bekas komputer anda.
- Locate the power supply mounting bay, typically at the top or bottom rear of the case.
- Carefully slide the Apevia ATX-GX850W into the bay, ensuring the fan is oriented correctly (usually facing downwards or inwards, depending on case design).
- Selamatkan bekalan kuasa ke bekas menggunakan skru pelekap yang disediakan.
5.3 Sambungan Kabel
The Apevia ATX-GX850W is a semi-modular power supply. Connect only the cables required for your system components. Refer to your motherboard and component manuals for specific connection points.
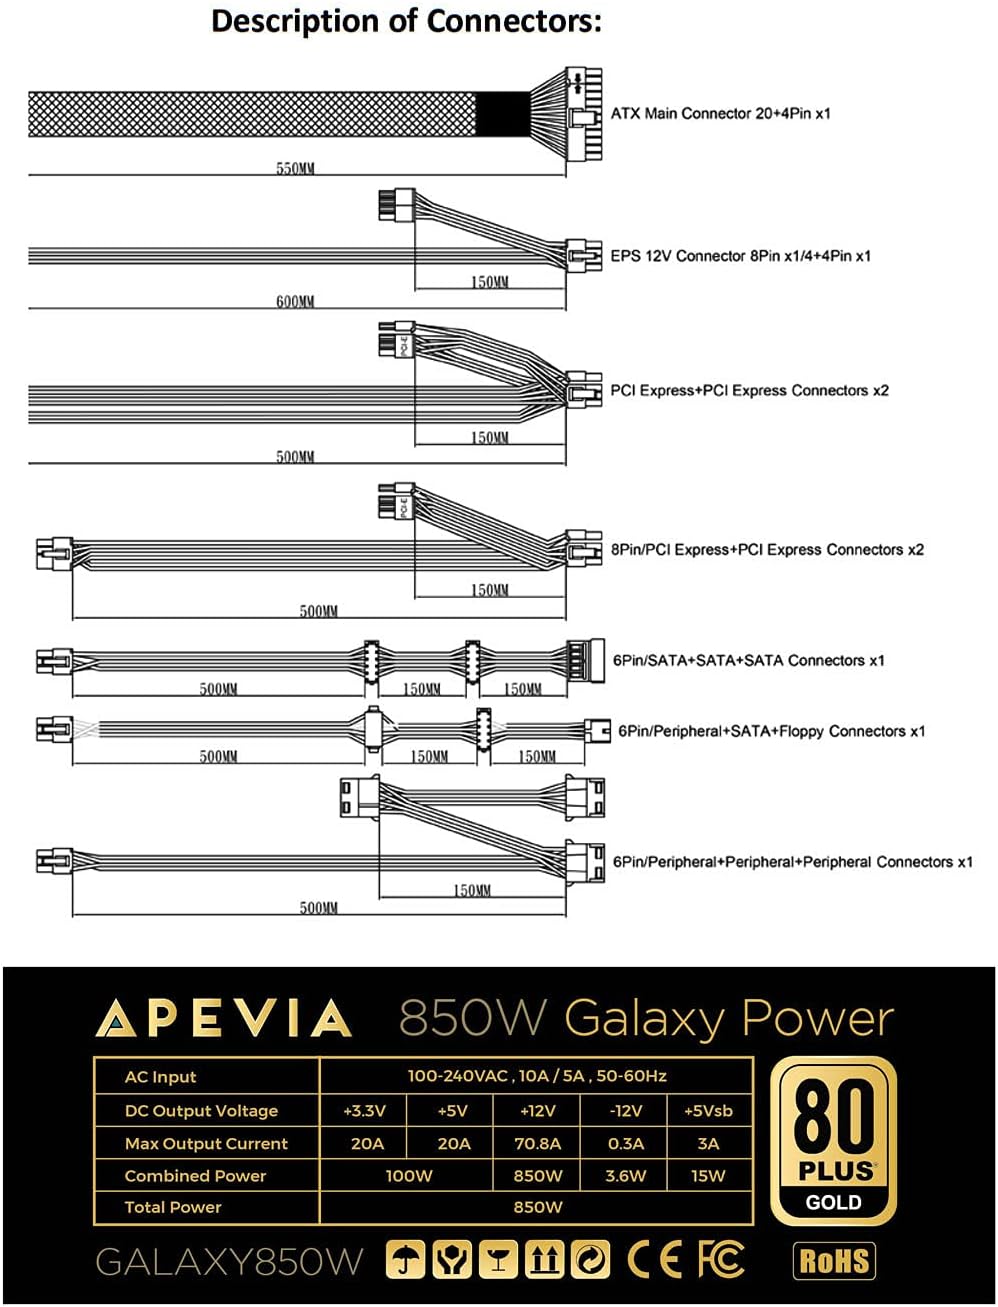
Figure 3: Description of Connectors

Rajah 4: Port Kabel Modular
- 20/24-pin Main Power Connector: Connect this to your motherboard. The 24-pin connector can be split into 20+4 pins for motherboards requiring a 20-pin connector.
- P8 (4+4P) EPS 12V Connector: Connect this to your motherboard's CPU power input. The 8-pin connector can be split into 4+4 pins for motherboards requiring a 4-pin connector.
- 8 (6+2)pin PCI-E Connectors: Connect these to your graphics card(s). The 8-pin connector can be split into 6+2 pins for graphics cards requiring a 6-pin connector.
- Penyambung SATA: Sambungkan ini kepada peranti SATA seperti SSD, HDD dan pemacu optik.
- Penyambung persisian (Molex): Used for older peripherals or case fans.
- Floppy Connector: Used for legacy floppy drives or some fan controllers.
IMPORTANT: The power supply will not power on simply by connecting the power cord to both the power supply and wall outlet. Ensure that all the power supply cables are properly connected to the PC for it to power on.
5.4 Sambungan Kuasa
- Setelah semua sambungan dalaman dibuat, tutup bekas komputer anda.
- Connect the AC power cord to the power supply's input socket.
- Palamkan hujung satu lagi kord kuasa AC ke salur keluar dinding yang dibumikan.
- Flip the power switch on the back of the power supply to the 'ON' position.

Figure 5: Power Supply Rear Panel with AC Input and Switch
6. Arahan Operasi
After successful installation, you can power on your computer. The power supply's 135mm fan will automatically adjust its speed based on the internal temperature, providing efficient cooling while minimizing noise.
To power off your computer, use the operating system's shutdown function. For a complete power cycle, you can also switch off the power supply using the switch on its rear panel after the system has shut down.
7. Penyelenggaraan
Untuk memastikan prestasi optimum dan jangka hayat bekalan kuasa anda:
- Pembersihan: Periodically clean the exterior of the power supply and the fan grille to prevent dust buildup. Use compressed air to gently clear dust from the fan and vents. Ensure the power supply is disconnected from the wall outlet before cleaning.
- Pengudaraan: Ensure your PC case has adequate airflow and that the power supply's fan is not obstructed.
- Pengurusan Kabel: Proper cable management not only improves aesthetics but also enhances airflow, contributing to better cooling for all components, including the PSU.
8. Penyelesaian masalah
8.1 Power Supply Does Not Turn On
- Periksa Kord Kuasa: Pastikan kord kuasa AC disambungkan dengan selamat ke kedua-dua bekalan kuasa dan salur keluar dinding yang berfungsi.
- Suis kuasa: Verify that the power switch on the back of the power supply is in the 'ON' position.
- Sambungan Dalaman: Double-check all modular cables are firmly connected to both the power supply and your computer components (motherboard, CPU, GPU, drives). A loose connection can prevent the system from powering on.
- Motherboard Stand-offs: Ensure your motherboard is correctly installed with stand-offs to prevent short circuits.
- Faulty Components: If the issue persists, try testing the power supply with a known working system or consult a qualified technician.
8.2 Excessive Fan Noise
- Pengumpulan habuk: Clean the power supply fan and vents as described in the Maintenance section.
- Lebihan beban: Ensure your system's power requirements do not exceed the 850W capacity of the power supply. High loads can cause the fan to spin faster.
- Halangan: Check for any cables or objects obstructing the fan's rotation.
9. Spesifikasi
| Ciri | Spesifikasi |
|---|---|
| Nama Model | Galaxy |
| Jenama | Apevia |
| Peranti Serasi | Komputer Peribadi |
| Jenis Penyambung | ATX, Floppy, PCI-E, SATA |
| Output Wattage | 850 Watt |
| Faktor Bentuk | ATX |
| Kaedah Penyejukan | Udara (kipas 135mm) |
| Dimensi Item (L x W x H) | 6.2 x 5.9 x 3.4 inci |
| Berat Barang | 4.6 paun |
| Reka Bentuk Bekalan Kuasa | Separuh Modular |
| Bilangan Peminat | 1 |
| Input Maksimum Voltage | 230 Volt |
| Input Minimum Voltage | 110 Volt |
| System Bus Connector Type | 24 Pin |
| UPC | 810047130796 |
| Nombor Bahagian Mfr | ATX-GX850W |
Output Table:
| Keluaran | semasa |
|---|---|
| +3.3V | 20A |
| +5V | 20A |
| +12V | 66A |
| -12V | 0.3A |
| +5Vsb | 3A |
10. Maklumat Waranti
The Apevia ATX-GX850W Galaxy 850W 80+ Gold Certified Power Supply typically comes with a 3-year manufacturer's warranty. Please retain your proof of purchase for warranty claims. For detailed warranty terms and conditions, refer to the official Apevia webtapak atau hubungi sokongan pelanggan mereka.
11. Sokongan
Untuk bantuan lanjut, sokongan teknikal, atau untuk view other Apevia products, please visit the official Apevia store:


