
CALEX Smart Security (Model 5501000300)
Manual Pengguna Kamera IP Dalaman Mini CALEX Smart
Model: Smart Security (5501000300)
1. Pengenalan
This manual provides comprehensive instructions for the installation, operation, and maintenance of your CALEX Smart Mini Indoor IP Camera. Please read this manual thoroughly before using the product to ensure proper functionality and safety.
The CALEX Smart Mini Indoor IP Camera is a Wi-Fi surveillance camera offering 1080P Full HD resolution, night vision capabilities, two-way audio communication, and flexible storage options via MicroSD card or cloud.
2. Kandungan Pakej
Sahkan bahawa semua item terdapat dalam pakej:
- 1 x CALEX Smart Mini Indoor IP Camera
- 1 x Power Adapter (AC 220-240 V, 50/60 Hz input; DC 5 V output)
- 1 x Kabel USB
- 1 x Manual Pengguna (dokumen ini)
- Mounting accessories (if applicable, not explicitly listed but common for cameras)

Figure 2.1: CALEX Smart Mini Indoor IP Camera and its retail packaging. The packaging highlights 1080P Full HD, Wi-Fi 2.4 GHz, and compatibility with the Calex Smart app.
3. Produk Lebihview
Familiarize yourself with the components of your CALEX Smart Mini Indoor IP Camera.
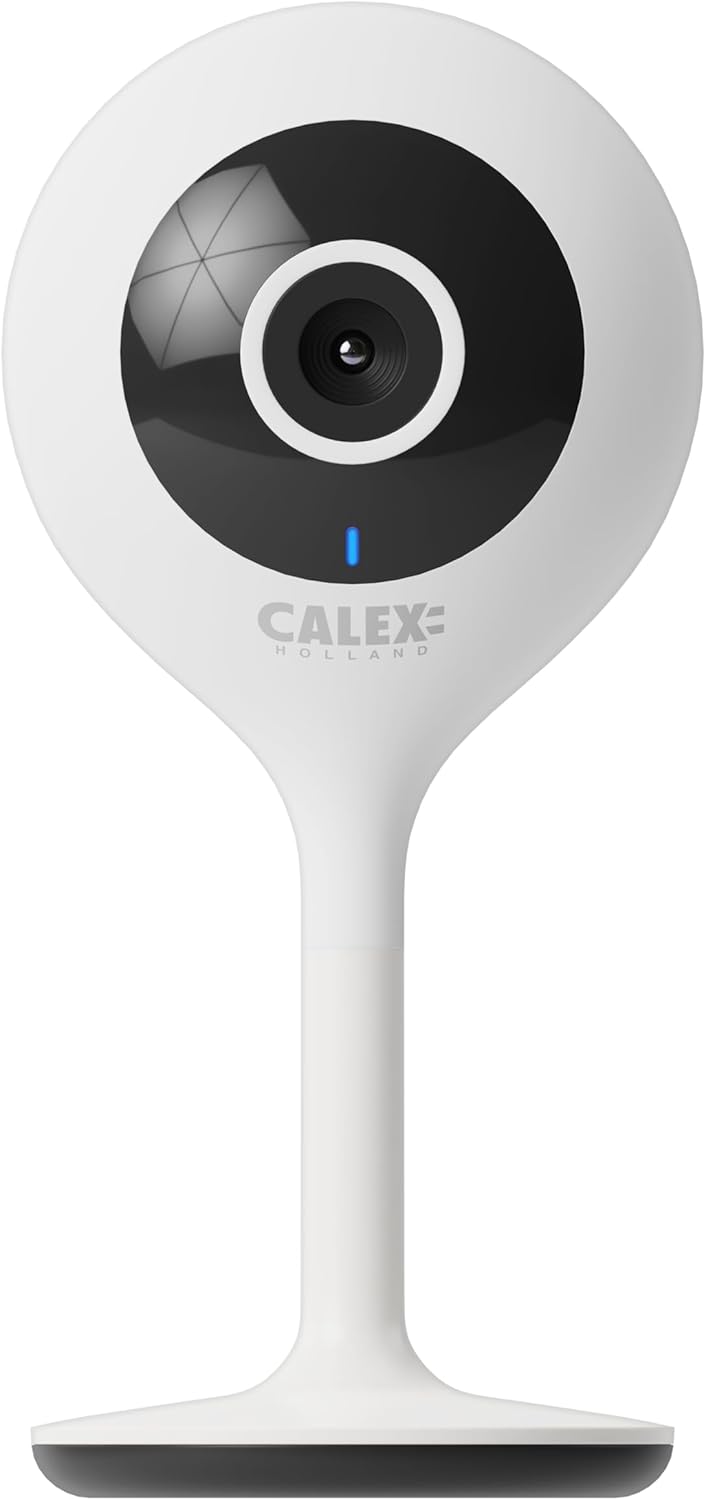
Rajah 3.1: Depan view of the CALEX Smart Mini Indoor IP Camera. It features a central lens, an indicator light, and the CALEX HOLLAND logo.

Rajah 3.2: Belakang view of the CALEX Smart Mini Indoor IP Camera. This view shows the speaker grille, a reset button, and the MicroSD card slot. The USB power input is located at the base.
Ciri-ciri Utama:
- Resolusi 1080P HD Penuh: Menyediakan foo video yang jelas dan terperincitage.
- Penglihatan Malam: Equipped with infrared LEDs for clear monitoring in low-light or dark conditions.
- Audio Dua hala: Mikrofon dan pembesar suara terbina dalam untuk komunikasi.
- Kesambungan Wi-Fi: Connects to your home Wi-Fi network (2.4 GHz only).
- Storan Setempat: Supports MicroSD card for continuous recording or event-triggered recording.
- Storan Awan: Optional cloud storage service for secure off-site recording.
- Pengesanan Pergerakan: Alerts and records upon detecting movement.
- Kawalan Apl Mudah Alih: Mengurus dan view live feed via the Calex Smart app.
- Keserasian Pembantu Suara: Berfungsi dengan Amazon Alexa dan Google Home.
4. Persediaan dan Pemasangan
4.1 Sebelum Anda Bermula
- Ensure your Wi-Fi network is 2.4 GHz. The camera does not support 5 GHz Wi-Fi.
- Have your Wi-Fi network name (SSID) and password ready.
- Download the "Calex Smart" app from your mobile device's app store.
- Place the camera within range of your Wi-Fi router.

Figure 4.1: QR codes for downloading the Calex Smart app. Scan the appropriate QR code for your device (iOS or Android) to download the application.
Download the Calex Smart app here: Gedung Apl iOS | Gedung Google Play
4.2 Langkah Persediaan Awal
- Hidupkan kuasa: Connect the camera to a power outlet using the provided USB cable and power adapter. The camera's indicator light will begin to flash, indicating it is ready for pairing.
- Open Calex Smart App: Launch the Calex Smart app on your smartphone. If you are a new user, register an account. If you already have an account, log in.
- Tambah Peranti: Tap the "+" icon in the top right corner of the app to add a new device. Select "Security & Video Surveillance" and then "Smart Camera".
- Confirm Indicator Status: Follow the in-app instructions. Confirm that the indicator light on your camera is flashing rapidly.
- Masukkan Butiran Wi-Fi: Enter your 2.4 GHz Wi-Fi network name and password when prompted.
- Imbas Kod QR: The app will generate a QR code. Hold your phone with the QR code approximately 15-20 cm (6-8 inches) in front of the camera lens. The camera will emit a sound when it successfully scans the QR code.
- Sambungan: Tap "I heard a prompt" in the app. The camera will then attempt to connect to your Wi-Fi network. Once connected, the indicator light will turn solid blue.
- Nama Peranti: Once connected, you can name your camera (e.g., "Living Room Camera", "Nursery Camera").


Gambar 4.2: Cthamples of the Calex Smart app interface. The left image shows a live camera feed with options for screenshot, speaking, and recording. The right image shows a settings screen within the app.
5. Mengendalikan Kamera Anda
5.1 Langsung View
Open the Calex Smart app and select your camera from the device list to access the live video feed. You can view the feed in portrait or landscape mode.

Figure 5.1: A user viewing the live feed from the CALEX Smart Mini Indoor IP Camera on their smartphone.
5.2 Audio Dua Hala
Semasa dalam live view, tap the microphone icon to speak through the camera's speaker. Tap the speaker icon to listen to audio from the camera's microphone.
5.3 Rakaman dan Main semula
- Rakaman Manual: Tap the "Record" button in the live view interface to start or stop manual recording. Recordings are saved to your phone's gallery.
- Tangkapan skrin: Tap the "Screenshot" button to capture a still image from the live feed.
- Rakaman Kad MicroSD: Insert a MicroSD card (up to 128GB, not included) into the camera's slot for continuous or event-triggered recording. Ensure the card is formatted within the app settings.
- Storan Awan: Subscribe to the cloud storage service via the app for secure, off-site storage of event recordings.
- Main balik: Akses foo yang dirakamtage from the "Playback" section within the camera's settings in the app.

Figure 5.2: The Calex Smart app interface displaying options for cloud storage and video playback. This allows users to review peristiwa yang dirakam.
5.4 Pengesanan Gerakan dan Makluman
Configure motion detection sensitivity and alert settings in the app. You will receive push notifications on your smartphone when motion is detected.
5.5 Kawalan Suara (Alexa/Google Home)
To integrate your camera with Amazon Alexa or Google Home, follow the instructions in the respective voice assistant app to enable the "Calex Smart" skill/action. You can then use voice commands to view the camera feed on compatible smart displays.

Figure 5.3: A couple using voice commands with an Amazon Echo device, demonstrating the camera's compatibility with smart home ecosystems like Alexa and Google Home.
6. Penyelenggaraan
- Pembersihan: Gunakan kain lembut dan kering untuk membersihkan kanta dan badan kamera. Jangan gunakan pembersih cecair atau aerosol.
- Kemas kini Firmware: Periodically check the Calex Smart app for available firmware updates for your camera. Keeping the firmware updated ensures optimal performance and security.
- Menetapkan semula Kamera: If you experience connectivity issues or need to reconfigure the camera, locate the reset button on the back of the device (refer to Figure 3.2). Use a pin or a straightened paperclip to press and hold the reset button for approximately 5-10 seconds until the indicator light flashes rapidly. This will restore the camera to factory settings.
7. Penyelesaian masalah
| Masalah | Kemungkinan Punca | Penyelesaian |
|---|---|---|
| Kamera gagal menyambung ke Wi-Fi. | Incorrect Wi-Fi password; 5 GHz Wi-Fi network; camera too far from router; Wi-Fi signal interference. |
|
| Tiada suapan video langsung. | Camera offline; poor internet connection; app issue. |
|
| Kad MicroSD tidak dikenali. | Card not inserted correctly; card corrupted; unsupported card size/format. |
|
| Audio dua hala tidak berfungsi. | Microphone/speaker muted in app; low volume; app permissions. |
|
8. Spesifikasi
| Ciri | Perincian |
|---|---|
| Nama Model | Keselamatan Pintar |
| Nombor Model | 5501000300 |
| Resolusi | 1080p HD Penuh |
| Ketersambungan | Wi-Fi (2.4 GHz sahaja) |
| Input Kuasa | AC 220-240 Volts, 50/60 Hz |
| Output Kuasa (Penyesuai) | DC 5 Volt |
| Penggunaan Kuasa | 5 Watt |
| Dimensi (L x W x H) | 3.2 x 5.3 x 11 cm (1.26 x 2.09 x 4.33 inci) |
| Berat badan | 167 Gram (0.37 lbs) |
| bahan | plastik |
| warna | putih |
| Pilihan Storan | MicroSD (sehingga 128GB), Storan Awan |
| Ciri Khas | Night Vision, Two-Way Audio, Motion Detection, Compatible with Alexa/Google Home |
| Persekitaran Penggunaan | Dalaman |
9. Waranti dan Sokongan
CALEX products are designed and manufactured to the highest quality standards. For warranty information and technical support, please refer to the official CALEX webtapak atau hubungi perkhidmatan pelanggan mereka secara langsung.
Pengeluar: CALEX
Untuk bantuan lanjut, lawati CALEX Official Webtapak.
10. Maklumat Keselamatan
- Do not expose the camera to water or moisture. This product is designed for indoor use only.
- Jangan cuba membuka atau membaiki kamera sendiri. Rujuk semua servis kepada kakitangan yang berkelayakan.
- Use only the provided power adapter and cable to prevent damage or fire.
- Keep the camera away from direct sunlight, heat sources, and strong magnetic fields.
- Ensure the camera is placed on a stable surface to prevent it from falling.
Ask a question about this manual
Ask about setup, troubleshooting, compatibility, parts, safety, or missing instructions. Manuals+ will review the question and use this page’s manual context to help answer it.