
tectake 401105
tectake 401105 Bike Repair Stand User Manual
Model: 401105
1. Pengenalan
Thank you for choosing the tectake 401105 Bike Repair Stand. This manual provides essential information for the safe and effective assembly, operation, and maintenance of your new repair stand. Please read these instructions carefully before use and retain them for future reference.
The tectake 401105 Bike Repair Stand is designed to provide a stable and convenient platform for bicycle maintenance and repair, allowing for comfortable work at eye level. It features a practical tool tray and a compact folding mechanism for easy storage.
2. Arahan Keselamatan
Sentiasa patuhi langkah keselamatan berikut untuk mengelakkan kecederaan atau kerosakan pada produk:
- Ensure the stand is placed on a stable, level surface before mounting a bicycle.
- Jangan melebihi kapasiti beban maksimum 20 kg.
- Always secure the bicycle firmly in the clamp sebelum melakukan sesuatu kerja.
- Keep hands and fingers clear of moving parts and pinch points during adjustment and folding.
- Do not allow children to play with or near the repair stand.
- Regularly inspect all components for wear or damage. Do not use the stand if any parts are damaged.
- Use the stand only for its intended purpose of supporting bicycles for maintenance.
3. Kandungan Pakej
Setelah membuka bungkusan, sila sahkan bahawa semua komponen ada dan tidak rosak:
- 1 x tectake 401105 Bicycle Repair Stand
- 1 x Tool Tray
- 1 x Front-wheel Mount
- 1 x Arahan Pemasangan (manual ini)

Figure 3.1: The tectake 401105 Bike Repair Stand, showing its main components.
4. Persediaan dan Pemasangan
The tectake 401105 Bike Repair Stand is designed for easy assembly. Follow these steps:
- Buka Lipatan Pangkalan: Carefully unfold the main legs of the stand until they are fully extended and locked into position. Ensure the stand is stable on the ground.
- Pasangkan Dulang Alat: Locate the designated slot or attachment point for the tool tray on the main shaft. Slide or clip the tool tray into place, ensuring it is secure and level.
- Laraskan Clamp Ketinggian: Loosen the quick-release lever or knob on the main vertical shaft to adjust the height of the bicycle clamp. Raise or lower it to your desired working height and then firmly tighten the lever/knob.
- Laraskan Clamp Sudut: The bicycle clamp can be rotated. Loosen the adjustment knob near the clamp to set the desired angle, then tighten it securely.
- Install Front-wheel Mount (Optional): If using the front-wheel mount, attach it to the lower part of the stand as indicated in the diagram. This provides additional stability for the front wheel.

Figure 4.1: The stand's adjustable height and angle, along with its compact folded configuration for storage.
5. Arahan Operasi
5.1 Mounting a Bicycle
- Ensure the stand is stable and the clamp is at an appropriate height.
- Buka clamp jaws by rotating the handle or lever.
- Carefully lift your bicycle and position a frame tube (e.g., top tube or seat post) between the open clamp rahang.
- Tutup clamp jaws firmly around the frame tube. Ensure the bicycle is securely held and balanced before releasing your grip. Do not overtighten, as this may damage the frame.
- If using the front-wheel mount, secure the front wheel into the designated slot for added stability.

Figure 5.1: A bicycle securely mounted on the tectake 401105 Bike Repair Stand, demonstrating proper positioning.
5.2 Menggunakan Dulang Alat
The integrated tool tray provides a convenient space to keep your tools, small parts, and lubricants within easy reach during maintenance tasks. Avoid placing heavy or excessively large items on the tray to maintain stability.
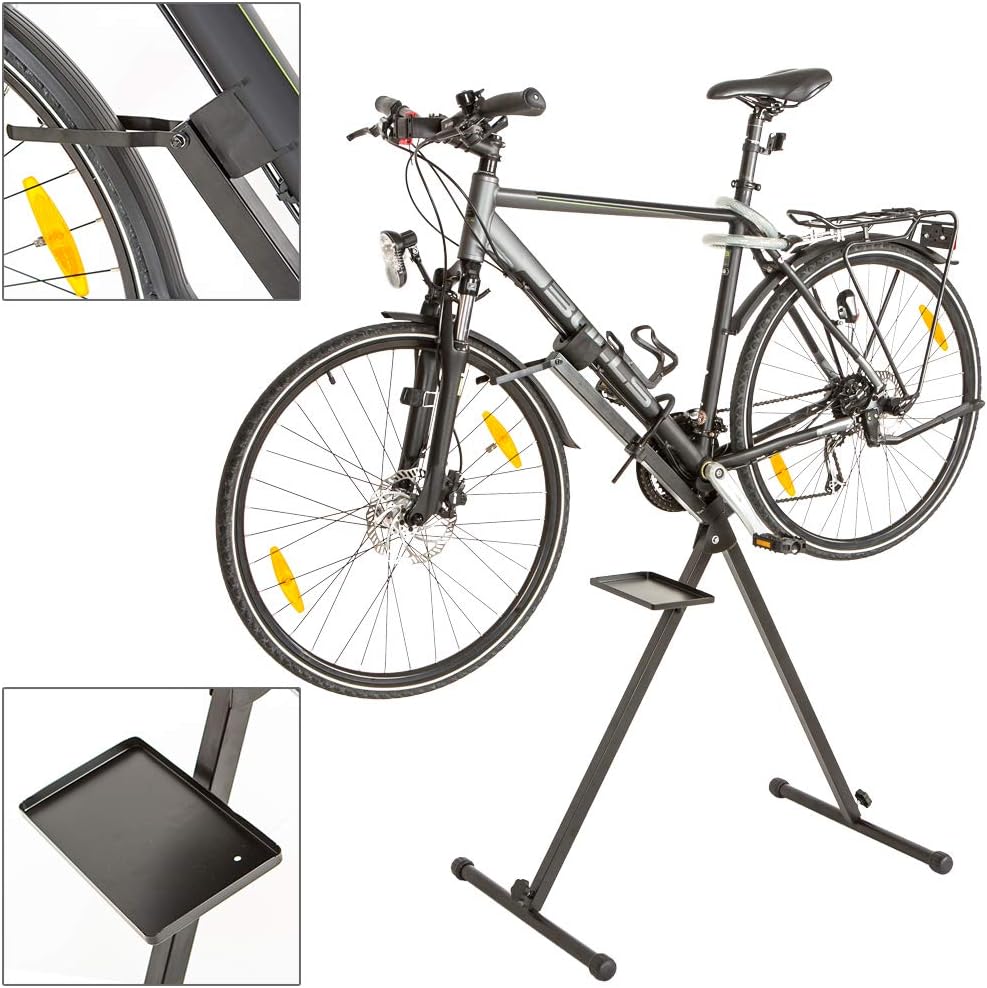
Rajah 5.2: Terperinci view of the practical tool tray and the front wheel support mechanism.
5.3 Lipatan untuk Penyimpanan
To fold the stand for compact storage:
- Remove the bicycle from the clamp.
- Remove the tool tray and front-wheel mount if attached.
- Loosen the quick-release levers and knobs to collapse the stand's legs and main shaft.
- Fold the stand into its compact configuration as shown in Figure 4.1. Ensure all locking mechanisms are engaged to prevent accidental unfolding.
6. Penyelenggaraan
Regular maintenance will extend the life of your tectake 401105 Bike Repair Stand:
- Pembersihan: Lap permukaan meja dengan iklanamp cloth after use to remove dirt, grease, or oil. Avoid abrasive cleaners.
- Pelinciran: Periodically apply a small amount of lubricant to moving parts, such as hinges and quick-release mechanisms, to ensure smooth operation.
- Pemeriksaan: Before each use, inspect all bolts, nuts, and quick-release levers to ensure they are tight and secure. Check for any signs of wear, cracks, or damage to the frame or plastic components.
- Storan: Store the folded stand in a dry, clean environment away from extreme temperatures and direct sunlight.
7. Penyelesaian masalah
| Masalah | Kemungkinan Punca | Penyelesaian |
|---|---|---|
| Pendirian goyah atau tidak stabil. | Not fully unfolded; placed on uneven surface; loose connections. | Ensure legs are fully extended and locked. Move to a level surface. Check and tighten all bolts and quick-release levers. |
| Bicycle slips in clamp. | Clamp not tightened enough; clamp jaws are dirty/greasy. | Ketatkan clamp more firmly (without overtightening). Clean clamp jaws with a degreaser. |
| Stand difficult to fold/unfold. | Moving parts are stiff or dirty. | Clean and lubricate hinges and quick-release mechanisms. |
8. Spesifikasi Teknikal
| Ciri | Perincian |
|---|---|
| Model | 401105 |
| Jenama | tectake |
| Dimensi Keseluruhan (anggaran) | 60 sm (W) x 93 sm (D) x 120 sm (H) |
| Dimensi Dilipat (anggaran) | 17 sm (W) x 61 sm (D) x 95 sm (H) |
| Tool Rack Dimensions (approx.) | 25 cm x 15 cm x 1.5 cm |
| bahan | Keluli Aloi |
| Kapasiti Beban Maksimum | 20 kg |
| Berat (lebih kurang) | 6 kg |
9. Waranti dan Sokongan
For warranty information, technical support, or spare parts, please contact tectake customer service. Refer to your purchase documentation or the official tectake weblaman web untuk maklumat hubungan.
Sila sediakan nombor model anda (401105) dan tarikh pembelian semasa menghubungi sokongan.
Ask a question about this manual
Ask about setup, troubleshooting, compatibility, parts, safety, or missing instructions. Manuals+ will review the question and use this page’s manual context to help answer it.