
Sorand AC 230V Floor Heating Thermostat
Sorand AC 230V Digital Programmable Floor Heating Thermostat User Manual
Model: AC 230V Floor Heating Thermostat
pengenalan
This manual provides comprehensive instructions for the installation, operation, and maintenance of your Sorand AC 230V Digital Programmable Floor Heating Thermostat. Please read this manual carefully before installation and use to ensure proper function and safety.
The thermostat is designed for electronic floor heating systems and other electrical heating elements. It features a large LCD with backlight, programmable temperature settings, and internal/external temperature sensing capabilities.
Maklumat Keselamatan
- Pemasangan mesti dilakukan oleh juruelektrik yang bertauliah.
- Pastikan kuasa diputuskan sebelum pemasangan atau penyelenggaraan.
- Jangan dedahkan termostat kepada air atau kelembapan berlebihan.
- Beroperasi dalam vol yang ditentukantage dan had semasa.
Kandungan Pakej
Sahkan bahawa semua item terdapat dalam pakej:
- 1 x Sorand AC 230V Digital Programmable Floor Heating Thermostat
- 1 x External Temperature Sensor Cable (approx. 3 meters)
- 2 x Skru Pemasangan
- 1 x Manual Pengguna (dokumen ini)

Image: Contents of the Sorand thermostat package, showing the main unit, external sensor cable, mounting screws, and the instruction manual.
Persediaan dan Pemasangan
Penting: Installation should only be carried out by a qualified electrician. Ensure the main power supply is turned off before commencing any wiring work.
Gambarajah Pendawaian
Refer to the wiring diagram on the back of the thermostat unit for correct connections. The terminals are typically labeled as follows:
- L1, N1: Power input (AC 230V)
- LOAD (1, 2): Connection to the heating element
- NTC (5, 6): Connection for the external floor temperature sensor

Imej: Belakang view of the Sorand thermostat, displaying the wiring terminals and a simplified diagram for electrical connections.
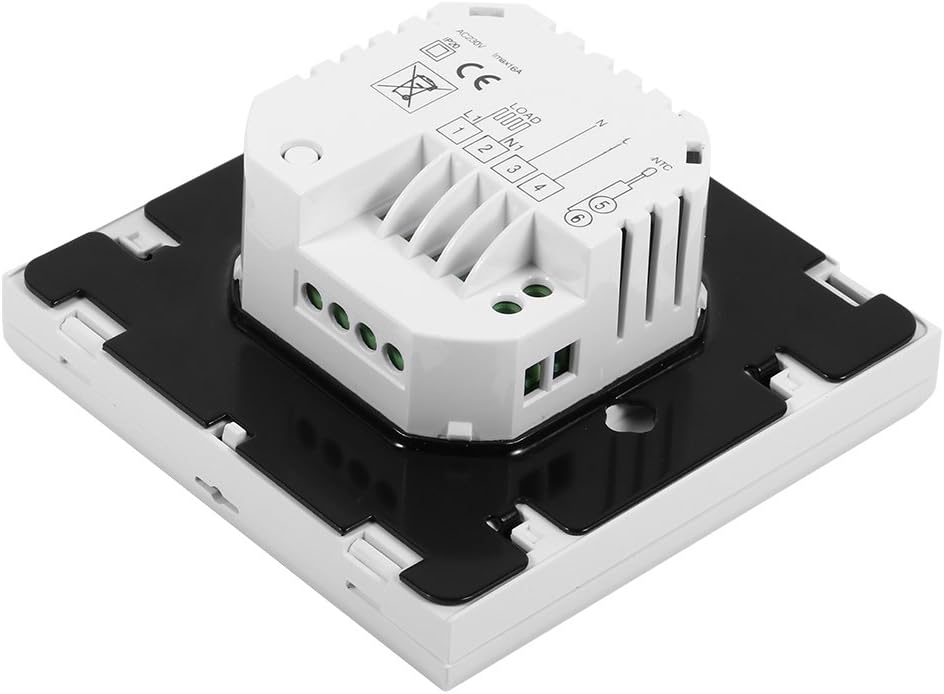
Imej: Sisi view of the Sorand thermostat, illustrating the internal components and ports for wiring connections.
Melekap
- Prepare a standard electrical wall box (86x86mm recommended).
- Connect the power supply, heating load, and external sensor wires according to the wiring diagram.
- Tolak termostat berwayar ke dalam kotak dinding dengan berhati-hati.
- Secure the thermostat to the wall box using the provided screws.
- Pasangkan panel hadapan termostat.
Arahan Operasi
The thermostat features a large LCD and touch-sensitive buttons for easy operation.
Fungsi Butang
- ⏻ (Kuasa): Menghidupkan/Mematikan termostat.
- ↻ (Mode/Cycle): Switches between manual mode and programmable mode.
- ⏱ (Clock/Time): Sets the time and enters programming mode.
- ▲ (Anak Panah Atas): Increases temperature setting or adjusts values.
- ▼ (Anak Panah Bawah): Decreases temperature setting or adjusts values.

Imej: Depan view of the Sorand thermostat, highlighting the LCD screen and the five touch-sensitive control buttons below it.
Menetapkan Masa dan Hari
- Tekan dan tahan butang ⏱ butang selama 3 saat untuk memasuki mod tetapan masa.
- Gunakan ▲ dan ▼ butang untuk melaraskan jam, kemudian tekan ⏱ to confirm and move to minutes, then day of the week.
- Tekan ⏱ again to exit, or wait for 10 seconds for automatic exit.
Operasi Mod Manual
In manual mode, the thermostat maintains a constant temperature set by the user.
- Tekan ke ↻ button to switch to manual mode (indicated by a hand icon or similar on the display).
- Gunakan ▲ dan ▼ butang untuk menetapkan suhu yang anda inginkan.
- The thermostat will now maintain this temperature.
Programmable Mode Operation (6 Periods)
The thermostat allows for 6 programmable periods per day, enabling different temperature settings at different times.
- Tekan ke ↻ button to switch to programmable mode (indicated by a clock icon or similar).
- Tekan dan tahan butang ⏱ button for 3 seconds to enter programming mode.
- The display will show the first period (e.g., "Period 1"). Use ▲ dan ▼ to set the start time and desired temperature for this period.
- Tekan ⏱ to move to the next period and repeat the process for all 6 periods.
- After setting all periods, press ⏱ again or wait for automatic exit to save settings.
Termostat akan mengikut jadual yang diprogramkan secara automatik.
Sensor Selection (Internal/External)
The thermostat can use its internal sensor or the external floor sensor. The selection method is typically found in advanced settings or by a specific button combination. Refer to the on-screen indicators for the active sensor.
Penyelenggaraan
- Clean the thermostat's display and casing dengan kain lembut dan kering. Jangan gunakan pembersih atau pelarut yang melelas.
- Pastikan termostat bebas daripada habuk dan serpihan untuk mengekalkan prestasi optimum.
- No user-serviceable parts inside. Do not attempt to open or repair the unit.
Menyelesaikan masalah
| Masalah | Kemungkinan Punca | Penyelesaian |
|---|---|---|
| Termostat tidak dihidupkan. | Tiada bekalan kuasa; pendawaian yang tidak betul. | Check circuit breaker. Verify wiring connections (consult a qualified electrician). |
| Heating not turning on/off. | Incorrect temperature setting; thermostat in OFF mode; wiring issue. | Adjust set temperature. Ensure thermostat is ON. Check heating element wiring. |
| Bacaan suhu tidak tepat. | Sensor malfunction; incorrect sensor selected. | Verify sensor connection. Check if internal or external sensor is active. |
| Paparan kosong atau berkelip. | Turun naik kuasa; kerosakan dalaman. | Reset power to the thermostat. If issue persists, contact support. |
Spesifikasi
| Ciri | Perincian |
|---|---|
| Jenama | Sorand |
| Model | AC 230V Floor Heating Thermostat |
| Bekerja Voltage | AC 230V, 50/60Hz |
| Muatkan Arus | 12/16A (Electric Heating) |
| Ketepatan | ±0.5 ℃ |
| Set-point Temperature Range | 5℃ - 35℃ |
| Hadkan Julat Suhu | 5℃ - 99℃ |
| Penggunaan Kuasa | <0.3W |
| Penderia Suhu | NTC (Internal and External) |
| Saiz Permukaan | Approx. 86 x 86 x 40mm (3.4 x 3.4 x 1.6 inches) |
| External Sensor Cable Length | Lebih kurang 3 meter (9.8 kaki) |
| bahan | PC+ABS |
| Jenis Paparan | LCD Digital dengan Lampu Latar |
| Kaedah Kawalan | Kawalan pad sentuh |
Waranti dan Sokongan
This product is covered by the manufacturer's standard warranty. Please refer to the product packaging or your point of purchase for specific warranty terms and conditions.
For technical support, troubleshooting assistance, or warranty claims, please contact your retailer or the manufacturer directly. Keep your purchase receipt as proof of purchase.
Ask a question about this manual
Ask about setup, troubleshooting, compatibility, parts, safety, or missing instructions. Manuals+ will review the question and use this page’s manual context to help answer it.