1. Pengenalan
Thank you for choosing the nooa Cordless Hair Clippers. This professional haircut kit is designed for smooth and fast trimming, offering versatility and convenience for personal grooming. This manual provides essential information for the safe and effective use, maintenance, and care of your new hair clipper.
2. Kandungan Pakej
Sila sahkan bahawa semua item yang disenaraikan di bawah disertakan dalam pakej anda:
- 1 x Gunting Rambut
- 4 x Plastic Guide Combs (various lengths)
- 1 x Sikat Rambut
- 1 x Hair Cutting Scissor
- 1 x Berus Pembersih
- 1 x Span Pembersihan
- 1 x Penutup Pelindung
- 1 x Kabel Pengecas USB
- 1 x Beg Penyimpanan

Image 2.1: The nooa Cordless Hair Clipper shown with all its accompanying accessories, including guide combs, scissors, cleaning tools, charging cable, and storage bag.
3. Arahan Keselamatan Penting
Sila baca dan fahami semua arahan keselamatan sebelum menggunakan produk ini. Kegagalan mematuhi arahan ini boleh mengakibatkan renjatan elektrik, kebakaran atau kecederaan serius.
- Always turn off the hair clipper before attempting to remove or attach the cutter head.
- Do not wash the hair clipper with water while it is connected to the charging cable.
- Ensure the charging port is completely dry and free of water before connecting the USB charging cable.
- When the LED indicator displays a battery power level below 10%, it is recommended to charge the device promptly.
- Jauhkan produk ini daripada kanak-kanak untuk mengelakkan kemalangan.
4. Produk Lebihview
The nooa Cordless Hair Clipper features a self-sharpening ceramic titanium alloy blade for precise cutting. It includes an adjustable trimming length setting directly on the clipper body and supports additional guide combs for extended length options. An LED display provides battery status and operational mode information.

Imej 4.1: Perincian view of the clipper's precision blades, highlighting the ceramic cutter and titanium alloy components, along with the adjustable length dial.

Image 4.2: The hair clipper is depicted next to a sleeping infant, emphasizing its low noise operation (below 60 decibels) during use.
5. Mengecas Peranti
The hair clipper is equipped with a rechargeable 2500mAh lithium battery. To charge the device:
- Pastikan pemotong dimatikan.
- Connect the provided USB charging cable to the charging port on the bottom of the clipper.
- Plug the other end of the USB cable into a compatible USB power adapter (not included) or a USB port.
- The LED indicator will display the charging status and current battery percentage.
A full charge typically takes approximately 3 hours and provides up to 200 minutes of cordless operation. It is recommended to use the provided USB charging cable for optimal performance.

Image 5.1: The hair clipper is shown connected to its USB charging cable, with the LED display indicating battery charge status and operational modes.
6. Setup and Length Adjustment
The clipper offers precise length adjustment through its integrated dial and additional guide combs.
6.1 Melaraskan Panjang Potongan
The clipper itself has 5 accurate trimming length settings: 0.8mm, 1.2mm, 1.6mm, 2.0mm, and 2.5mm. Rotate the dial on the clipper body to select your desired length.
6.2 Memasang Sisir Panduan
For longer cutting lengths, attach one of the four plastic guide combs. These combs provide additional trimming lengths, extending the range from 0.8mm up to 14.5mm when combined with the clipper's internal settings.
- Pastikan pemotong dimatikan.
- Pilih sikat panduan yang dikehendaki.
- Align the comb with the clipper head and push it firmly until it clicks into place.
- To remove, gently pull the comb away from the clipper head.
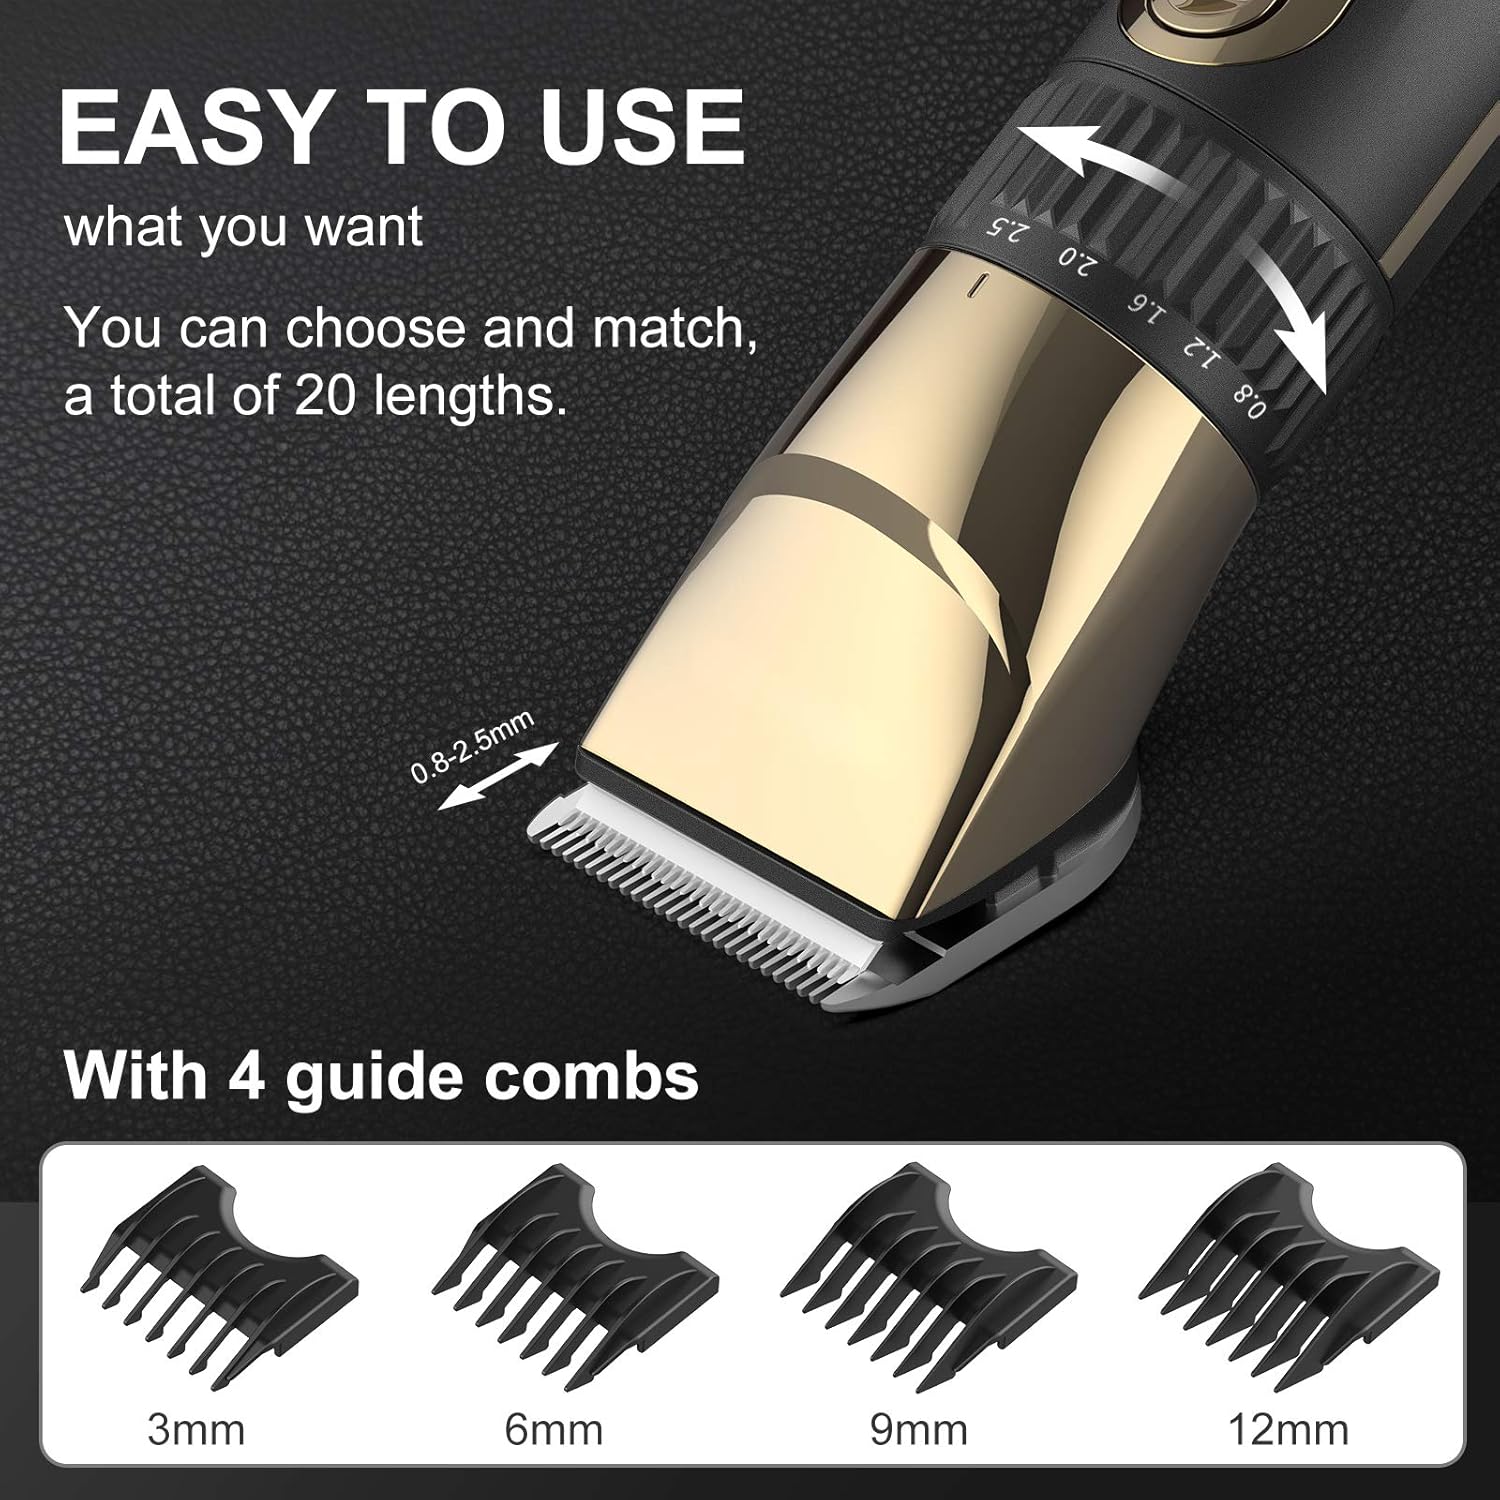
Image 6.1: The hair clipper's adjustable length dial is shown in detail, alongside the four interchangeable guide combs (3mm, 6mm, 9mm, 12mm) that offer a total of 20 length options.
7. Operating the Hair Clipper
The nooa hair clipper is designed for ease of use, suitable for both beginners and experienced users.
- Hidupkan/Mati Kuasa: Tekan butang kuasa untuk menghidupkan atau mematikan pemotong.
- Tetapan Kelajuan: The clipper offers two speed settings. The first speed setting operates at less than 60 decibels, suitable for general use or sensitive areas. The second speed setting provides more power for thicker or coarser hair, or for faster trimming.
- pemangkasan: Hold the clipper firmly and move it against the direction of hair growth for an even cut. Use the included hair comb to guide and lift hair as needed.

Image 7.1: A collage demonstrating the versatility of the nooa hair clipper, showing its use for beard trimming, children's haircuts, and professional-style fades.
8. Penyelenggaraan dan Pembersihan
Regular cleaning and maintenance will ensure the longevity and optimal performance of your hair clipper.
8.1 Reka Bentuk Kalis Air
The nooa hair clipper is waterproof, allowing for easy cleaning under running water. However, ensure the charging port is dry before charging.
8.2 Membersihkan Bilah
- Matikan pemotong.
- Gently push the blade head to detach it from the clipper body.
- Rinse the detached blade head under running water to remove hair clippings.
- Use the provided cleaning brush to remove any stubborn hair or debris.
- Allow the blade head to air dry completely before reattaching it to the clipper.
- Periodically apply a small amount of clipper oil (not included) to the blades for smooth operation and to prevent rust.

Image 8.1: A three-step visual guide demonstrating how to remove the blade head from the clipper and rinse it under running water for cleaning.
9. Penyelesaian masalah
If you encounter any issues with your nooa hair clipper, please refer to the following common solutions:
| Masalah | Kemungkinan Punca | Penyelesaian |
|---|---|---|
| Clipper does not turn on or has low power. | Bateri habis. | Charge the clipper fully (approximately 3 hours). Check the LED display for battery level. |
| Clipper is not cutting effectively or pulls hair. | Blades are dull, dirty, or not properly aligned. | Clean the blades thoroughly. Ensure no hair is trapped. Apply clipper oil. If blades are dull, consider professional sharpening or replacement. |
| Clipper mengeluarkan bunyi yang luar biasa. | Blades may be dry or misaligned. | Turn off the clipper, remove and clean the blades, then reattach them securely. Apply clipper oil. If the issue persists, contact customer support. |
10. Spesifikasi
| Ciri | Perincian |
|---|---|
| Jenama | nooa |
| Nombor Model | G-9932 |
| Bahan Bilah | Ceramic, Titanium Alloy |
| Sumber Kuasa | Battery Powered (Cordless/Corded use) |
| Jenis Bateri | 1 bateri Polimer Litium (termasuk) |
| Kapasiti Bateri | 2500mAh |
| Masa Mengecas | lebih kurang 3 jam |
| Masa Larian | lebih kurang 200 minit |
| Kalis air | ya |
| Tahap Kebisingan | Less than 60 decibels (at first speed setting) |
| Dimensi Produk | 22 x 10 x 5.5 cm |
| Berat Produk | 442 g |
| UPC | 791711043317 |
11. Waranti dan Sokongan
The nooa Cordless Hair Clippers come with a 12-month quality warranty from the date of purchase. This warranty covers manufacturing defects under normal use. Please retain your proof of purchase for warranty claims.
For technical support, warranty service, or any questions regarding your product, please contact nooa customer service through the retailer where the product was purchased.