1. Pengenalan
Thank you for choosing the Ginour Line Laser Level Model 34. This manual provides essential information for the safe and effective operation, maintenance, and troubleshooting of your device. Please read it thoroughly before use and retain it for future reference.

Image: Ginour Line Laser Level Model 34, showing its compact design and green laser lines.
2. Maklumat Keselamatan
AMARAN: This device emits Class II laser radiation. Direct eye exposure to the laser beam can cause eye injury. Always follow these safety guidelines:
- Jangan merenung terus ke pancaran laser.
- Jangan halakan pancaran laser kepada orang atau haiwan.
- Use the provided protective glasses to reduce glare and protect your eyes, especially during extended use or in bright conditions.
- Do not attempt to modify or disassemble the laser level. Repairs should only be performed by authorized personnel.
- Jauhkan peranti daripada capaian kanak-kanak.
- Operate the device in a safe environment, away from flammable materials.

Image: The Ginour Line Laser Level package contents, including the laser level, protective glasses, and reflector. The glasses are essential for eye protection.
3. Kandungan Pakej
Sahkan bahawa semua item terdapat dalam pakej anda:
- Ginour Line Laser Level Model 34
- Cermin Mata Pelindung
- Plat Reflektor
- L-shaped Magnetic Bracket
- Kabel Pengecasan USB Jenis-C
- Manual Pengguna (dokumen ini)
- Storage Pouch/Package
4. Spesifikasi
| Kelas Laser | Class II, Green Laser |
| Jarak Kerja | Up to 30m (100ft); up to 50m (164ft) with receiver (not included) |
| Ketepatan Talian | ±3mm / 15m (±0.2mm/m) |
| Plumb Point Accuracy | Upper: 3mm/15m; Downward: 6mm/15m |
| Laser Extension Angle | 110° (Mendatar & Menegak) |
| Julat Meningkat Diri | ±4° ±1° |
| Sumber Kuasa | Bateri Litium-Ion Boleh Dicas semula |
| Antara Muka Pengecasan | USB Jenis-C |
| Masa Mengecas | Lebih kurang 3 jam |
| Masa Operasi | Sehingga 8 jam (penggunaan berterusan) |
| Penarafan IP | IP54 (Dustproof and Splashproof) |
| bahan | Plastic with TPR soft rubber exterior |
| Benang Melekap | 1/4 inci dan 5/8 inci |
| Dimensi (L x W x H) | 13.1 x 12.8 x 13.7 cm |
| Berat badan | 680 g |
5. Persediaan
5.1 Mengecas Peranti
Before first use, fully charge the laser level. Connect the provided USB Type-C cable to the charging port on the device and to a compatible USB power source (e.g., wall adapter, computer, power bank). The charging indicator will show the charging status.

Image: The Ginour Line Laser Level connected to various USB power sources for charging, highlighting the USB-C port.
5.2 Pilihan Pemasangan
The Ginour Line Laser Level offers versatile mounting options:
- Pangkalan Magnetik: Attach the L-shaped magnetic bracket to the bottom of the laser level. The strong magnets allow it to be securely mounted on most metal surfaces, such as steel studs or beams. The bracket also allows for 360° horizontal rotation.
- Pemasangan Tripod: The device features standard 1/4 inch and 5/8 inch threaded apertures on its base and the magnetic bracket, making it compatible with most tripods or laser poles.
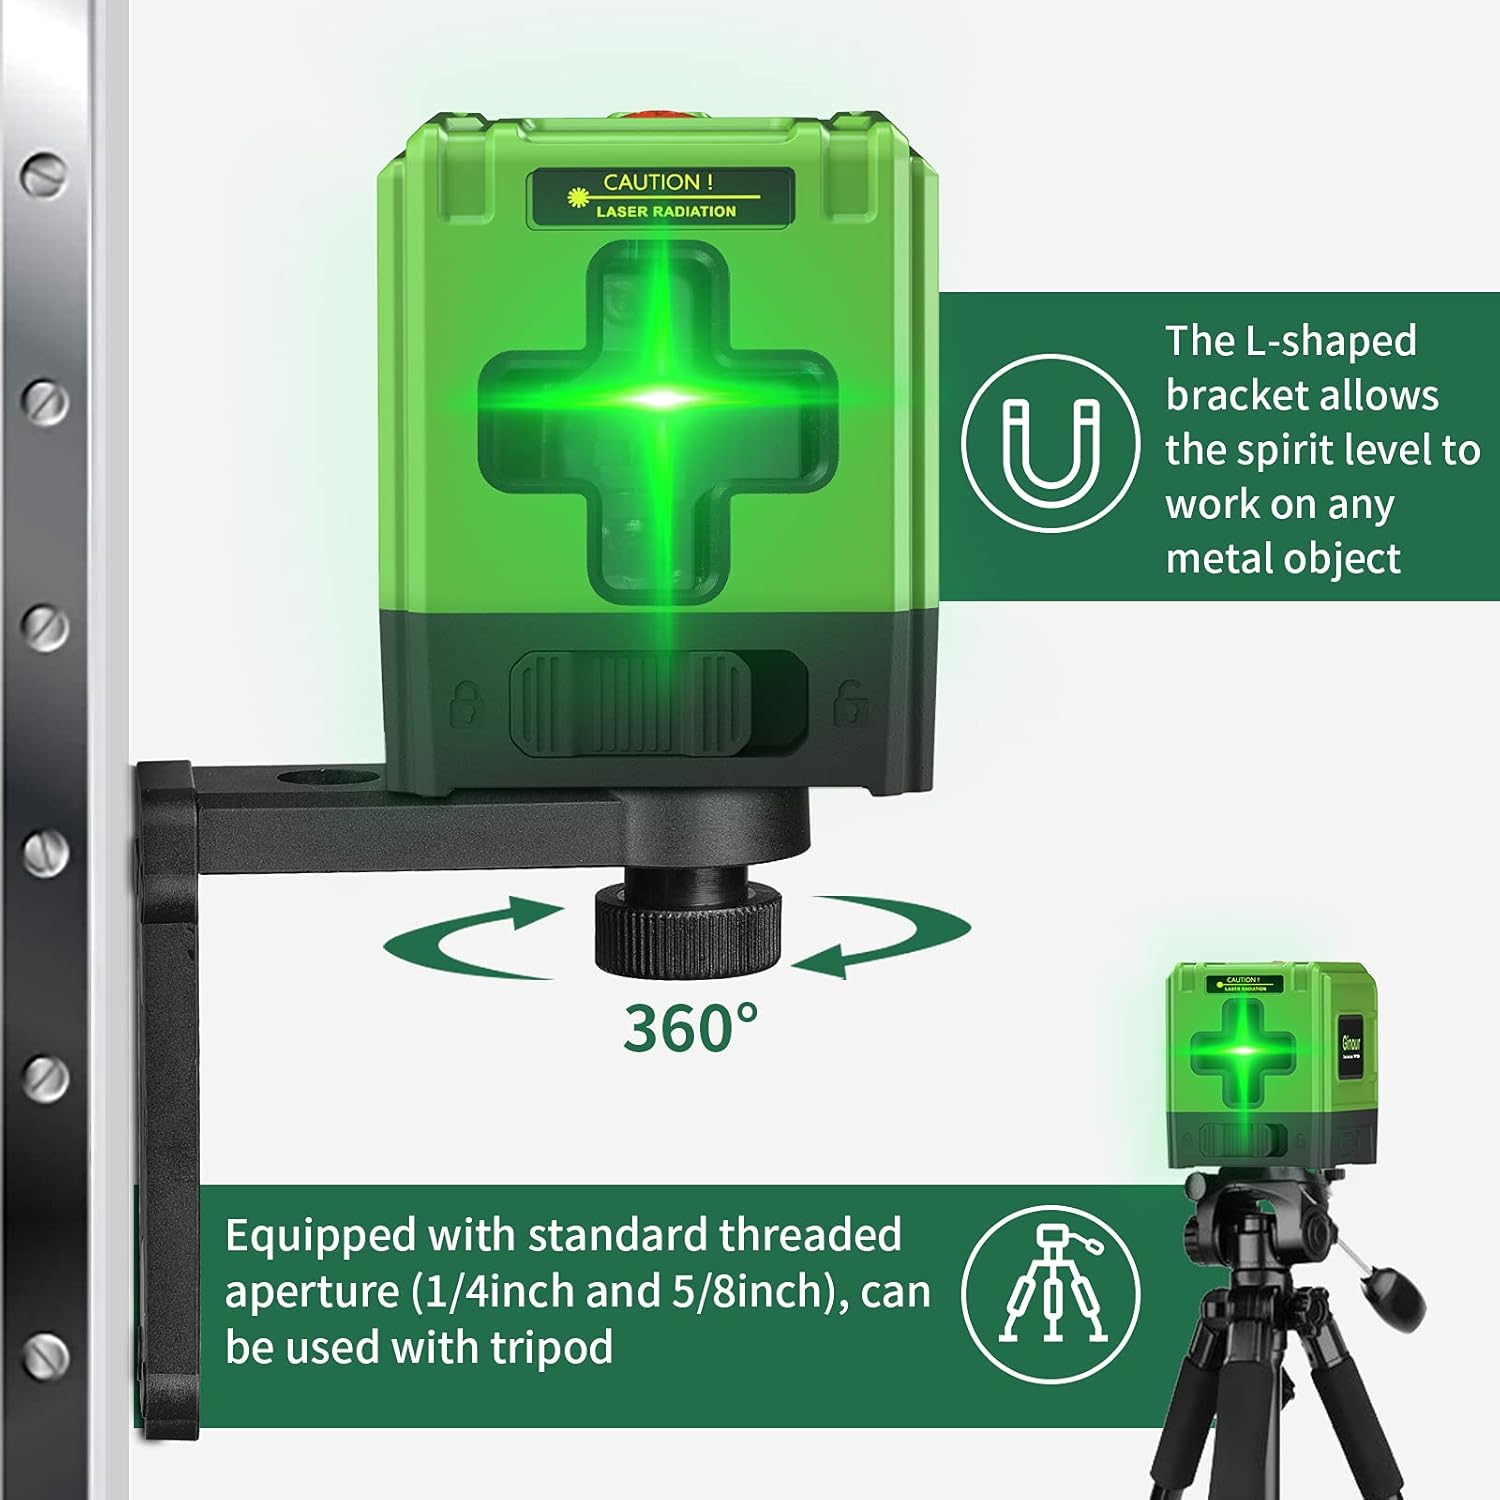
Image: The Ginour Line Laser Level shown mounted on its L-shaped magnetic bracket attached to a metal surface, and also on a tripod, demonstrating its versatile mounting capabilities.
6. Operasi
6.1 Menghidupkan/Mematikan dan Pemilihan Mod
- Hidupkan kuasa: Press and hold the power button on the top of the device for 2 seconds to turn it on.
- Pilih Mod: Use the lock button (slider switch) on the side of the device to select the desired working mode.

Imej: Jarak dekat view of the Ginour Line Laser Level, illustrating the power button on top and the lock/unlock slider switch on the side for mode selection.
6.2 Automatic Leveling Mode
When the lock button is adjusted to the buka kunci position, the instrument enters automatic leveling mode by default. The device will self-level within a range of ±4° ±1°.
- If the surface on which the instrument is placed is tilted more than 4° ±1° in the unlocked state, the laser lines will flash to indicate that the device is not in a horizontal state. Adjust the position of the device until the laser lines stop flashing and become steady.

Image: Comparison showing the laser lines before and after automatic leveling, demonstrating how the device corrects for minor tilts to project a perfectly level line.
6.3 Mod Manual
To enter manual mode, press and hold the power button for 2 seconds while the device is on. In manual mode, the self-leveling function is deactivated, allowing you to project laser lines at any desired angle. The laser lines will flash once every 5 seconds to indicate that it is in manual mode.
- Manual mode is useful for tasks such as installing handrails on stairs or creating angled designs.
6.4 Using the Reflector Plate
The included reflector plate enhances the visibility of the laser line, especially over longer distances or in bright conditions. Place the reflector plate at the target location to make the laser line more prominent for precise positioning.
6.5 Aplikasi
The Ginour Line Laser Level is suitable for various indoor and outdoor applications, including:
- Menurap jubin
- Installing doors, windows, or furniture
- Hanging wallpaper or pictures
- General construction and DIY projects requiring precise leveling and alignment.

Image: The Ginour Line Laser Level being used for various tasks such as tiling, hanging pictures, and aligning objects on a staircase, demonstrating its versatility.
7. Penyelenggaraan
- Pembersihan: Lap peranti dengan lembut, damp kain. Jangan gunakan pembersih atau pelarut yang melelas.
- Storan: Store the laser level in its protective pouch in a cool, dry place when not in use.
- Penjagaan Bateri: Untuk memanjangkan hayat bateri, elakkan daripada kerap mencas sepenuhnya bateri. Cas semula peranti dengan kerap, walaupun tidak digunakan untuk tempoh yang lama.
- Ketahanan: The device features a TPR soft rubber exterior for anti-fall protection and has an IP54 rating for dust and splash resistance. While robust, avoid dropping it from significant heights or submerging it in water.

Image: Visual representation of the Ginour Line Laser Level's durability features, including its dustproof, waterproof (IP54), and anti-fall design.
8. Penyelesaian masalah
| Masalah | Kemungkinan Punca | Penyelesaian |
|---|---|---|
| Laser lines are flashing rapidly. | Device is outside its self-leveling range (tilted more than ±4° ±1°). | Place the device on a more level surface or adjust its position until the lines become steady. |
| Laser lines are flashing slowly (once every 5 seconds). | Device is in manual mode. | If automatic leveling is desired, ensure the lock button is in the unlock position and restart the device. |
| Peranti tidak dihidupkan. | Bateri habis. | Charge the device using the provided USB Type-C cable. |
| Garisan laser malap atau tidak kelihatan. | Bright ambient light or long distance. | Use the reflector plate to enhance visibility. For outdoor use or very bright conditions, a laser receiver (not included) may be required. Ensure protective glasses are clean. |