GVDA GD128
GVDA GD128 Digital Multimeter User Manual
Model: GD128
Jenama: GVDA
1. Pengenalan
The GVDA GD128 SMART Digital Multimeter is a professional testing instrument designed for accurate and reliable measurements. It is an ideal choice for professional electricians, engineers, electronics enthusiasts, and for general household use. This manual provides detailed instructions on the safe and effective operation of your GD128 multimeter.
Keupayaan utama termasuk:
- AC dan DC Voltage Pengukuran
- Pengukuran Arus AC dan DC
- Pengukuran Rintangan
- Pengukuran Kapasitans
- Pengukuran Kesinambungan
- Pengukuran Diod
- NCV (Voltage) Pengukuran
- True RMS for accurate readings of non-sinusoidal signals
- Large VA color HD LCD screen with 9999 counts display
- Julat Auto dan Manual
- Flashlight and Input Connector LED Indication

Figure 1.1: GVDA GD128 Digital Multimeter with test probes.
2. Maklumat Keselamatan
WARNING: To avoid electrical shock or personal injury, please read and understand all instructions and safety information before using this multimeter.
- Sentiasa pastikan multimeter berada dalam fungsi dan julat yang betul sebelum membuat pengukuran.
- Jangan melebihi nilai input maksimum untuk sebarang julat.
- Berhati-hati apabila bekerja dengan voltagadalah melebihi 30V AC RMS, puncak 42V atau 60V DC. Ini voltagia menimbulkan bahaya kejutan.
- Periksa petunjuk ujian untuk penebat yang rosak atau logam terdedah sebelum digunakan. Gantikan jika rosak.
- Do not operate the multimeter if it appears damaged or if it is not operating properly.
- Sentiasa putuskan sambungan kuasa ke litar dan nyahcas semua voltan tinggitage kapasitor sebelum menguji rintangan, kesinambungan, diod atau kemuatan.
- Pastikan penutup bateri ditutup dengan selamat sebelum beroperasi.
- This device meets safety standards EN61010-1,-2-030, EN61010-2-033, EN61326-1 CAT III 1000V, CAT IV 600V.
3. Produk Lebihview dan Komponen
Familiarize yourself with the different parts of your GVDA GD128 Digital Multimeter.

Rajah 3.1: Depan dan sisi view of the GD128 Multimeter with labeled components.
- Kawasan Sensor NCV
- Kekunci kuasa
- Kunci lampu suluh
- Penunjuk amaran
- Lampu suluh
- Penunjuk bicu input
- Jack other than current and NCV
- COM jack (Common)
- mA (<600mA) jack
- bicu 10A
- Auto power off key
- Kunci fungsi
- Paparan

Rajah 3.2: Belakang view of the GD128 Multimeter highlighting the integrated LED flashlight.
4. Persediaan
4.1 Pemasangan Bateri
The GVDA GD128 Multimeter requires 3 x 1.5V AAA batteries (not included) for operation.
- Ensure the multimeter is powered off.
- Cari petak bateri di bahagian belakang peranti.
- Gunakan pemutar skru untuk membuka penutup petak bateri.
- Insert 3 AAA batteries, observing the correct polarity (+ and -) as indicated inside the compartment.
- Gantikan penutup petak bateri dan kencangkannya dengan skru.

Figure 4.1: Battery compartment for 3 AAA batteries.
4.2 Menghubungkan Petunjuk Ujian
Connect the test leads to the appropriate input jacks for the desired measurement function. Always connect the black test lead to the COM (Common) jack. Connect the red test lead to the jack corresponding to the measurement type (e.g., VΩHz for voltage/resistance/frequency, mA for milliampere current, 10A for ampsebelum arus).
5. Arahan Operasi
The GD128 features both auto-ranging and manual-ranging capabilities. The "SMART" function automatically identifies AC/DC voltage, rintangan, dan kesinambungan.
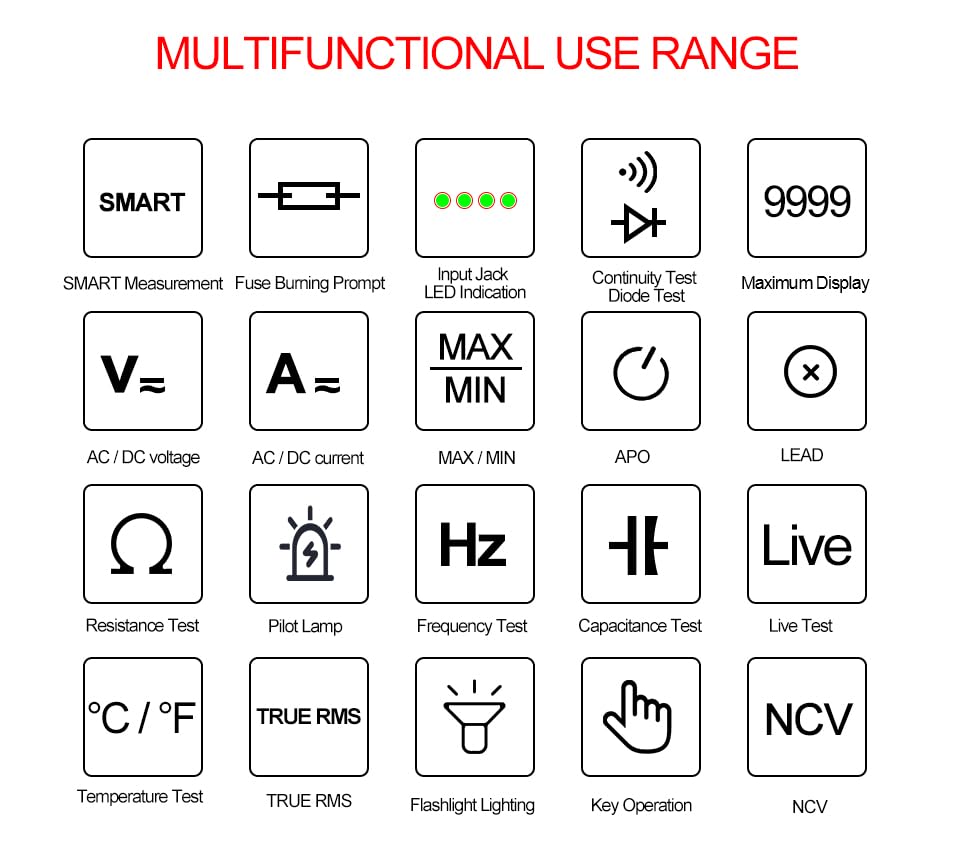
Figure 5.1: Multifunctional Use Range icons.
5.1 Hidupkan/Mati Kuasa
Tekan ke Kekunci kuasa (2) to turn the multimeter on or off.
5.2 Pemilihan Fungsi
The multimeter typically starts in SMART mode. Press the FUNGSI (Function) key (12) or SEL key to cycle through different measurement modes within a category (e.g., AC/DC voltage, resistance/continuity/diode).
5.3 Common Measurement Functions
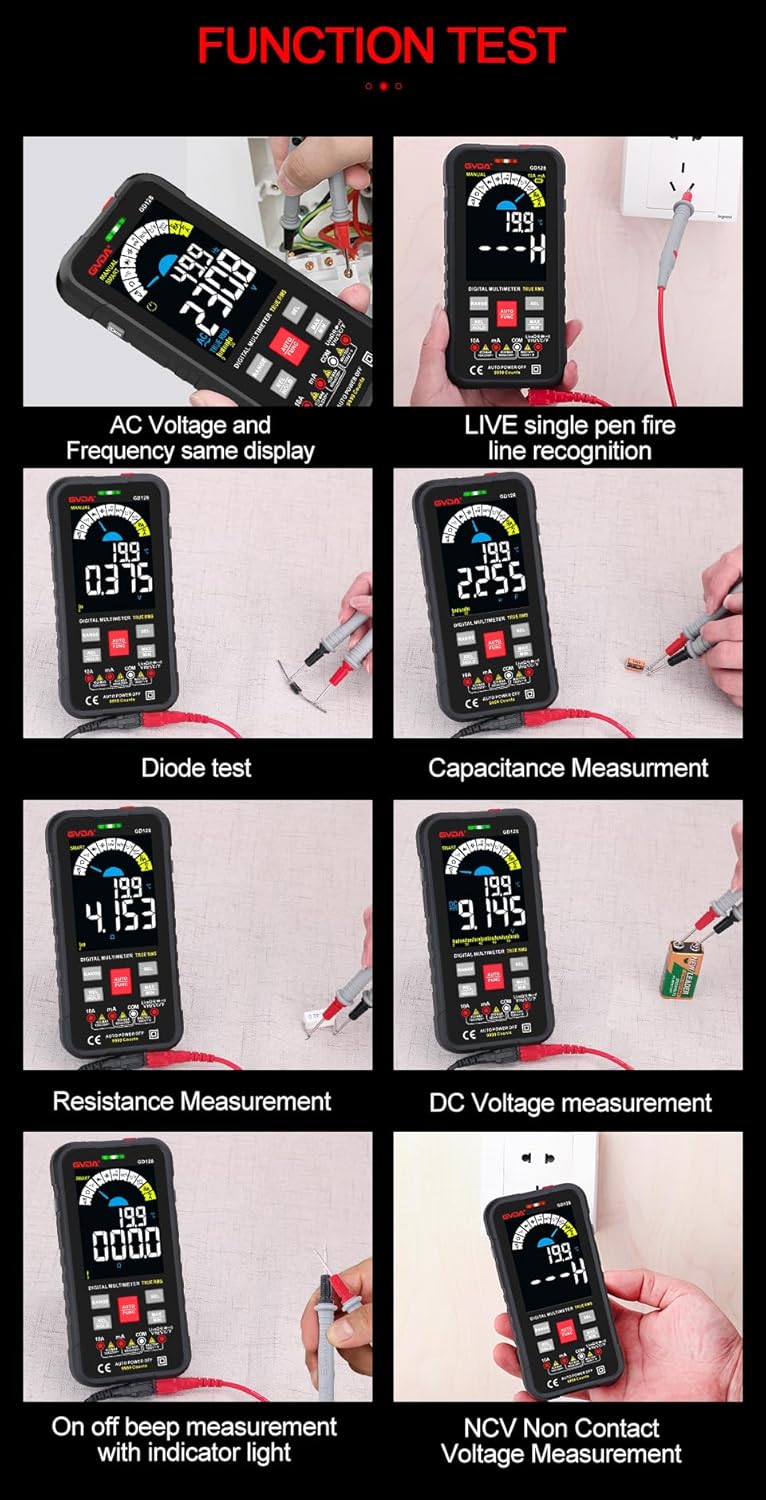
Gambar 5.2: Cthamples of various function tests.
5.3.1 Jldtage Pengukuran (AC/DC)
- Sambungkan petunjuk ujian hitam ke bicu COM dan petunjuk ujian merah ke bicu VΩHz.
- Select the appropriate AC (~) or DC (---) voltagmod e.
- Sambungkan wayar ujian secara selari dengan litar atau komponen yang hendak diukur.
- Paparan akan menunjukkan voltage membaca.
5.3.2 Pengukuran Arus (AC/DC)
- Sambungkan petunjuk ujian hitam ke bicu COM.
- For current up to 600mA, connect the red test lead to the mA jack. For current up to 10A, connect the red test lead to the 10A jack.
- Select the appropriate AC (~) or DC (---) current mode.
- Sambungkan multimeter secara bersiri dengan litar yang hendak diukur.
- Paparan akan menunjukkan bacaan semasa.
5.3.3 Pengukuran Rintangan (Ω)
- Sambungkan petunjuk ujian hitam ke bicu COM dan petunjuk ujian merah ke bicu VΩHz.
- Select the Resistance (Ω) mode.
- Pastikan litar dinyahtenagakan sebelum mengukur rintangan.
- Sambungkan petunjuk ujian merentasi komponen yang akan diukur.
- Paparan akan menunjukkan bacaan rintangan.
5.3.4 Pengukuran Kapasitans (F)
- Sambungkan petunjuk ujian hitam ke bicu COM dan petunjuk ujian merah ke bicu VΩHz.
- Select the Capacitance (F) mode.
- Ensure the capacitor is fully discharged before measurement to avoid damage to the multimeter.
- Sambungkan petunjuk ujian merentasi terminal kapasitor.
- Paparan akan menunjukkan bacaan kapasitansi.
5.3.5 Ujian Kesinambungan (Ω)
- Sambungkan petunjuk ujian hitam ke bicu COM dan petunjuk ujian merah ke bicu VΩHz.
- Select the Continuity mode.
- Touch the test leads to the points you want to check for continuity. A continuous beep indicates a complete circuit.
5.3.6 Ujian Diod (→|)
- Sambungkan petunjuk ujian hitam ke bicu COM dan petunjuk ujian merah ke bicu VΩHz.
- Select the Diode Test mode.
- Sambungkan wayar ujian merah ke anod dan wayar ujian hitam ke katod diod. Paparan akan menunjukkan voltan hadapantage jatuh. Songsangkan wayar; bacaan litar terbuka (OL) menunjukkan diod yang baik.
5.3.7 NCV (Not-Contact Voltage) Pengukuran
- Pilih mod NCV.
- Move the NCV sensor area (1) near the conductor. The multimeter will beep and the warning indicator (4) will light up with increasing frequency as it detects AC voltage.
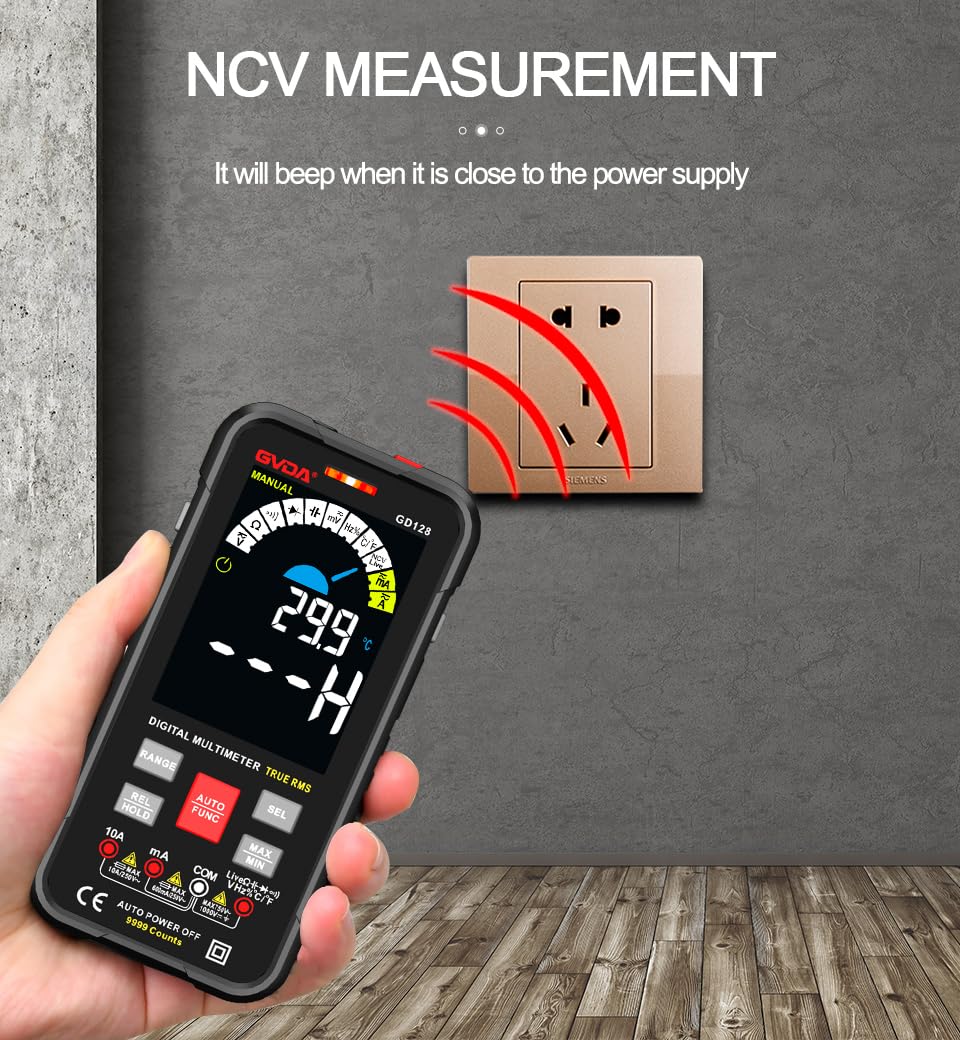
Rajah 5.3: NCV (Non-Contact Voltage) measurement in progress.
5.3.8 Fungsi Lain
- RMS Benar: Provides accurate readings for both sinusoidal and non-sinusoidal AC waveforms.
- MAX/MIN/AVG: Tekan ke MAX/MIN key to record maximum, minimum, and average readings.
- REL (Pengukuran Relatif): Tekan ke REL/HOLD key briefly to set the current reading as a reference for subsequent measurements.
- Pegangan Data: Tekan ke REL/HOLD key briefly to freeze the current reading on the display.
- Lampu suluh: Tekan ke Kunci lampu suluh (3) to turn the built-in flashlight on/off.
- Mati Kuasa Automatik (APO): The multimeter will automatically power off after a period of inactivity to save battery life.
6. Aplikasi
The GVDA GD128 Digital Multimeter is versatile and suitable for a wide range of applications, including but not limited to:

Figure 6.1: Diverse applications of the GD128 Multimeter.
- Electronic beginners and hobbyists
- Electronic circuit installation and testing
- Electronic maintenance and repair
- Electromechanical maintenance
- Vehicle inspection and automotive electrical work
- Maintenance of household appliances
- General electrical troubleshooting
7. Spesifikasi
Detailed technical specifications for the GVDA GD128 Digital Multimeter:
| Ciri | Julat | Ketepatan |
|---|---|---|
| DC Voltage | 99.99mV/999.9mV; 9.999V/99.9V/1000V | ±(0.5%+3) |
| Vol. ACtage | 99.9mV/999.9/mV; 9.999V/99.9V/750V | ±(0.8%+3) |
| Arus DC | 9.999mA/99.99mA/999.9mA; 9.99A | ±(0.8%+3) for mA, ±(1.2%+3) for A |
| AC Semasa | 9.999mA/99.99mA/999.9mA; 9.99A | ±(1.0%+3) for mA, ±(1.5%+3) for A |
| Rintangan | 99.99/999.9 ohms/9.999k/99.99k/999.9kohm; 9.999 m/99.99 m ohms | ±(0.8%+3) for kΩ, ±(1.2%+3) for MΩ |
| Kapasitansi | 9.999/99.99/999.9nF/9.999/99.99/999.9uF; 9.999mF/99.99mF | ±(4.0%+3) for nF/uF, ±(5.0%+5) for mF |
| Kekerapan | 99.99/999.9/9.999k/99.99k/999.9kHz/9.999mHz | ±(1.0%+3) |
| Kitaran Tugas | 0.1%-99.99% | ±(1.0%+2) |
| Suhu | -40~1000°C; -40-1832°F | ±2°C |
| Kiraan Paparan | 9999 kiraan | |
| Jenis Paparan | VA color screen | |
| SampKadar ling | lebih kurang 3 kali sesaat | |
| Paparan Lebih Julat | "OL" | |
| Vol. Rendahtage Petunjuk | Petunjuk bateri rendah | |
| Bekalan Kuasa | Bateri AAA 3 x 1.5V (tidak termasuk) | |
| Berat Produk | lebih kurang 230g | |
| Saiz Produk | 83x23x165mm | |
| Penilaian Keselamatan | EN61010-1,-2-030 EN61010-2-033, EN61326-1 CAT III 1000 V CAT IV 600 V |
8. Penyelenggaraan
Penyelenggaraan yang betul memastikan jangka hayat dan ketepatan multimeter anda.
- Pembersihan: Lap kes dengan iklanamp kain dan bahan pencuci ringan. Jangan gunakan pelelas atau pelarut.
- Penggantian Bateri: Gantikan bateri dengan segera apabila penunjuk bateri lemah muncul untuk memastikan bacaan yang tepat.
- Penggantian fius: If the current measurement function fails, the fuse may be blown. Refer to the warning label inside the battery compartment for fuse specifications (e.g., F600mA/250V, F10A/250V). Ensure the multimeter is off and test leads are disconnected before replacing fuses.
- Storan: Jika multimeter tidak digunakan untuk jangka masa yang lama, tanggalkan bateri untuk mengelakkan kebocoran. Simpan di tempat yang sejuk dan kering, jauh daripada cahaya matahari langsung.
9. Penyelesaian masalah
If you encounter issues with your GVDA GD128 Multimeter, try the following:
- Tiada Paparan/Kuasa Hidup: Periksa pemasangan bateri dan pastikan bateri tidak habis. Gantikan jika perlu.
- Bacaan yang salah: Verify test lead connections, ensure the correct function and range are selected, and check if the circuit is de-energized for resistance/continuity/capacitance tests.
- Paparan "OL": Indicates an over-range condition or an open circuit (e.g., when measuring resistance on an open wire).
- Tiada Bip Kesinambungan: Check if the circuit is truly continuous. If not, the circuit is open.
- Fuse Blown Warning: If the current measurement function is not working, the fuse might be blown. Replace the fuse as per maintenance instructions.
Untuk isu yang berterusan, hubungi sokongan pelanggan.
10. Waranti dan Sokongan
Your GVDA GD128 Digital Multimeter comes with a Waranti 30 hari for system failures or factory problems. Please retain your proof of purchase for warranty claims.
For technical support, warranty claims, or further assistance, please refer to the contact information provided with your product packaging or visit the official GVDA webtapak.
11. Kandungan Pakej
Upon opening your GVDA GD128 Digital Multimeter package, you should find the following items:

Figure 11.1: Contents included in the GD128 Multimeter package.
- 1 x GVDA GD128 Digital Multimeter
- 1 x Test Lead Set (Original pen cable)
- 1 x Beg Kain
- 1 x Thermocouple Probe
- 1 x Manual Pengguna
- 1 x Gift Box (Packaging)