
Produk Selesaiview
The DAYBETTER 44-Key Remote Control is designed to manage 12-24V DC 4-pin LED strip lights, offering a wide range of color and mode options. It features a dual-port connector, allowing control of one or two LED strips simultaneously.

DAYBETTER 44-Key Remote Control and Controller Box with LED Strip Lights
Kandungan Pakej
- 1 x 44-Key IR Remote Control
- 1 x LED Controller Box (with two 4-pin output ports)
- 1 x Penyesuai Kuasa
Arahan Persediaan
Follow these steps to properly set up your DAYBETTER LED strip light system.
- Step 1: Prepare the Remote Control. Before first use, locate the plastic insulation tab in the battery compartment of the 44-key remote control. Pull this tab out to activate the battery.
- Step 2: Connect LED Strips to the Controller. Ensure the power adapter is disconnected. Connect your 4-pin LED strip lights to the output ports on the LED controller box. Align the arrow on the LED strip connector with the arrow on the controller's output port. The controller box has two 4-pin ports, allowing connection of one or two LED strips.
- Step 3: Connect Power Adapter. Connect the power adapter to the DC input port on the LED controller box.
- Step 4: Connect to Power Source. Plug the power adapter into a suitable 12-24V DC power outlet.

Removing the plastic insulation tab from the remote control battery compartment.

Proper alignment of 4-pin LED strip connector with the controller port, ensuring arrow-to-arrow connection.

jarak dekat view of the LED controller box, showing the DC power input port and IR sensor.
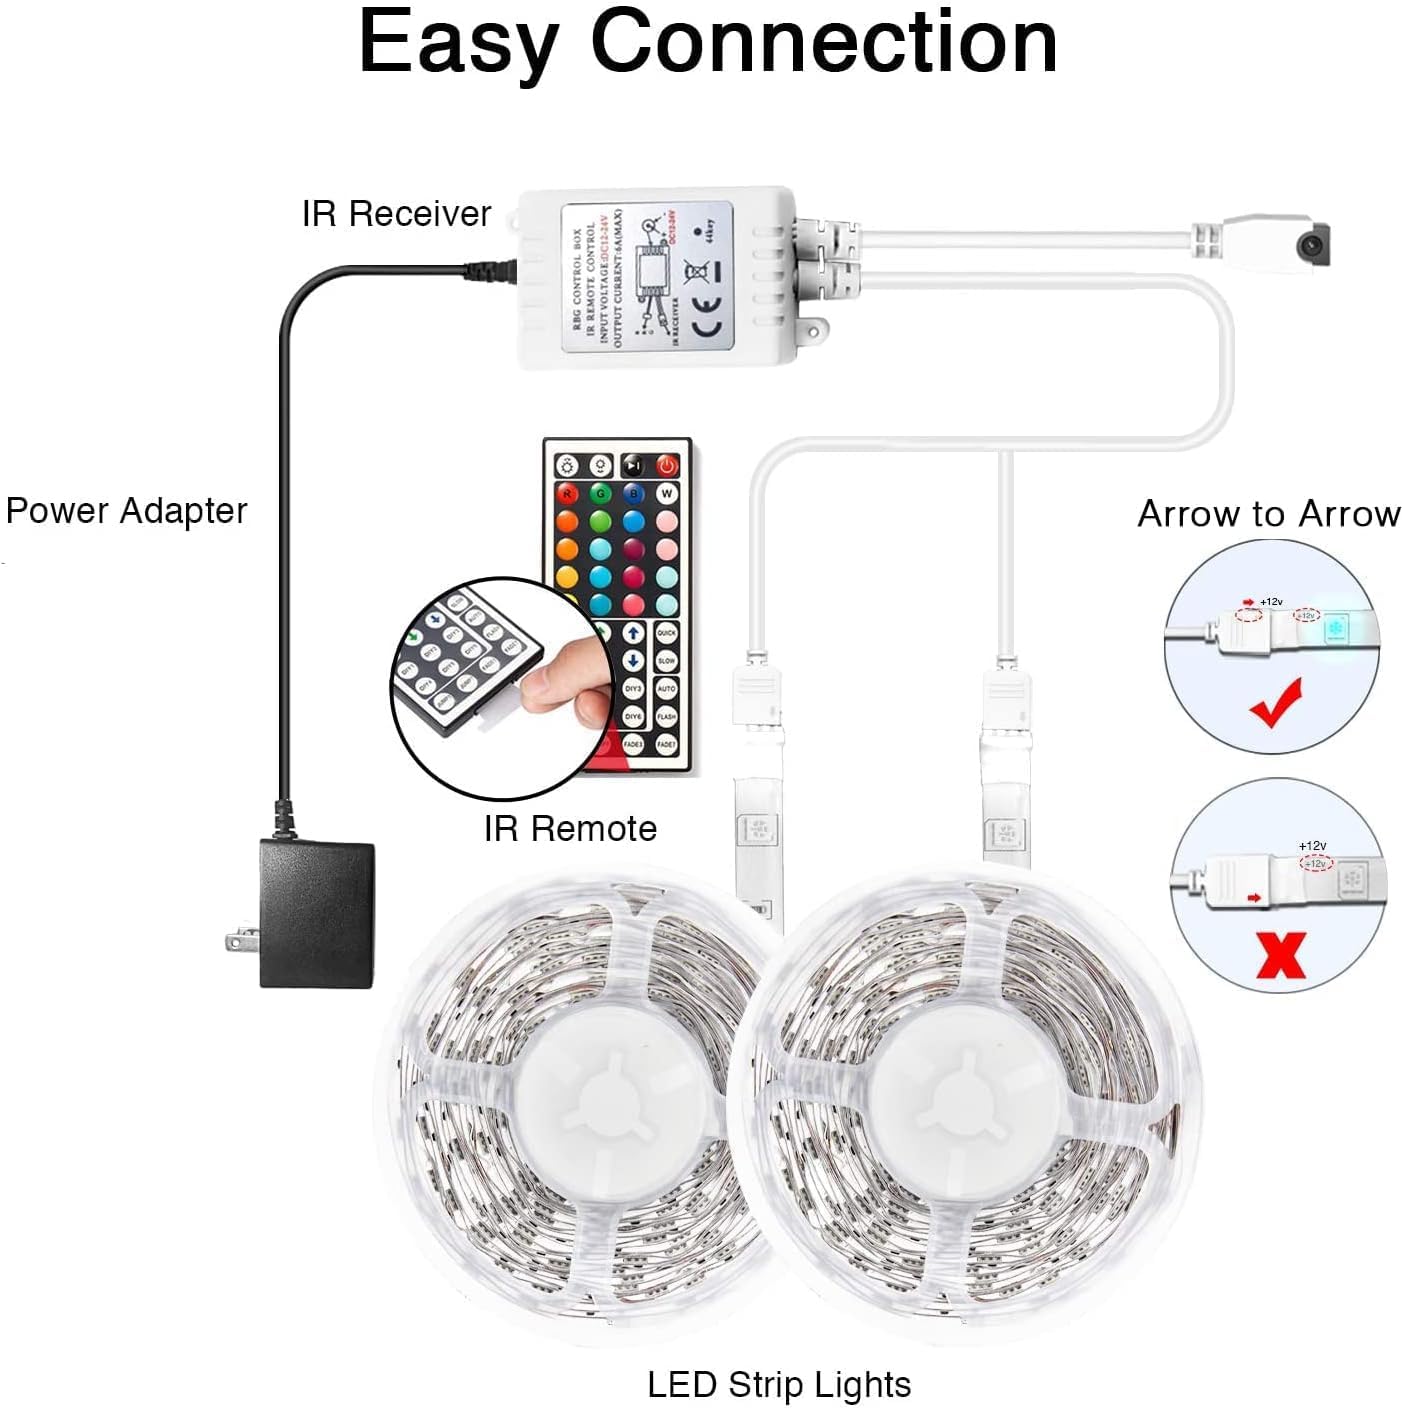
Diagram illustrating the complete connection process: Power Adapter to IR Receiver, IR Receiver to LED Controller, and LED Controller to LED Strip Lights, highlighting correct 4-pin connector orientation.
Operating Your LED Controller
The 44-key remote control allows for comprehensive control over your LED strip lights. Ensure the remote is pointed directly at the IR sensor on the controller box within approximately 30 feet for optimal functionality.
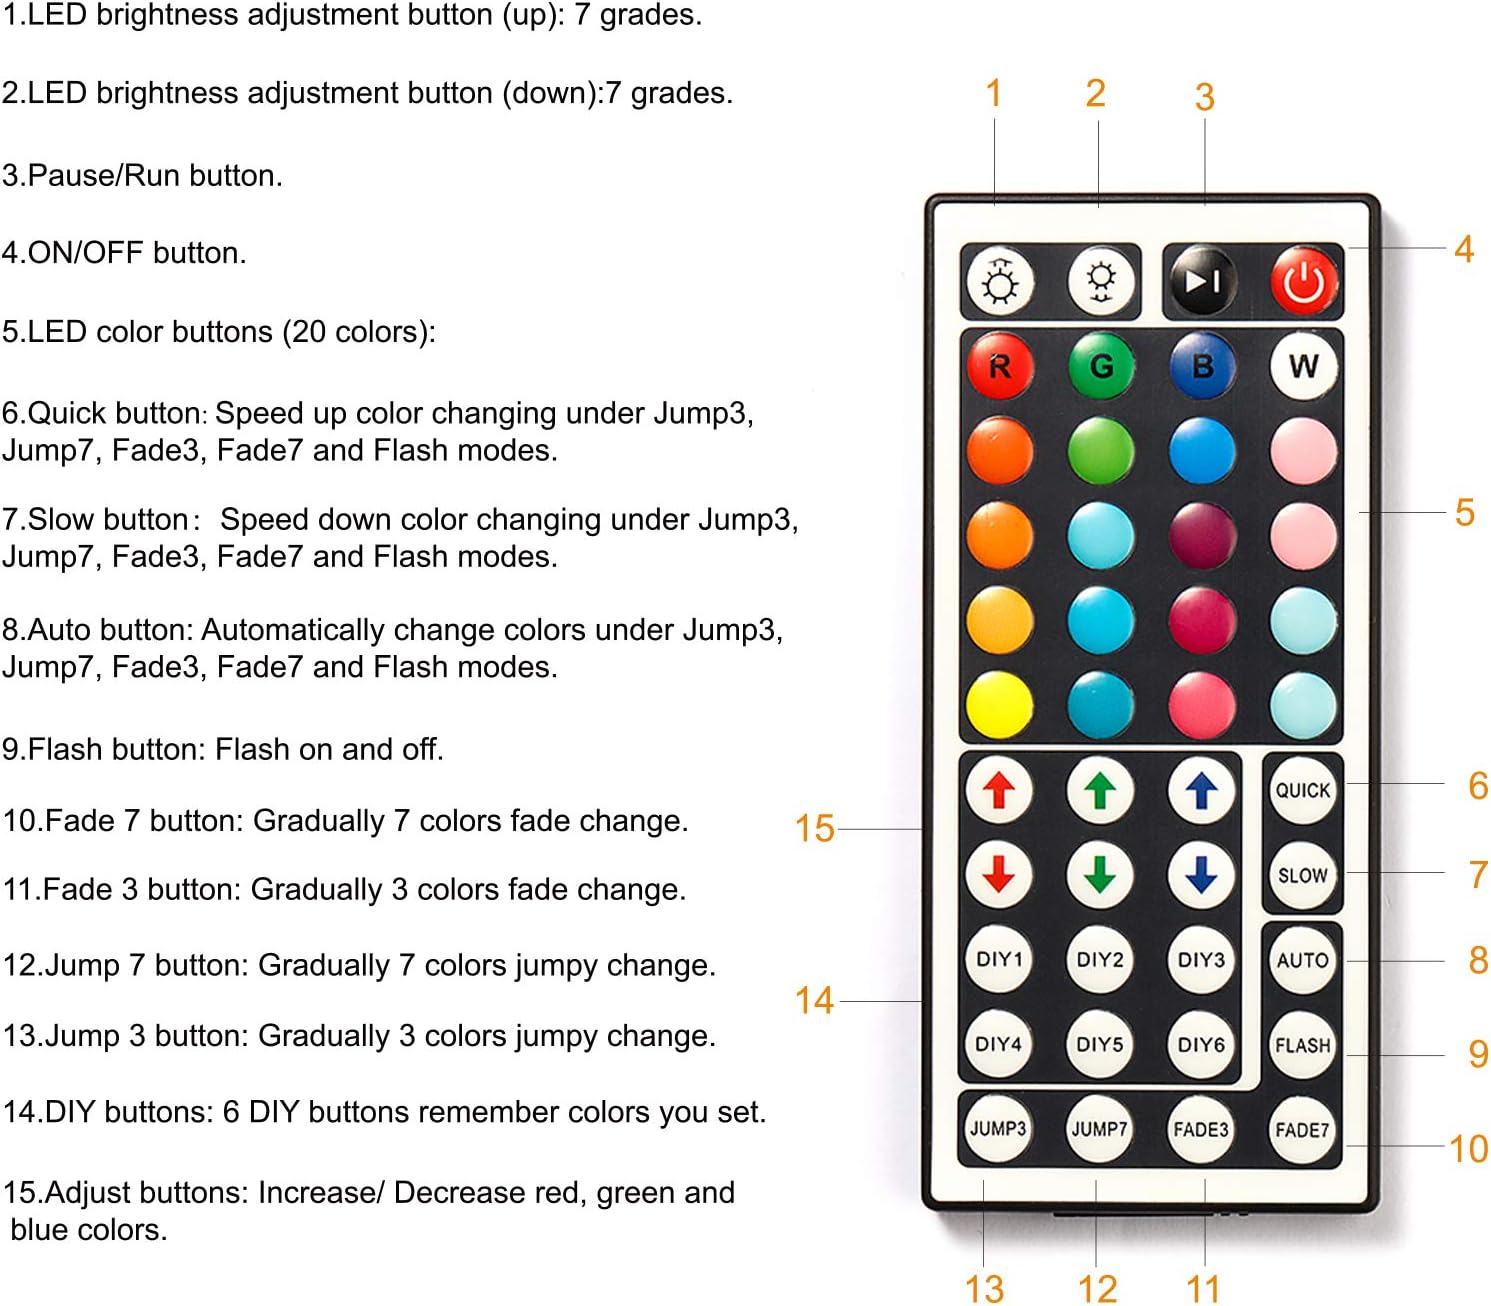
Diagram of the 44-key remote control, detailing the function of each button for color selection, brightness adjustment, and mode changes.
- Hidupkan/Mati Kuasa: Tekan ke HIDUP/MATI button to turn the lights on or off.
- Pelarasan Kecerahan: Gunakan Kecerahan Naik (anak panah atas) dan Kecerahan Turun (down arrow) buttons to adjust the light intensity (7 levels).
- Warna Statik: Select from 20 static colors by pressing the corresponding color buttons.
- RGB Adjustment: Gunakan R, G, B buttons to fine-tune red, green, and blue color levels.
- Quick/Slow: Adjust the speed of dynamic modes (Jump3, Jump7, Fade3, Fade7, Flash) using the CEPAT dan LAMBAT butang.
- Mod Auto: Tekan AUTO for automatic color cycling through various modes.
- Mod Denyar: Activates a rapid flashing effect.
- Fade Modes:
- PUDAR7: Gradually fades through 7 colors.
- PUDAR3: Gradually fades through 3 colors.
- Mod Lompat:
- LOMPAT7: Jumps between 7 colors.
- LOMPAT3: Jumps between 3 colors.
- DIY Buttons (DIY1-DIY6): These buttons allow you to save custom color settings. To set a custom color:
- Tekan a DIY butang.
- Gunakan R, G, B adjustment arrows to create your desired color.
- Tekan sama DIY button again to save the color.
Penyelenggaraan
- Pembersihan: Use a dry, soft cloth to clean the controller and remote. Do not use liquid cleaners or abrasive materials.
- Penggantian Bateri: If the remote control's range or responsiveness decreases, replace the battery (CR2025 coin cell, not included). Ensure correct polarity.
- Storan: Simpan peranti di tempat yang sejuk dan kering jauh dari cahaya matahari langsung dan suhu yang melampau apabila tidak digunakan untuk tempoh yang lama.
Menyelesaikan masalah
| Masalah | Penyelesaian |
|---|---|
| Lampu tidak menyala. | Check power connections. Ensure the power adapter is plugged in and the LED strips are correctly connected (arrow to arrow). Verify the remote control battery is active and correctly inserted. |
| Alat kawalan jauh tidak bertindak balas. | Ensure the plastic insulation tab has been removed from the remote. Point the remote directly at the IR sensor on the controller box. Replace the remote control battery if necessary. The effective range is approximately 30 feet. |
| Lampu malap atau berkelip-kelip. | Check the power adapter for sufficient voltage (12-24V DC). Ensure all connections are secure. Reduce the length of the LED strip if it exceeds the controller's maximum current capacity (6A). |
| Incorrect colors displayed. | Ensure the 4-pin connectors are aligned correctly (arrow to arrow). Disconnect and reconnect the LED strips. |
| Only one LED strip works. | Verify both 4-pin connectors are properly inserted into the controller's dual ports. Check the connections of the non-working strip. |
Spesifikasi Produk
- model: DRF-0362-W
- Jenama: DAYBETTER
- Jenis Pengawal: 44-Key IR Remote Control
- Input Voltage: 12-24V DC
- Port Output: 2 x 4-pin
- Arus Maks: 6A
- Kaedah Kawalan: Alat Jauh Inframerah (IR).
- Jarak jauh: Approximately 30 feet (line of sight required)
- Bahan: plastik
- Penggunaan Dalaman/Luar: Dalaman
- Ciri Khas: Dimmable, 20 Static Colors, Dynamic Modes (Flash, Fade, Jump), DIY Color Saving
- Compatible LED Strips: 5050, 3528, 2835 (4-pin RGB)
Maklumat Waranti
For warranty details, please refer to the product packaging or contact DAYBETTER customer service. Keep your purchase receipt as proof of purchase for any warranty claims.
Sokongan Pelanggan
If you encounter any issues or have questions regarding your DAYBETTER 44-Key Remote Control, please contact DAYBETTER customer support through the retailer's platform or visit the official DAYBETTER webtapak untuk mendapatkan bantuan.